When you first encounter the Ronin character, facing those messy and poorly translated attribute descriptions, you're probably full of confusion, not understanding what the gameplay for this class is all about. Don't worry; in today's guide on how to play the Ronin, we'll break down the character's traits one by one, helping everyone completely get rid of this state of bewilderment. The Ronin class is a bit complex, so there's a learning curve to playing it.
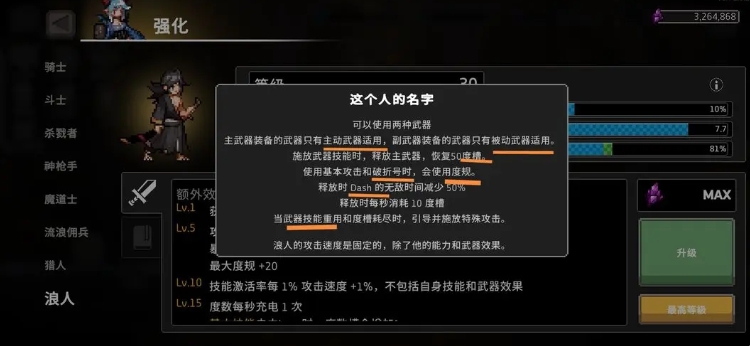
First, before playing as the Ronin, you need to understand a few key terms. The "charge gauge" and "charge meter" are the same thing, referring to the bar below the health bar that gradually fills up. Only when it is fully charged can you release the weapon skill. "Dash" and "dash" mean the same thing, referring to the familiar sprint action. "Weapon skill cooldown" refers to the time when the skill is on cooldown and waiting to be used again. Finally, and very importantly, only the weapon the Ronin carries and the attributes gained from leveling up the character can affect his attack speed. No other factors can change his attack speed. This characteristic makes him particularly suitable for pairing with the "Idiot Set," as you don't have to worry about wasting the attack speed bonuses from other equipment. Moving on to main weapon effects and passive weapon effects, the former corresponds to the active effect of the sword, while the latter is the passive effect of the sword. Typically, the descriptions marked in green are passive effects, and the rest are active effects. Passive effects are always present as long as you hold the weapon, while active effects only trigger after releasing the weapon skill.
There's also the term "lead," which refers to the moment when the weapon skill ends, also known as the special attack. It's worth noting that when the Ronin releases a weapon skill on the ground, there is a noticeable recovery time, during which he is vulnerable to enemy attacks. However, if he jumps and releases the skill, he can directly rush to the enemy, reducing the risk of being hit. The dash action after releasing the weapon skill comes with multiple slashes, but oddly enough, these multiple slashes seem to count as only one attack, which means they cannot quickly trigger active skills and may even fail to trigger them at all. This point still needs more in-game testing to verify.
As we all know, the Ronin's attack speed is basically fixed, and even the additional attack speed from sacred relics has no effect on him. But the developers clearly won't let him be at a disadvantage in this aspect and will compensate in other areas. In terms of talents, there is a core mechanism: for every 1% activation rate gained, you also gain 1% attack speed. In simple terms, all the extra attack speed that should be added will ultimately be converted into skill activation rate. This is the key to the Ronin's strength.
The core sacred relic supporting this mechanism is the three once-maligned synergy relics. In actual combat, the attack speed bonus they provide is almost negligible, and their duration is pitifully short. However, through the Ronin's talent, this insignificant extra attack speed can be fully converted into skill activation rate, making it extremely valuable. At this point, some might wonder, many skills are perfectly usable even if their activation rate is less than 100%, and they have built-in cooldowns, so what's the point of converting extra attack speed into activation rate? The answer lies in the blue buff skill, Charm.

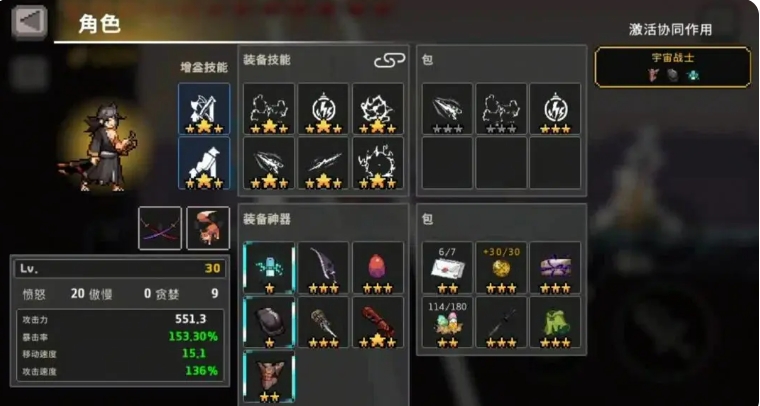
For now, ignore its other effects and focus on its Focus 3 modification. In the later stages, the attack speed will first be converted into skill activation rate through the Ronin's talent, and then, through the Charm skill's Focus 3 modification, it will ultimately be transformed into a terrifying panel attack power. Depending on the equipment, this panel attack power can reach astonishing values between 500 and 1000. With such a strong foundation, no matter what build you choose, you will never lack burst damage. Once you understand this core mechanism, subsequent equipment choices become much clearer. For the Cosmic Instant Kill build, the preferred weapon is the Magic Sword. In terms of sacred relics, the core must be the Cosmic Warrior, and the secondary cores should be the Mysterious Egg and the Red Iron Gauntlet. The remaining two slots should be chosen based on the skill in the first slot of the skill bar. Options like the Eternal Sword, Elixir of Immortality, Shadow Blade, Death Judgment, and Crystal Stone are all good choices.

In terms of skills, Charm is a must-have, and 6 Lightning should also be included. The first slot in the skill bar can be filled with different attribute skills based on your preference. It's recommended to bring a Dark or Bleed attribute skill, as the 200-point bonus from the Elixir of Immortality is quite significant. Of course, if you place an Electric attribute skill in the first slot, it can make the electric effect more stable. For talents, 2133 is recommended, and for prayer points, it's suggested to allocate 20 points to Fury, with the rest distributed as you see fit. As for pets, Seagull, Rocker, Treasure Chest, Red Fairy, Little Wolf, and Swim Ring can all be brought along, but honestly, pets have minimal impact on the Ronin. Finally, a key point and tip: with high panel attack power, you can rely on the Magic Sword's sheathing action to deal incredible burst damage, instantly wiping out enemies without any trouble.
The above strategies on how to play the Ronin can be referenced to develop your own build. If you find the Ronin's strength doesn't meet your expectations, you can check whether the steps mentioned above have been optimized to the desired level.