As the only tactical character in the game with long-range rescue capabilities, how does one play Gloria in Matrix Zero Day Crisis? In fact, this character becomes a versatile choice for high-difficulty dungeons due to its turret automation output and team safety assurance. The core mechanism lies in triggering law effects at high frequency through turrets, while using combat matrix to enhance skill damage, achieving a unique experience of "set and forget" output. The following systematically breaks down Gloria's deep gameplay from skill analysis, build construction to practical techniques.

【biubiu Accelerator】Download the latest version
》》》》》#biubiu Accelerator#《《《《《
I. Role Positioning and Core Mechanisms
Skill Set Characteristics
E Skill "Turret Deployment": Core output skill, summoning automatic turrets to continuously attack enemies. Multiple turrets can exist simultaneously and be placed on walls/ceilings (avoiding ground AOE). Turret damage inherits both skill attack power and skill damage bonuses.
C Skill "Toaster Guardian": Generates a shield to protect self and teammates. Shield value is enhanced by the red module of the combat matrix, key for survival assurance.
Right-click "Rescue Helicopter": Unique long-range revival skill, dispatching drones to rescue fallen teammates, ignoring dangerous area restrictions, cementing its team value.
Passive "Engineering Master": Turret attacks have a chance to generate ammo packs, which upon pickup, replenish primary weapon ammo and increase turret damage by 15% (lasts 8 seconds).

Output Logic
Gloria's damage relies 90% on turrets, so attribute stacking should focus on skill damage (not weapon damage). Turret attack frequency is extremely high (about 2 times per second), efficiently triggering special effects like "Wealth Law" and "Electric Play Law," leading to a qualitative change in damage.
II. Recommended Build Construction:
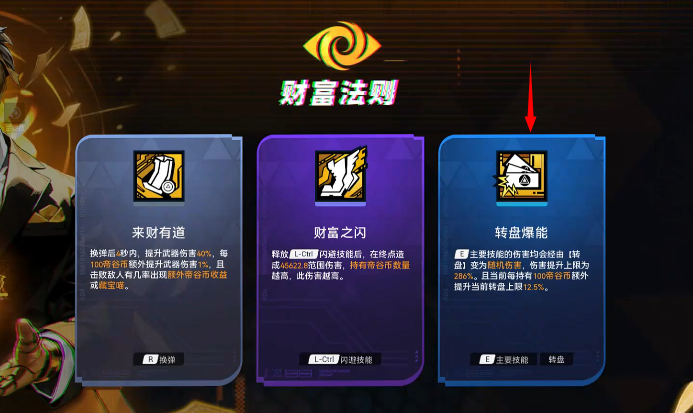
1. Build 1: Wealth Roulette Burst Energy Flow (Extreme Output)
Core Law: Wealth (amplifying turret single-shot damage through "Roulette Burst Energy" permission)
Permission Priority:
Roulette Burst Energy (randomly amplifies turret damage by 4-7 times) > Windfall (increases overall damage by 1% per 1,000 Dige coins) > Financial Wisdom (gold income +30%).
Linked Permissions:
Electric Play Law "Kyubi's Wrath" (floating cannons assist in attacks)
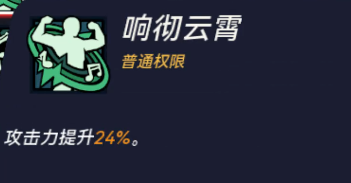
Music Law "Echoes Through the Clouds" (note explosions add area damage)
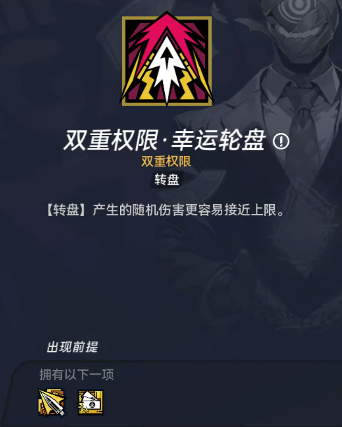
Luck Law "Lucky Wheel" (triggers secondary damage judgment on critical hits)
Potential Key Must-Have:
Power Decay (increases damage to low-health targets by 35%) > Electric Big Bang (adds chain lightning) > Skill Amplification (skill damage +25%).
Equipment and Sets:
Single Pieces: Rescue Helicopter (enhances revival efficiency), Charged Great Axe (turret crit rate +20%), Fortune Ninja Cat (chance to drop gold on kill).
Sets: Battery Set (reduces skill cooldown by 20%), Game Console Set (floating cannon damage +50%), War Axe Set (crit damage +40%) as a secondary option.
Advantages: Higher Dige coin stockpile leads to stronger damage, with single turret shots breaking the million damage mark in the late game, enabling a 15-minute speedrun.
2. Build 2: Safety Law Control Flow (Survival and Team-Oriented)
Core Law: Safety (freezing enemies through "Enhanced Imprisonment")
Permission Priority:
Enhanced Imprisonment (E skill hit has a chance to freeze enemies for 3 seconds) > Ice Crystal Piercing (frozen targets take +50% damage) > Chain Reaction (E skill hit has a chance to fully restore ammo).
Linked Permissions:
Energy Law "Continuous Burst Energy" (increased damage from skill combos)
Electric Play Law "High-Energy Kyubi" (floating cannons add slow effect)

Potential Key Must-Have:
More People, More Power (increases damage by 15% per surviving teammate) > Law Power (activates number of laws × 8% total damage) > Skill Cooldown (E skill CD -20%).
Operational Points:
Place turrets on walls/ceilings to avoid boss AOE, use freezing effects to create output windows for teammates, prioritize team survival.

III. Combat Matrix and Out-of-Combat Cultivation Configuration
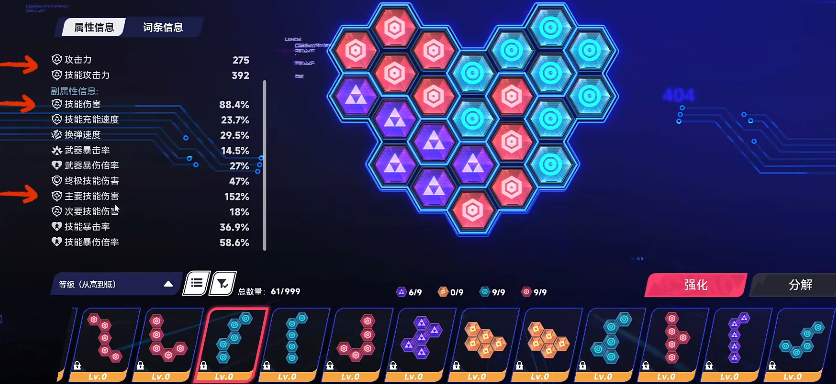
Priority of Terms (retain only effective attributes):
Main Terms: Skill Attack Power (base) > Skill Damage > Skill Crit Rate > Skill Crit Damage > Shield Strength (exclusive to red modules).
Special Terms (only for legendary modules):
Safety Permission: Increases "Enhanced Imprisonment" trigger rate (essential).
Chain Reaction: E skill hit has a chance to restore ammo (significantly improves sustainability).
Full Ammo Damage Boost: E skill damage +40% when ammo is full (pairs with Chain Reaction).
Module Layout Strategy:
9 fixed slots: Blue modules (skill attack power) ×5 + Red modules (shield strength) ×4 (strengthens survival).
Remaining 6 slots: Fill with purple modules (skill crit/crit damage), completely discarding weapon attack terms.
Key Proficiency Rewards:
Lv.3 unlocks Combat Bear: Right-click summons a bear-shaped turret, increasing damage by 30% when linked with regular turrets.
Lv.10 unlocks Overload Protocol: Turret damage +50%, attack speed +30% during overclock period.
IV. Practical Techniques: Turret Art and Team Collaboration
Turret Placement Rules:
Three-Dimensional Deployment: 50% turrets placed on walls/ceilings (to avoid ground AOE), 50% around boss weak points (e.g., mechanical core).
Dynamic Adjustment: Immediately recall turrets (hold E) when the boss changes phases, redeploy in the new phase.
Optimized Output Cycle:
Opening Move: C skill shields → E skill deploys 2 turrets → pick up ammo pack to trigger passive damage boost.
Burst Period: Concentrate on deploying remaining turrets during ultimate, combining with "Roulette Burst Energy" for instant burst damage.
Team Role Positioning:
High-Risk Rescue: Prioritize using right-click drones to rescue fallen teammates, ignoring environmental damage like lava/poison zones.
Control Support: Safety flow requires closely monitoring elite monster spawns, using freezing effects to interrupt their skill cast.
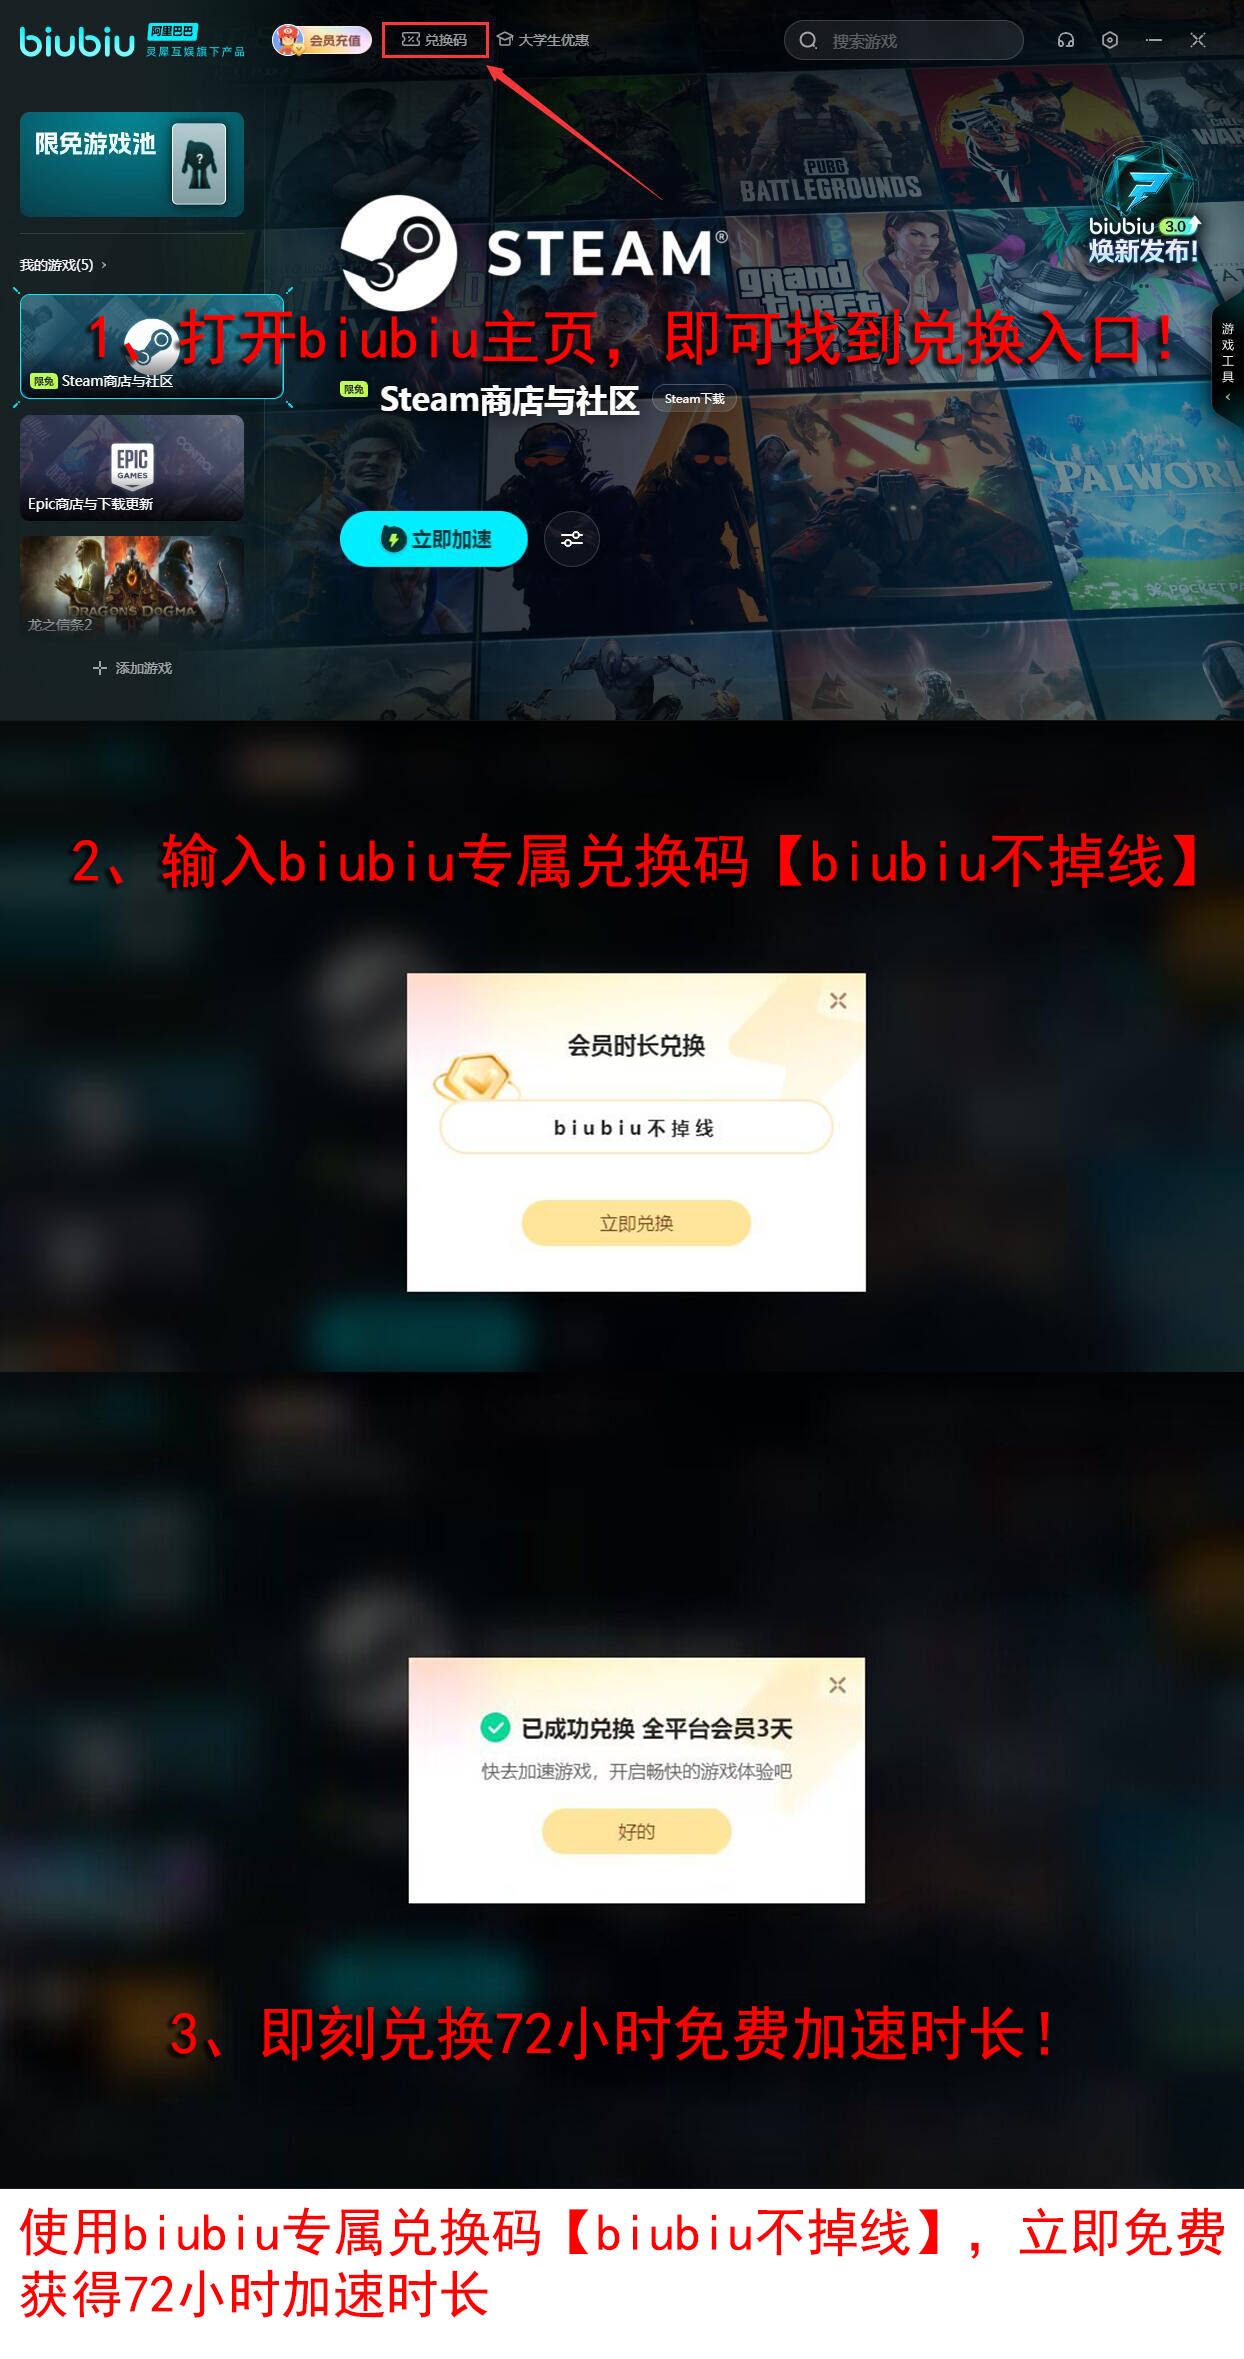
Lastly, it's important to note that internet speed cannot be poor when playing online, otherwise, skills won't be able to be used. It is recommended to use biubiu Accelerator during gameplay, not only directly speeding up and reducing latency by 50ms, but also offering gifts. Starting today, just enter the code 【biubiu no disconnection】to receive72 hours of membership, with an additional 24 hours for first-time registrants, totaling 96 hours of usage rights.
In summary, the complete introduction to Gloria's skills and build recommendations in Matrix Zero Day Crisis is finished. Gloria's essence is that of a battlefield architect—triggering law effects through three-dimensional turret arrays, achieving numerical dominance with the "Wealth Roulette Flow" or controlling team rhythm with the "Safety Control Flow." During the early stages, the wealth flow is preferred for quickly farming resources, while high-difficulty dungeons switch to the safety flow for survival assurance. Operationally, adhere to the "three no principles": do not stand still and output (maintain movement to avoid projectiles), do not be greedy with turret numbers (prioritize survival), and do not waste ammo packs (use them in conjunction with passive damage boosts). Ultimately, turret placement determines the upper limit of output, and team survival takes precedence over individual data. With seasonal updates, if turret mechanics are adjusted, one can quickly switch to the "Electric Play + Music" floating cannon synergy flow, maintaining its status as a versatile tactical option.