Nida Harb 3: Champions' Strife
Game Introduction


Hot Strategy
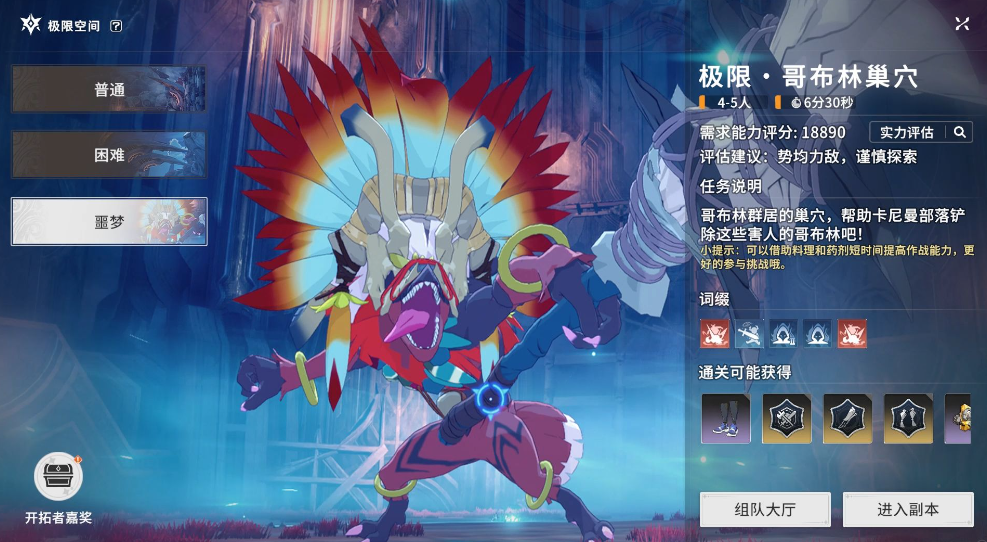
Star Trace Resonance Goblin Nest Instance Guide: How to Clear the Star Trace Resonance Goblin Nest Instance
In this edition, the editor brings you a guide for the Goblin Nest dungeon in Star Trace Resonance. This is an MMO-style 2D role-playing game with very clear and distinctive visuals and character designs. Players can control their favorite characters to explore the world and pass various levels. However, many players are unsure about what to pay attention to when facing goblins, especially the strategies for different types of small monsters. So, in this edition, the editor has briefly organized some points that might be helpful. Players who need it can take a look at what aspects they should be cautious about.
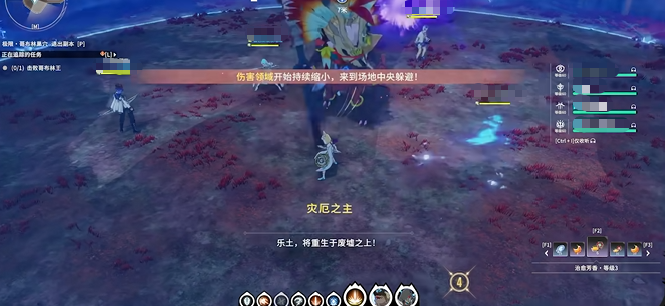
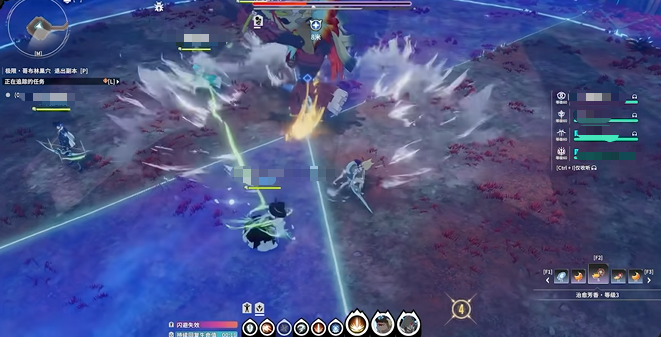
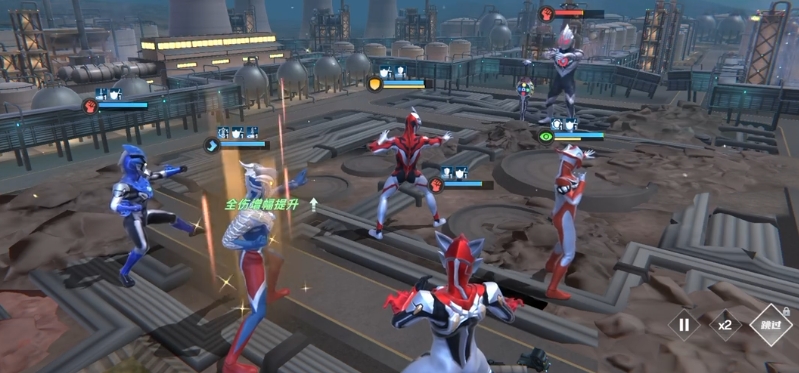
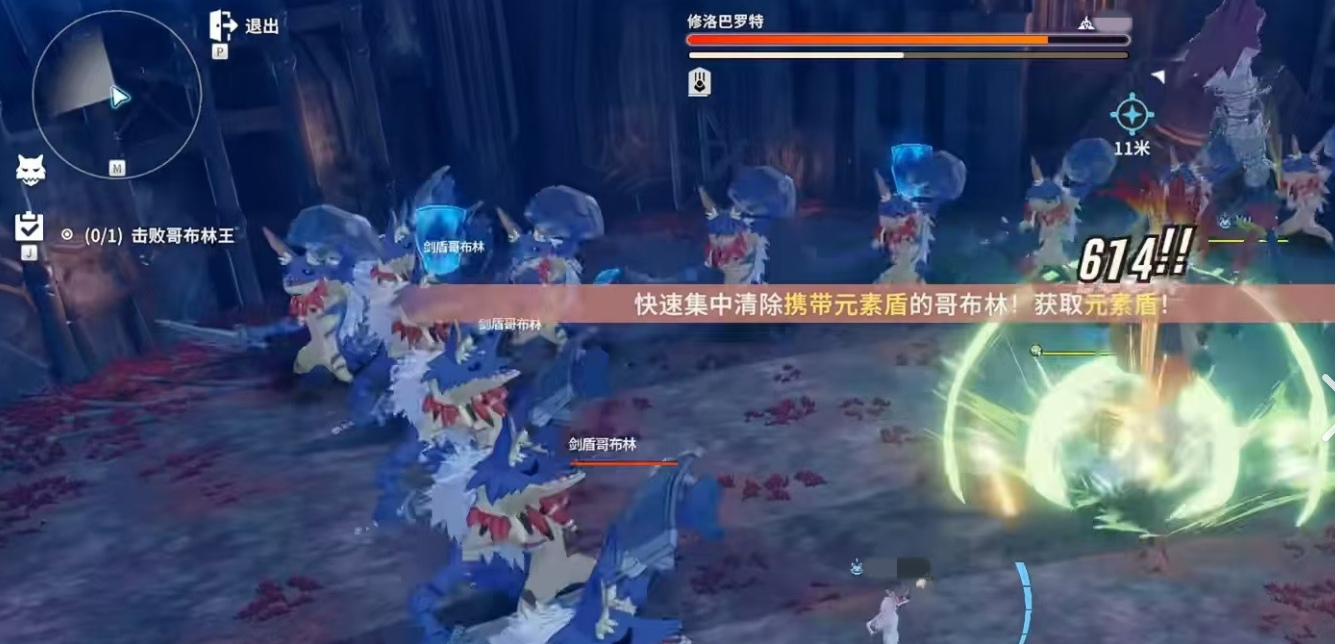
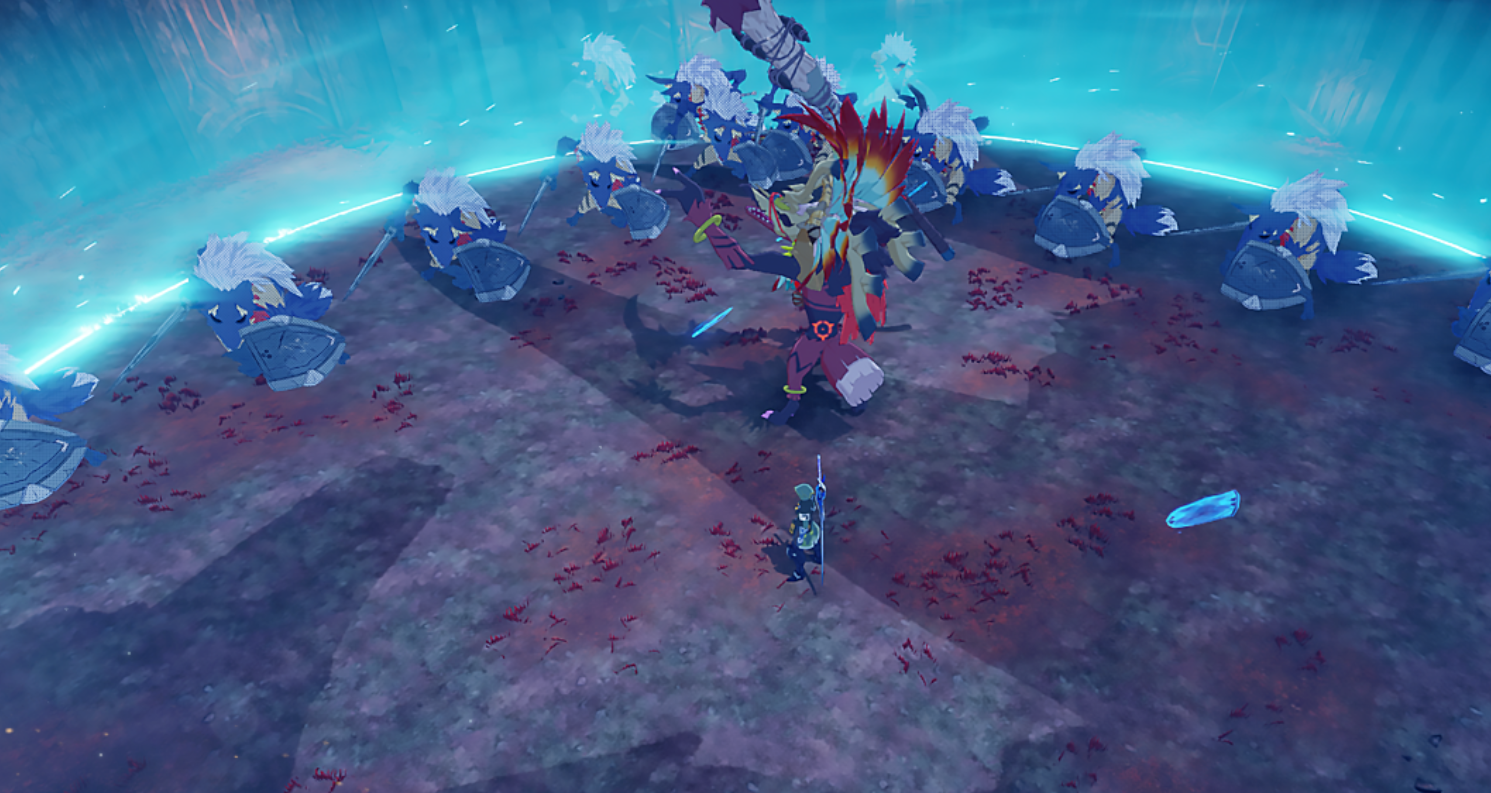
Firstly, everyone needs to understand the main types of enemies they are facing. For example, Forest Goblins mainly serve as healers, Fire Goblins have burst damage, and Sword and Shield Goblins play a critical role in mechanics. It's important to know when to attack which type. Additionally, there's the big boss, which is quite challenging because the boss triggers different mechanisms based on its HP, divided into 20%, 50%, and enrage stages.
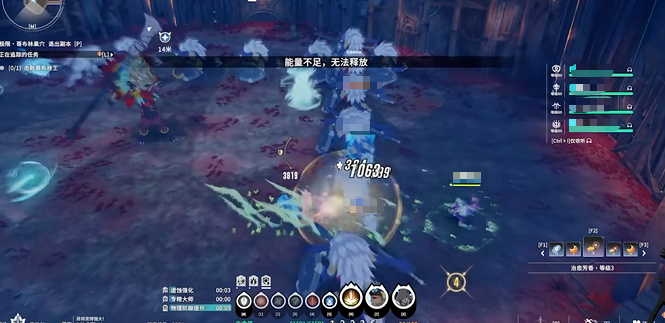
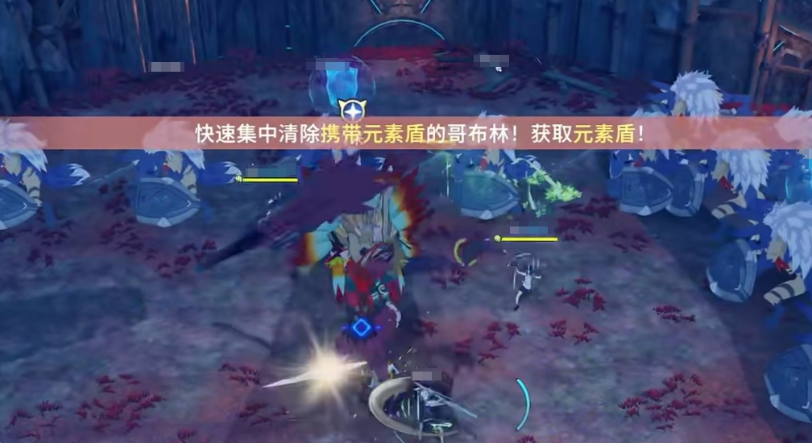
Among the small monsters, prioritize killing the Forest Goblins; otherwise, they will continuously heal and shield themselves, making the battle more difficult and prolonged. Next, target the Fire Goblins, as they deal high AOE damage. You need to manage aggro and quickly focus fire to eliminate them. The remaining ones are the Sword and Shield Goblins. When the boss's HP drops to 20%, a corresponding mechanism will trigger. After killing these, some shield items will drop, but only specific characters can pick them up.
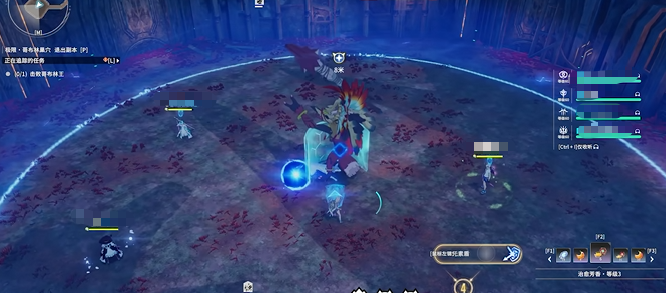
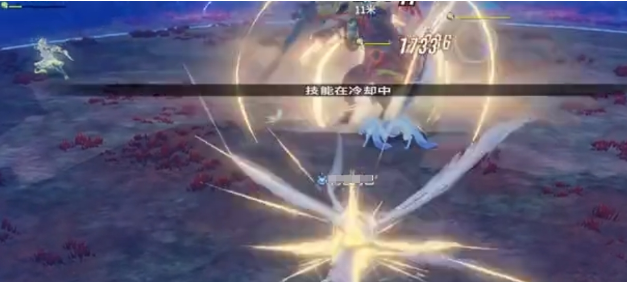
How should you fight the boss? During the Sword and Shield phase, players need to react quickly and disperse to the edges of the battlefield. Kill the two Sword and Shield Goblins first, then let the tank and healer each pick up a shield to deal with the bouncing energy ball mechanism. After the boss locks onto the shielded targets, it will generate a barrier. Form a triangle between the two shielded players and the boss, and then redirect the energy balls back to the boss to trigger its weakness.
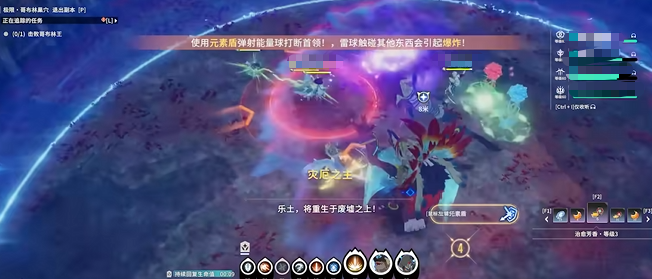
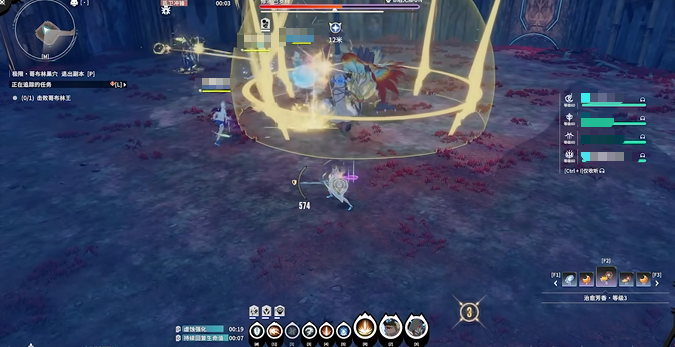
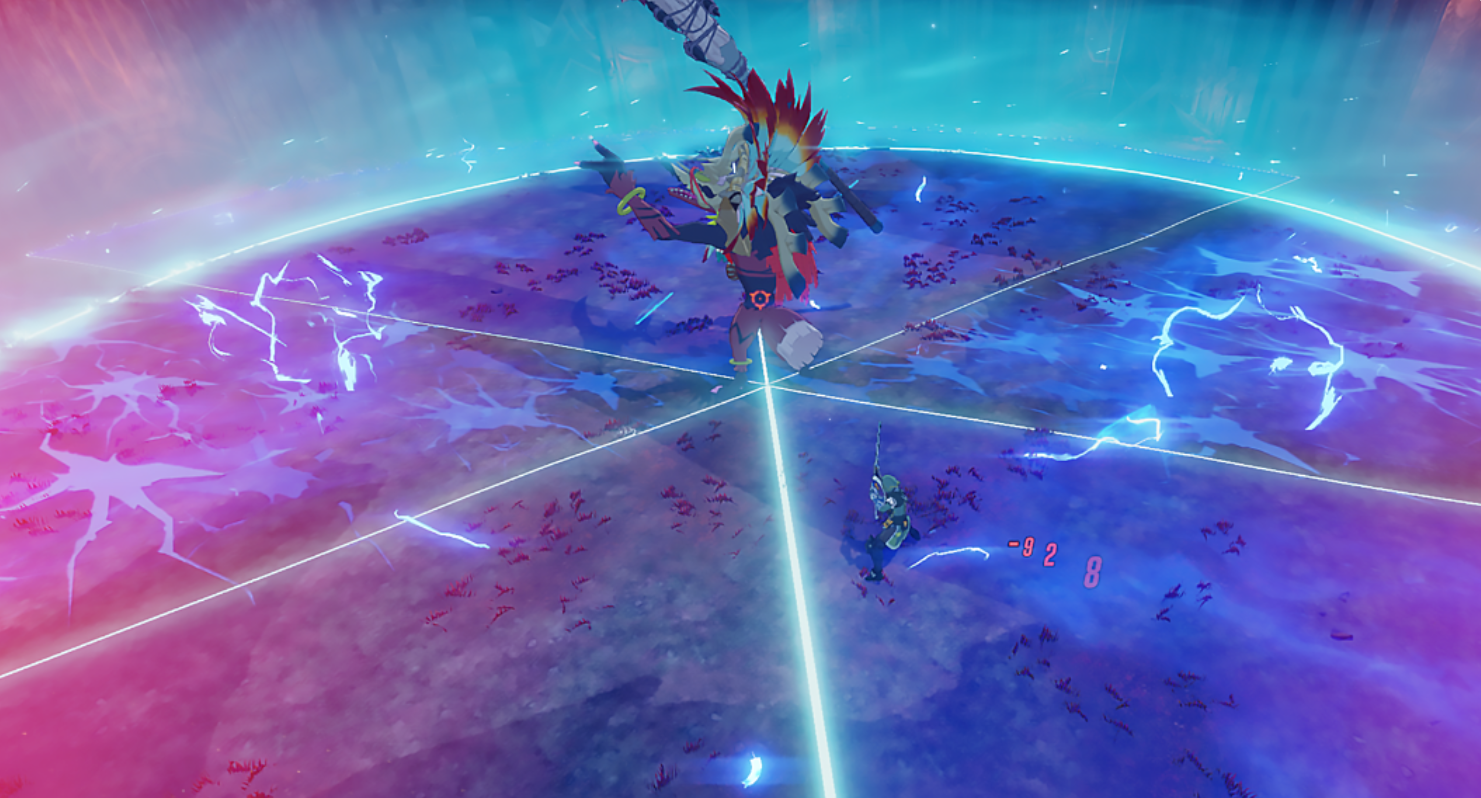
During the battle, the map will be divided into several areas. Players need to adjust their positions promptly according to the boss's location and movement direction, without being too greedy for damage output. When the boss's HP falls below 50%, it will trigger a cross hurricane, and red marks will appear on the ground. Players should use a cross-formation, with two players standing horizontally and two vertically, to dodge effectively.
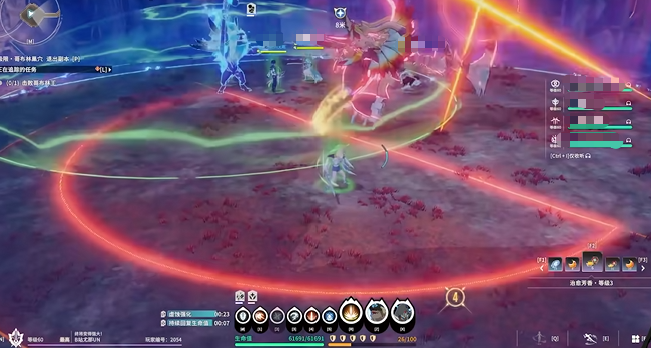
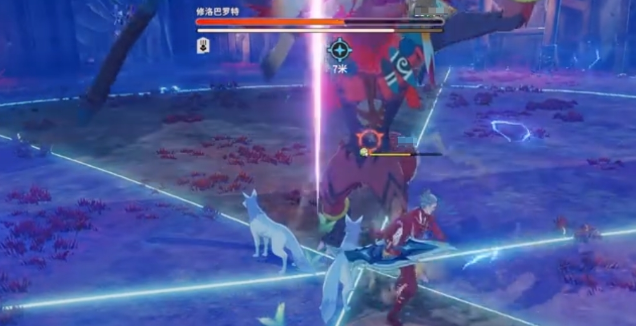
When the boss's HP drops below 10%, it enters a berserk state, releasing full-screen AOE skills like horizontal and vertical slashes. Players should reserve burst skills for this stage to quickly kill the boss, or skilled players can use invincibility frames to avoid damage.
For team play, it's recommended that the tank draws the boss's aggro and guides the skill output direction. Healers should primarily focus on the tank's status. Prioritize classes with high burst damage for DPS, such as Thunder Shadow Swordsmen, and bring skills like Thunder Strike to quickly clear monsters. For group shields, bring skills like Thunder Cloud Protection or those with purification abilities.
To summarize, this is the complete guide for the Goblin Nest dungeon in Star Trace Resonance. Afterward, players can obtain rare equipment, such as the Void Rending Shredder, as well as some mount parts and enhancement materials. If you're unsure how to proceed, check which small monsters to prioritize and the related tactics, as well as the actions to take at different stages of the boss's HP. Following the steps shared above is essential, unless your level and strength are so high that you can easily wipe out the small monsters and the boss. If playing with friends, it's recommended to communicate via voice chat, to coordinate and guide teammates who may not be as strong in terms of positioning and timing.
Star Trace Resonance Goblin Nest Dungeon Guide: How to Play the Star Trace Resonance Goblin Nest Dungeon
In the game, the experiences that players can unlock are quite rich, and there are multiple career paths for everyone to choose from. If a player encounters the Goblin Nest dungeon during the clearance, they should first understand the Star Trace Resonance Goblin Nest dungeon strategy. Take a look at how to successfully clear the stage, and master the following skills.
It is recommended to select two DPS roles, one healer role, and one tank role when forming a team. At the beginning of the game, the DPS characters need to quickly release their skills and then swiftly pull the mobs. The healer only needs to stand outside the tank, which will provide more healing effects to the teammates.
When the boss's health drops to 20%, you should prioritize killing the two goblins. The boss will directly lock onto the target with a shield, then form a protective barrier. This will make the boss enter a weakened phase immediately. Additionally, the ranged support role can also achieve an auxiliary effect, allowing for faster cleanup of remaining small monsters.
If the boss's health is below 50, red warnings will appear on the ground, generating cross hurricanes. Players need to form a cross position to avoid overlapping and taking too much damage. When the remaining 10% of health is left, the boss will enter a berserk state. The tank must focus on controlling the boss, while the healer needs to pay attention to blood collection.
What is the Star Trace Resonance Goblin Nest dungeon strategy? This is the content introduced today. Many players do not know how to clear the stage, mainly due to the combination of roles. It is recommended to choose two DPS, one healer, and one tank. When these roles are combined, it ensures the survival of the team.
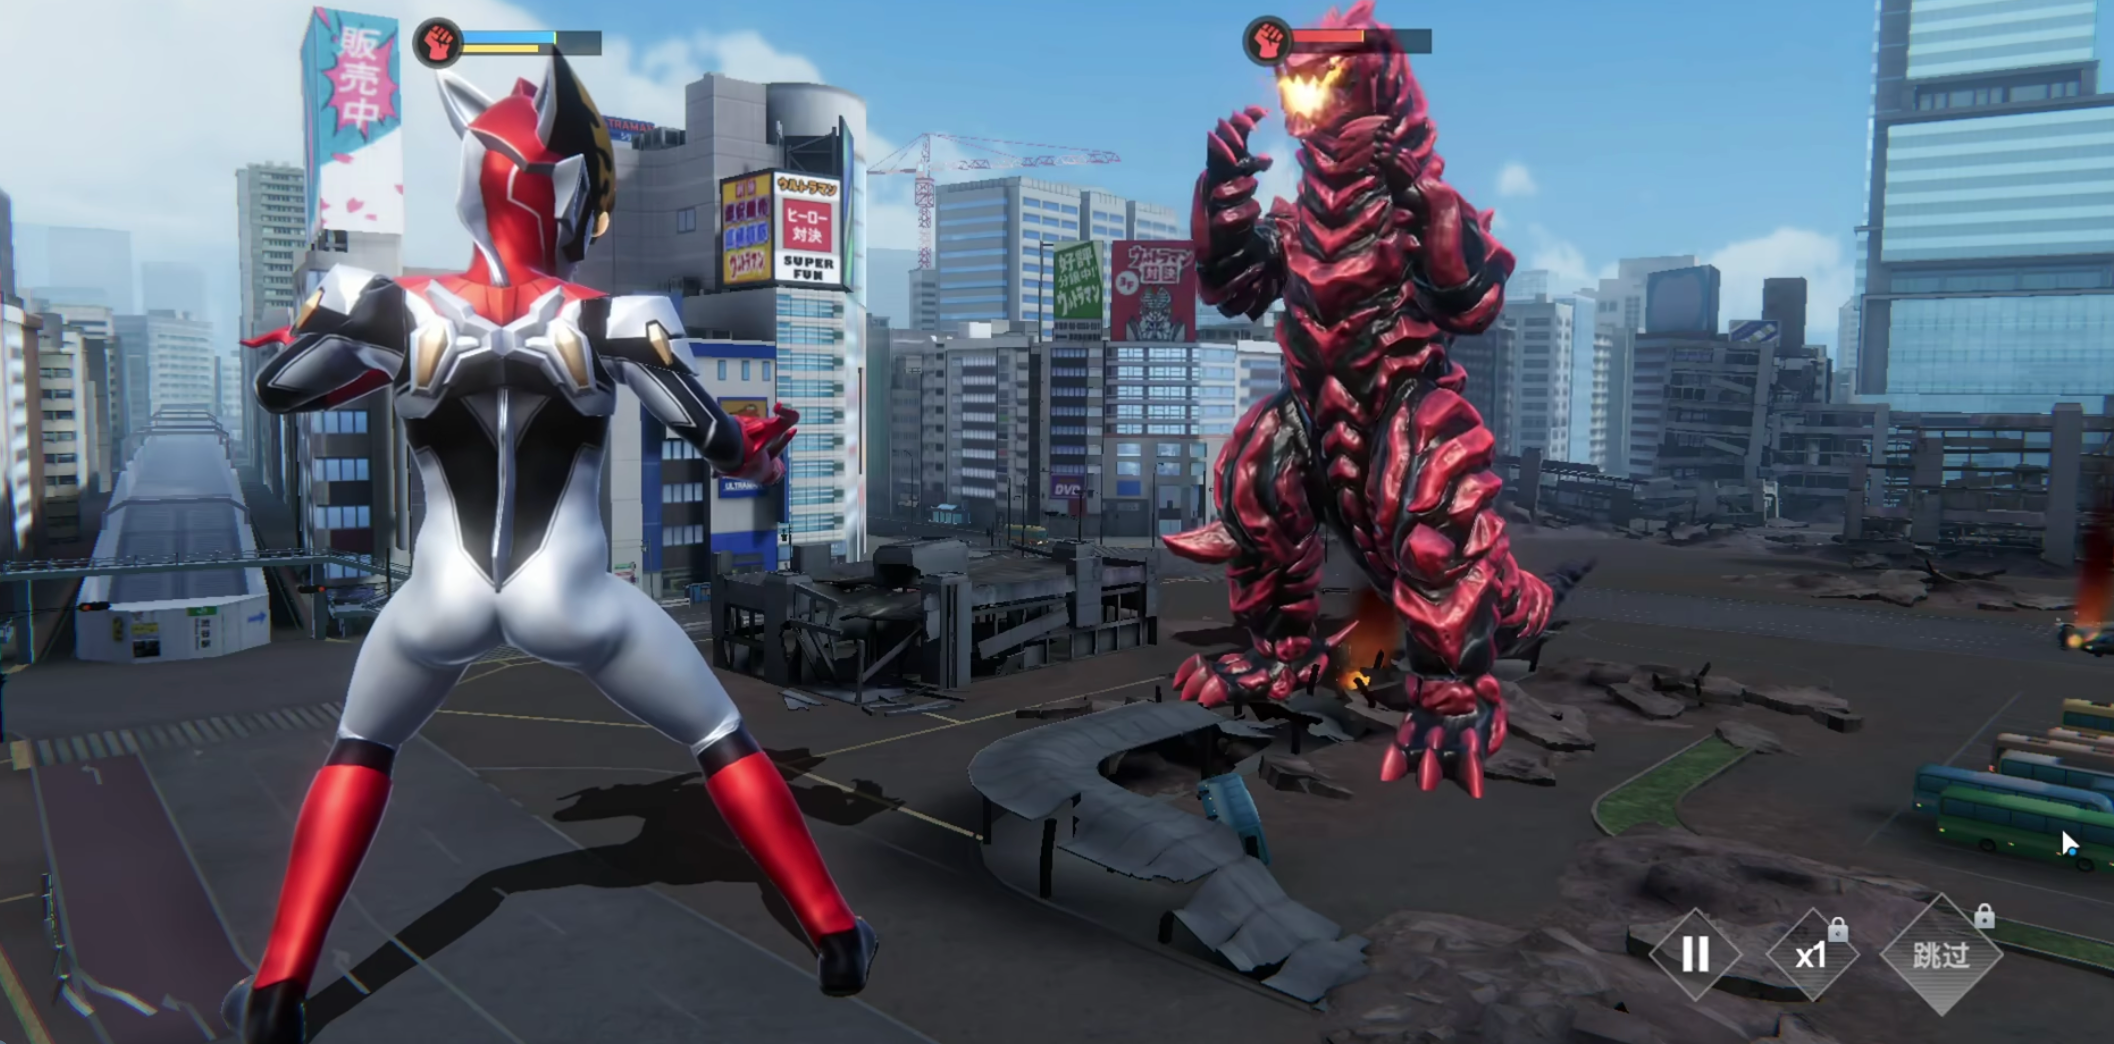
Ultraman Series vs. Ultraman Blazer How is the Ultraman series' confrontation with Blazer? Introduction to the effects of the Ultraman series vs. Blazer
In the battlefield of the Ultraman series showdown, Ultraman Blazar is the first choice in the hearts of players. This Ultraman not only has a familiar appearance design but also showcases extraordinary highlights in skills and characteristics. For those who love the authentic combat of Ultraman, Ultraman Blazar has won a lot of recognition with its all-around performance. So, if you want to use this Ultraman, everyone can come and check out this introduction.
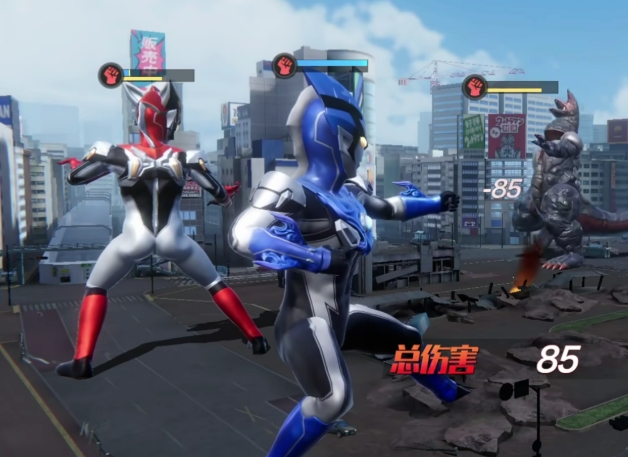
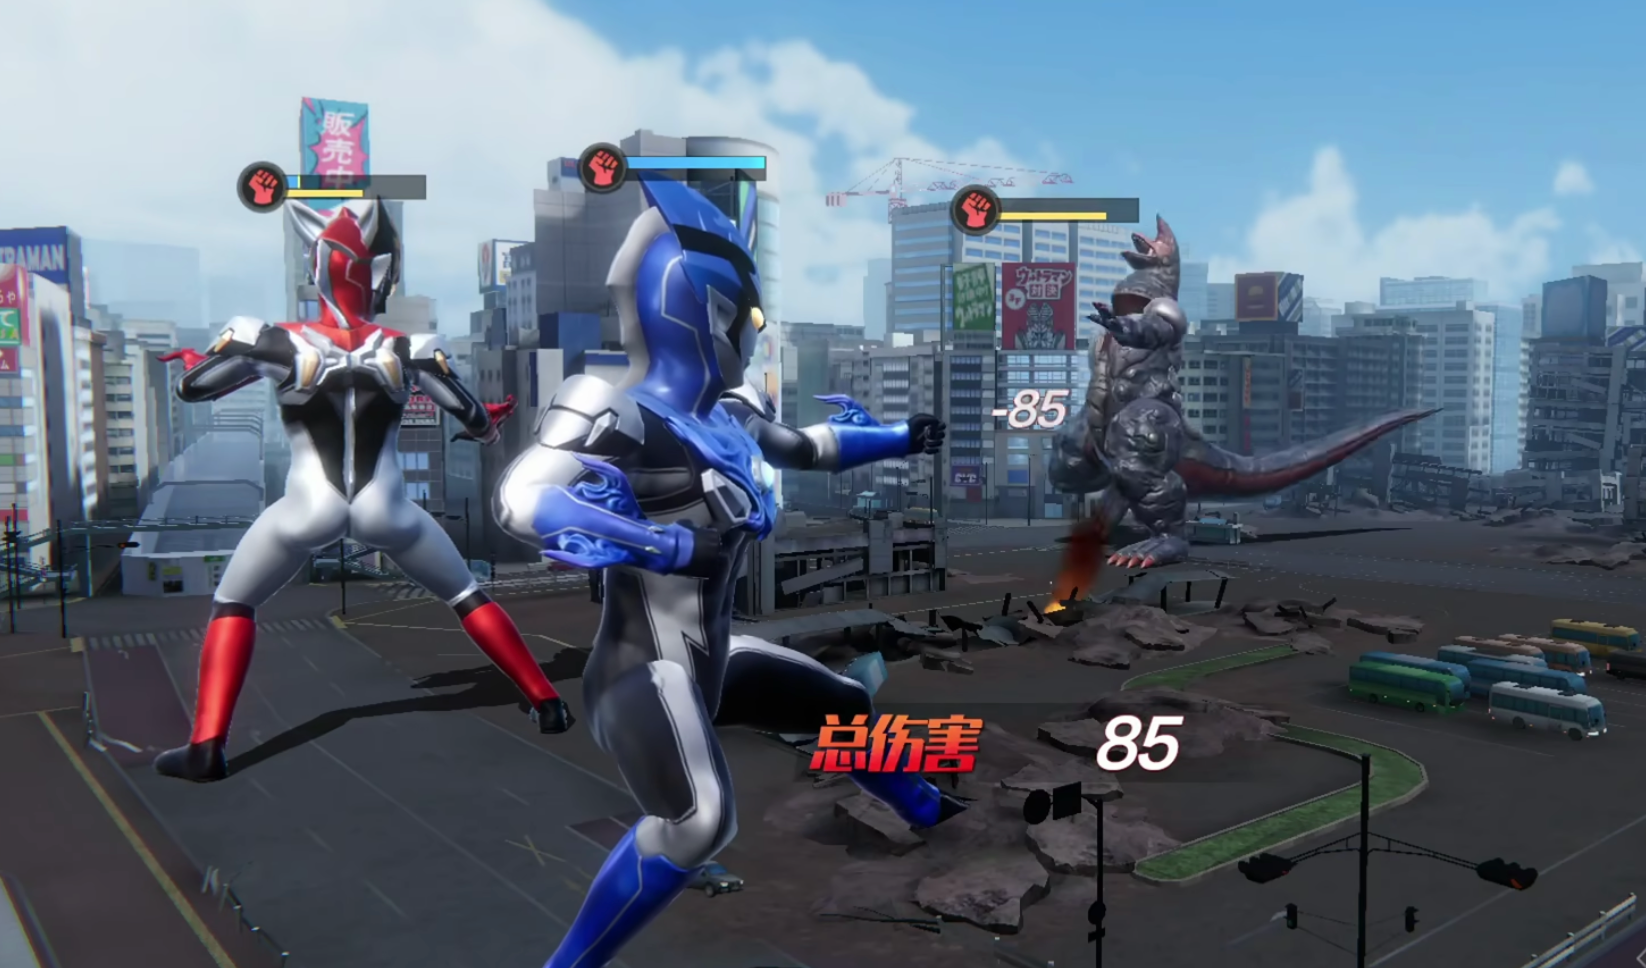
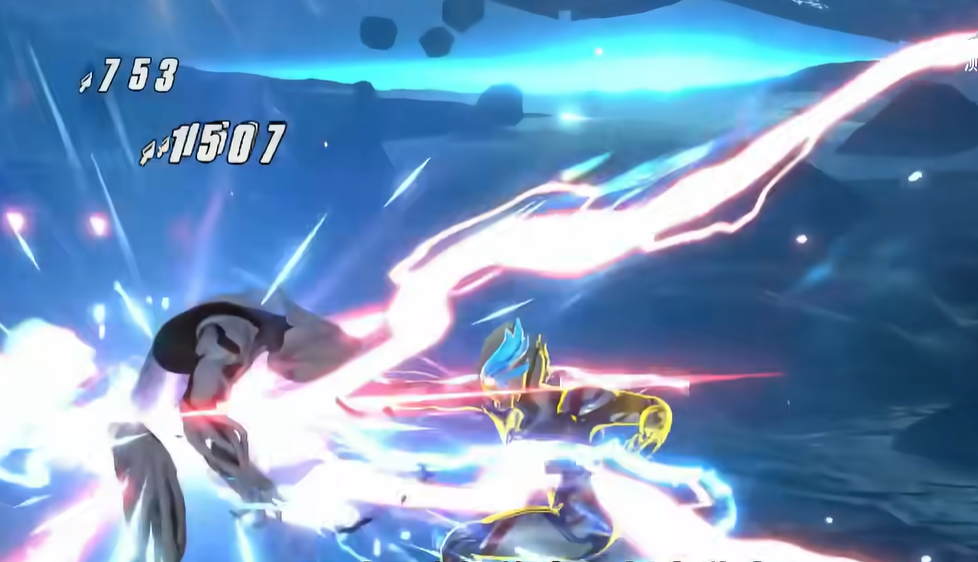
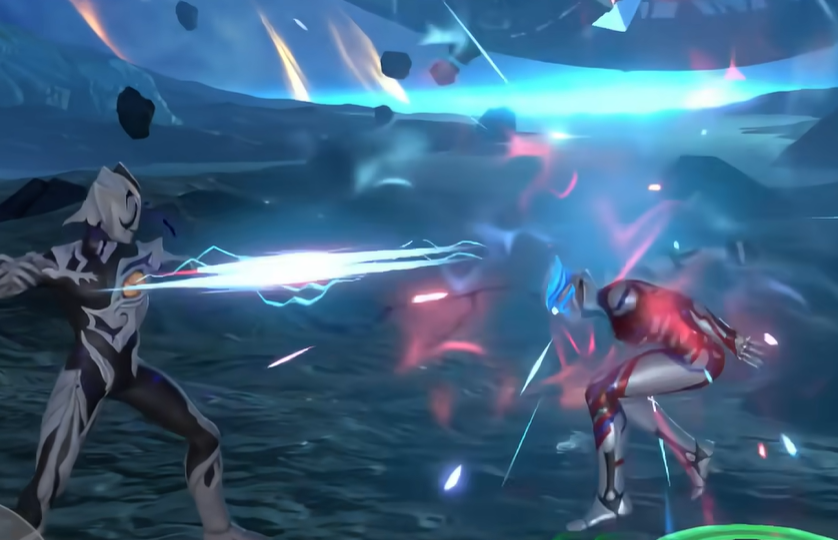
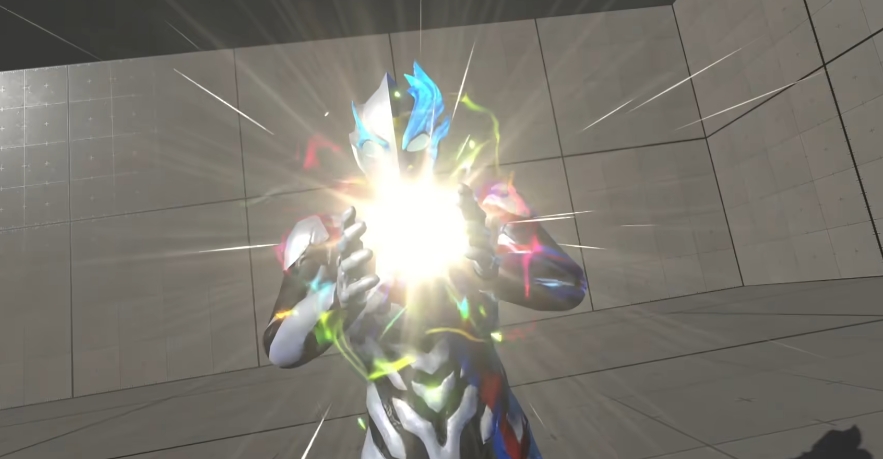
Firstly, Ultraman Blazar's basic skill, Intimidating Thunder Light, can precisely lock onto two random targets in the enemy lineup, dealing a massive 350% damage, while also adding a debuff effect. This debuff not only reduces the target's penetration rate and hit rate by 30%, lasting for two turns, but also weakens the enemy's survival ability and hit accuracy. Especially when facing enemies known for high hit rates and high defense, the auxiliary value of Intimidating Thunder Light is greatly amplified. In the game, this basic attack effect is often used in combination with other moves for combo attacks.
And the energy skill, Spiral Light Lance, is another very useful skill in Ultraman Blazar's arsenal. This skill has a two-stage burst. The first stage deals 250% piercing damage to a straight line of enemy units, and the second stage sweeps like a storm, dealing up to 450% AOE damage to all enemies. More astonishingly, both stages of damage have the absolute characteristic of being un-dodgeable and un-blockable, allowing Ultraman Blazar to almost ignore the enemy's defensive effects and directly deliver output into the heart of the enemy formation.
Such powerful skills not only make enemies relying on evasion or high blocking ineffective, but as the skill level increases, the total damage can exceed 600%. Coupled with the bonuses from passive skills, its burst power is a number that most ordinary Ultramen need to cultivate to reach. However, the strength of Ultraman Blazar goes far beyond this. Every time he uses the Spiral Light Lance, he stacks a unique buff state called Hunting Moment on himself.
This state boosts attack power, critical hit damage, and all abnormal status enhancement effects by 8% per layer, stacking up to three layers, and lasts for 15 turns. More importantly, this state cannot be dispelled by any means, meaning that as long as the battle continues and the opponent remains in an attacking state, Ultraman Blazar will continuously improve his abilities, becoming stronger and stronger. Ultimately, his burst power will far exceed the initial stage, so it can be said that the later phase with enhanced effects is when Ultraman Blazar is at his strongest.
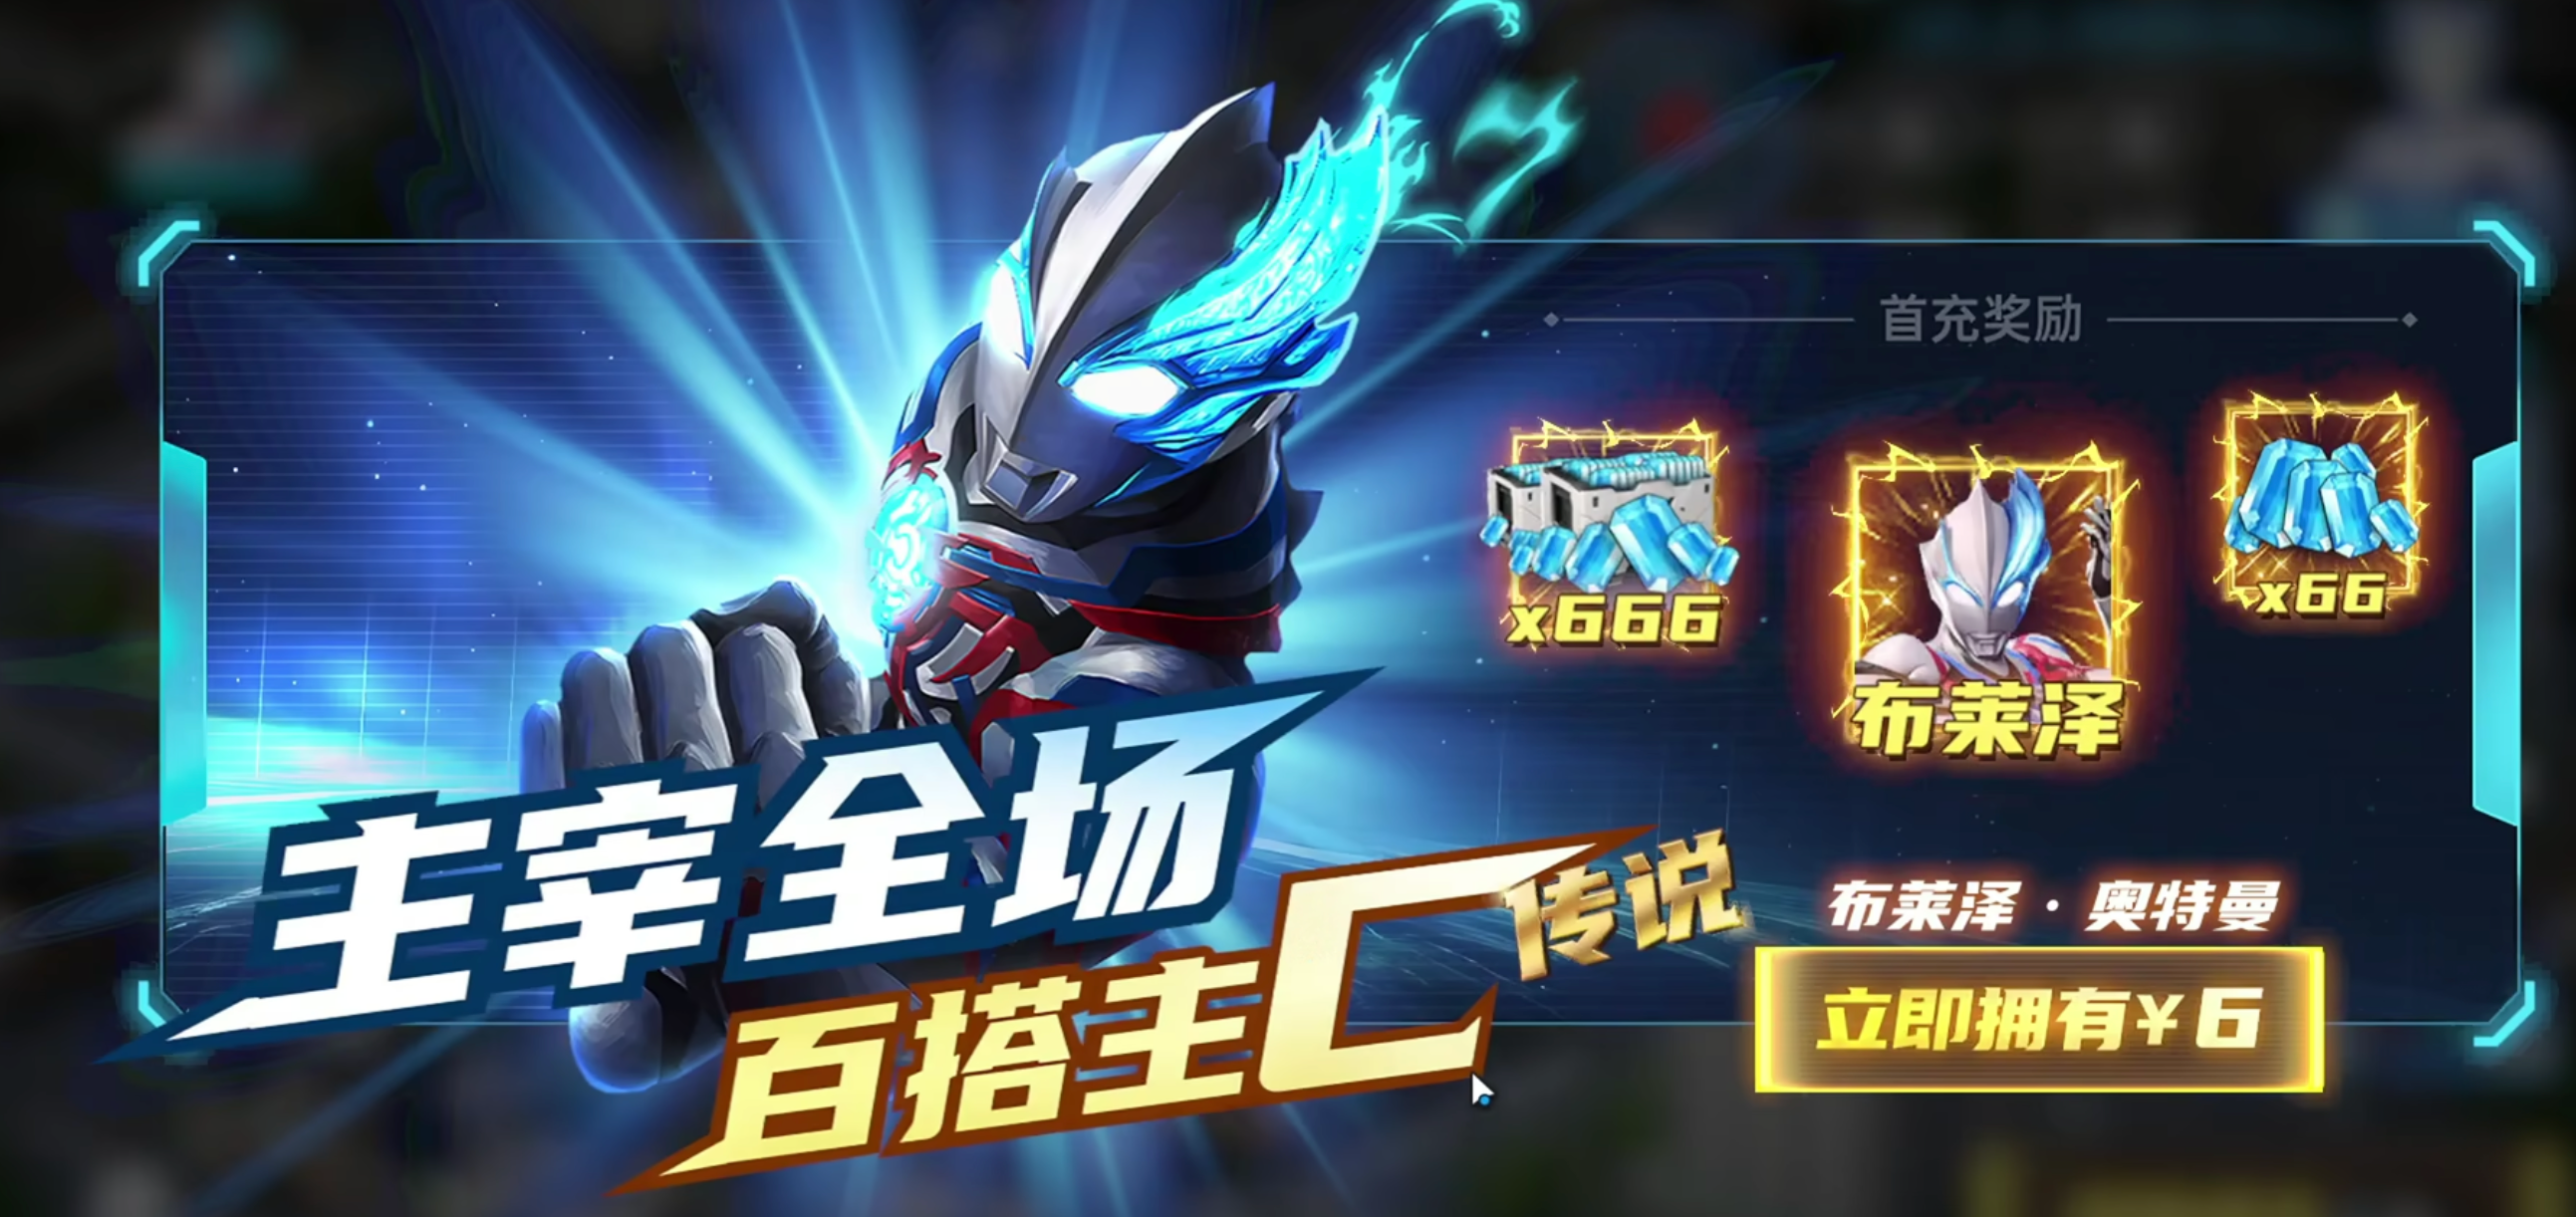
Moreover, the way to obtain Ultraman Blazar is extremely simple and cost-effective. Early in the game, players can easily acquire this powerful Ultraman through the affordable Blazar package in the game. This package costs only 6 RMB, which is available with the first recharge. Compared to other characters that require drawing cards, fragment synthesis, or participating in complex limited-time events, Ultraman Blazar is a blessing for zero-spend or low-spend players. Therefore, it is highly recommended that everyone buy this first recharge early on.
Regarding how good Ultraman Blazar is in the Ultraman series showdown, whether from the perspective of skill mechanics, output capability, growth potential, or actual combat performance, he demonstrates a very high standard. He is not only a familiar Ultraman on the battlefield but also a character that players enjoy operating. If you haven't used Ultraman Blazar before, I would recommend getting and trying him out.
Introduction to Hati in Silver and Scarlet's Return Home Guide to Hati in Silver and Scarlet's Return Home
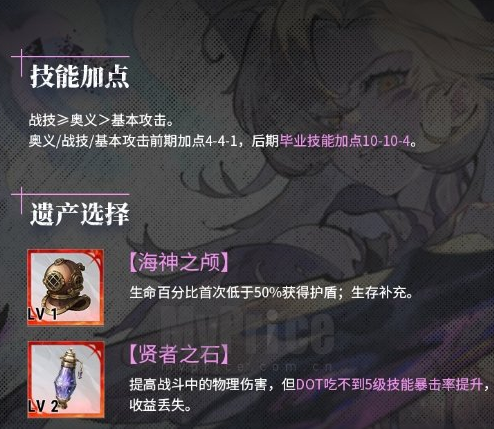
In the game Silver and Crimson, players can experience the most exquisite visuals and choose from many mysterious dark characters. The game presents an adventurous medieval fantasy world with a gothic style. An introduction to Hati, the character returning home in Silver and Crimson, is also very unique as an SSR-level initial character. His abilities are quite good, with excellent area-of-effect attack capabilities, allowing for suppressive attacks.

The overall appearance of this character is very delicate, and his striking effects are also quite good, which can better weaken the enemy. As a member of the Kingdom faction, he can use plague effects to continuously weaken the opponent, and there's also a debuff effect that works well. In the game, you can pair him with control-type characters to help players better manage their resources.
If you want to develop him better, it's important to understand his performance. This character can consistently deal damage in various situations, but he excels in debuff suppression teams. His core skills revolve around inflicting plague, causing continuous damage to enemies. During gameplay, he can also reduce the defense and healing effects of target enemies, making it easier to effectively suppress front-line tank characters and hinder their health regeneration.
To allocate points, first, enhance the main output skill to increase the frequency of plague stacking, ensuring overall suppression. Then, choose to pair with penetration, enhancement, or status duration relics to maximize the benefits of DoT (damage over time). For equipment, prioritize physical attack, continuous multiplier, and hit rate gear as the core. In subsequent setups, placing him in the mid-row can optimize his damage output.
That's all about the introduction to Hati, the character returning home in Silver and Crimson. In the game, this character is very unique with a clear role. If you're looking for a character with strong debuff effects, he is an excellent choice, capable of continuous suppression and wide-ranging coverage.
How is Silver and Crimson Hatty? Introduction to Silver and Crimson Hatty
Returning Hati is an ancestral character in the game and also a core mainstay, belonging to the Kingdom faction. Many players are interested in this character and want to know how Silver and Crimson Hati perform. Below, I will analyze the unique aspects of this character and whether it has sustained advantages.

Hati belongs to the Veteran class, with main attributes divided into two types: physical damage and Full Moon attribute. It can effectively release a plague effect, weakening the enemy, and also has continuous suppression ability and excellent area attack. It is suitable for pairing with armor-piercing or control-oriented characters. In the mid-row position, it can deliver good output damage.

Twin Plague God's Veil: Within a rectangular area, it can deal about 1500 points of physical damage to enemies, which is shared by all hit targets. Additionally, it can cause two instances of continuous damage effects, such as burning and poisoning, instantly suppressing the group's health. This can accelerate the rate at which the enemy's numbers are reduced.

Scales of the Plague Spring: Triggered every two normal attacks, it deals 150% physical damage to the primary target and inflicts a plague effect on enemies within the area. After entering the Blood Moon state, the next two normal attacks are replaced with combat skills, quickly achieving group immunity.
Trail of Sorrow: After the enemy's continuous damage ends, there is approximately a 50% chance of gaining a plague effect that lasts for 10 seconds. Each layer reduces the target's attack speed by about 20%, and after stacking seven layers, it spreads to nearby enemies.

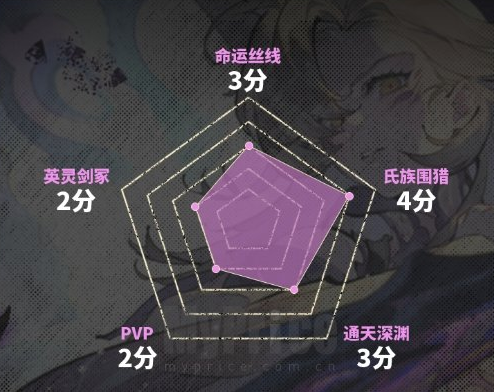
In terms of team composition, you can choose to pair with Seth or Cera to effectively absorb damage and achieve crowd control. To enhance the damage output, you can pair with A Capella or Bella. For functional roles, you can also choose Noah, who can effectively stack armor penetration. If the lineup is correctly paired, it can effectively exert a suppressive role. The characteristics of this character are quite good, with its core value lying in the burst cycle and the ability to cause continuous damage.
In the team, Hati is a key figure with strong overall dominance. How is Silver and Crimson Hati? After reading the above content, players should have a clear understanding. In terms of tactical control, this is a major core that cannot be ignored, and players need to understand this.
Ultraman Series vs. Ultraman Blazer: How Strong is Ultraman Blazer Analysis of the Strength in the Ultraman Series vs. Blazer
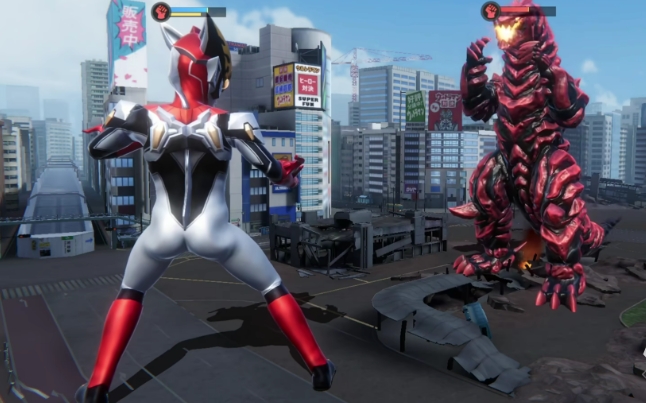
In the Ultraman series battle game, Ultraman Blazer is a highly popular character. How strong is Ultraman Blazer in the Ultraman series battles? Whether in PVE or PVP, Ultraman Blazer has very impressive performance. Today, the editor will bring you an analysis of the strength of Ultraman Blazer in the Ultraman series battles, and take a look at which skills and characteristics of this Ultraman stand out.

Blazer's normal skill "Dazzling Thunder Light" can cause 350% damage to two random targets on the enemy side, and comes with a debuff effect that reduces the target's block break rate and hit rate by 30% each, lasting for 2 turns. This skill not only provides stable damage output but also effectively suppresses the enemy's survivability and hit rate, creating more room for error for one's own team. Especially when facing high-hit, high-defense enemy lineups, the supportive significance of this skill is very clear.
The energy skill "Spiral Light Spear" consists of two segments of damage: the first segment deals 250% damage to a straight line of enemy units, and the second segment inflicts a massive 450% AOE damage to all enemies. These two segments of damage have a crucial advantage: they cannot be dodged or blocked, allowing Blazer to almost ignore the enemy's defense mechanisms and steadily deal damage in battles, making it very suitable for countering roles that rely on dodge or high block. As the skill level increases, the total damage of this skill can exceed 600%, and with the addition of passive skill bonuses, the burst power is extremely astonishing.
Apart from the damage itself, Blazer's "Spiral Light Spear" also applies a unique buff state to itself - "Hunting Moment". Each use of the skill stacks one layer of this state, with each layer increasing attack power, critical hit damage, and all abnormal state amplifications by 8%, stacking up to 3 layers and lasting for 15 turns. Most importantly, this state cannot be dispelled. In other words, as the battle drags on, Blazer becomes stronger and stronger, and its final burst capability will significantly surpass its initial stage.
The way to obtain Ultraman Blazer is very simple, and the cost-effectiveness is also very high. Players can obtain this character through the Blazer package in the game, which costs only 6 RMB. Compared to other characters that require gacha, fragment synthesis, or participation in limited-time events, the threshold for obtaining Blazer is extremely low, making it almost the first choice for zero-spend or low-spend players.
Overall, Blazer's skill mechanism is also very powerful, with outstanding output ability, growth potential, and practical performance. Therefore, Blazer is undoubtedly a very worthwhile character to acquire and cultivate. The above is the complete introduction to the strength of Ultraman Blazer in the Ultraman series battles.
How is Ultraman Blazar in Ultra Space-Time Heroes? Analysis of Ultraman Blazar's Strength
There are many Ultramen in the Ultra Space-Time Heroes game, and there are a lot of warriors from the Land of Light. Among them, Blazar Ultraman has attracted the attention of many players with his primitive fighting style. However, some worry that this hero might be too weak, leading to the question: How is Blazar Ultraman in Ultra Space-Time Heroes? Here, I will provide an overview of Blazar Ultraman's general strength.
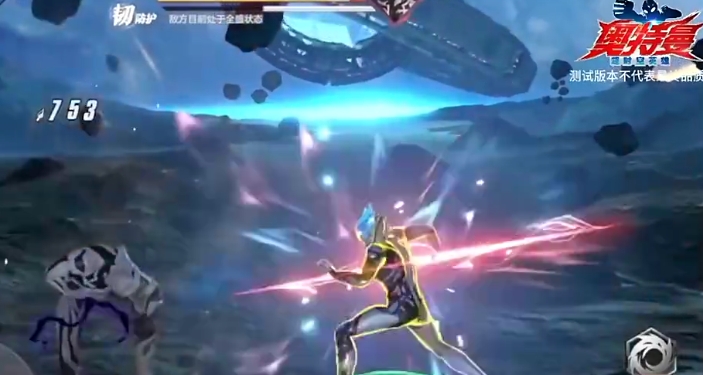
Blazar Ultraman's normal attack consists of a standard five-segment attack, but there is a variation during the third segment. After the third attack, if you press the first skill, it will result in an Iron Mountain Rely, causing close-range damage to the enemy, while also forming an energy wave that directly hits the opponent. This damage is quite high, and the opponent cannot defend against it.
Then, during the fifth segment of the attack, the first skill again shows a variation. At this point, Ultraman will distance himself from the enemy and then pull out two light swords from behind, directly hitting the opponent. It's a good skill for wearing down the enemy, but it's easy for the opponent to avoid, so use it depending on the situation. In its normal state, the first skill acts like a fishing rod, pulling the enemy over directly. However, this skill can easily miss, and it is most effective when the opponent is on the ground.
The second skill summons a light blade to rush forward. This skill can be charged up to deal higher damage, but the charging time is long, making it easy for the opponent to avoid. It can only effectively deal damage at a considerable distance. The ultimate move summons a giant light wheel that continuously damages enemies in front and can also bounce back to cause massive damage.

In summary, Blazar Ultraman's attacking style is very flexible, allowing him to switch between different output modes by linking normal attacks with small skills. It requires some practice to master, but once proficient, he can effectively engage the opponent. By using normal and special skills interchangeably, it's easy to defeat the opponent at full health. Additionally, the ultimate move is a long-range attack, making it easy to hit the opponent without taking damage, although it does require a high level of proficiency.
I believe most players now have a comprehensive understanding of Blazar Ultraman in Ultra Space-Time Heroes. Blazar Ultraman's skill set is quite strong, and he can frequently switch skills to perform combos. If you enjoy playing with a lot of control, you might want to practice with this hero!
Ultraman Blazer Introduction in Ultraman Transcendence Heroes, Is Ultraman Blazer Powerful?
In the current gaming world, there is such an Ultraman-type game. I believe that after delving into it, players will not find it hard to realize that its overall playability is extremely high. Today, regarding this game, I can bring you the introduction of Ultraman Bureizer in Ultra Hero Beyond Time and Space. One of its irresistible charm points is the appearance of many classic and deeply ingrained Ultraman figures in the game, which naturally attracts a lot of players.
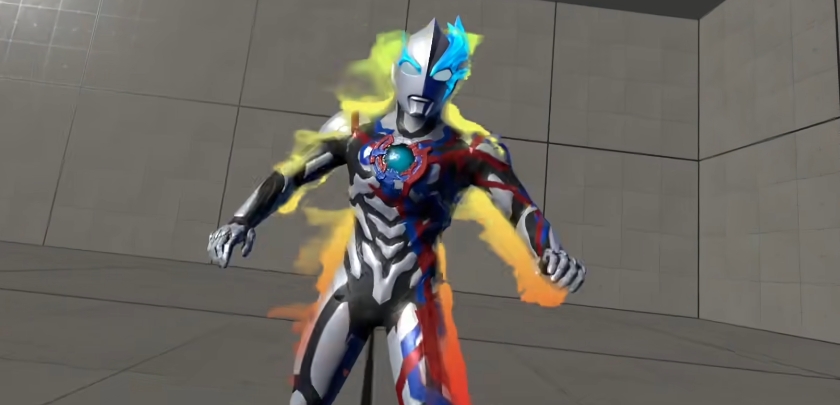
The story of Ultraman Bureizer starts with Earth's wormhole experiment, full of unknowns and variables. Originally, this experiment carried the beautiful vision of mankind exploring the mysteries of the universe. However, an unexpected accident suddenly occurred, and the experiment failed. It was in such a chaotic space-time rift that Ultraman Bureizer unexpectedly met a young man named Gen. In the game, Ultraman Bureizer also demonstrates strong combat abilities due to this story, with his attack speed being so fast that every move leaves enemies unable to guard against it.
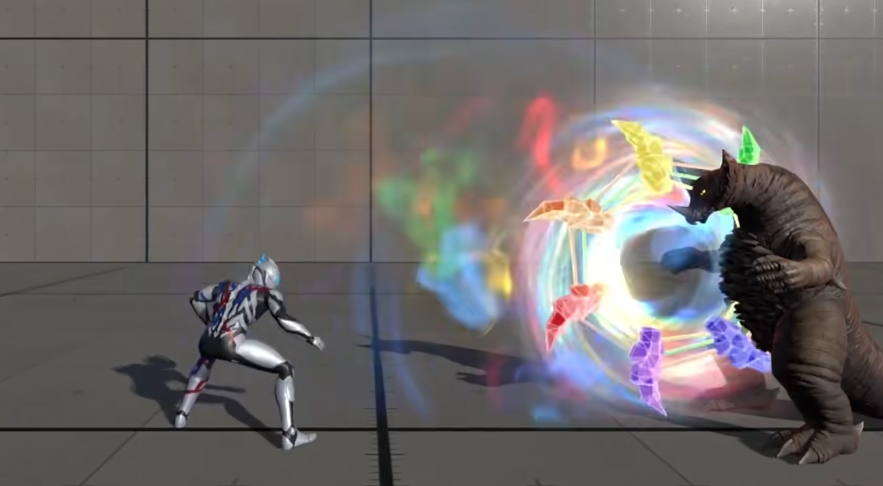
And his ultimate skill is the Spiral Light Lance. This skill involves Ultraman Bureizer instantly condensing energy in his hands when he launches the Spiral Light Lance, followed by a dazzling light being hurled fiercely at the enemy. Moreover, this skill can evolve into different combat skills. Besides the Spiral Light Lance, another commonly used ultimate skill of Ultraman Bureizer is the Spiral Light Blade. During battles, Ultraman Bureizer can skillfully concentrate photon energy in his right hand. As he swings his arm, a powerful energy gathers and rotates in his hand, gradually forming a double helix-shaped light spear.
This light spear, when thrown at the enemy, can instantly eliminate the target. More impressively, this skill also has multiple variant moves. Additionally, the Bureizer Beam is another powerful skill of Ultraman Bureizer. When the battle reaches a fever pitch, Ultraman Bureizer will cross his hands, and the energy within his body will surge rapidly, gathering between his hands. Then, a red and blue double helix beam will be shot out. Wherever this beam hits, the enemy will be pushed back by the powerful energy.
The Rainbow Wheel is another skill that Ultraman Bureizer frequently uses in battles. At critical moments in the fight, Ultraman Bureizer will take out the Rainbow Card and Kirishima Stone, inserting them into the Bureizer Bracelet. With a low shout and a wave of his hands, a large, colorful circular saw-like wheel is summoned from his hands. This wheel spins rapidly towards the enemy target. Enemies hit by the wheel not only suffer massive damage but also enter a bleeding state, with their combat power decreasing as a result.
It's worth mentioning that even in the initial stage, Ultraman Bureizer's combat power is quite astonishing. Take his weapon, for example; the Bureizer Light Sword in Ultra Hero Beyond Time and Space, is simply an invincible divine weapon. In battle, whenever Ultraman Bureizer wields this weapon, each strike deals significant damage to the enemy. Even more astonishingly, this weapon has a special ability: it can split into two, becoming two incredibly sharp light swords. Finally, there's the Kirishima Stone Sword. When Ultraman Bureizer summons this Thunder Sword, he slowly switches to sword-wielding mode, bringing with it a whole new set of skills. Among these, skills like the Overlimit Thunder Slash have the capability for area-of-effect damage. In this state, Ultraman Bureizer's combat power gets a certain degree of enhancement.
This concludes the introduction to Ultraman Bureizer in Ultra Hero Beyond Time and Space. Currently, in the development, Ultraman Bureizer is a very powerful hero. For players in the early stages, he is simply the best combat partner, easy to get started with and having strong output, helping new players quickly become familiar with the game's combat mechanics. However, since the game has not officially launched, adjustments may still be made, and the final version will be based on the official release.
How to Play the Star Trace Resonance Goblin Nest: A Guide to Playing the Star Trace Resonance Goblin Nest
How to play the Goblin Nest in Stellar Resonance, in this fantasy-filled game of Stellar Resonance, the Goblin Nest is a rather challenging multiplayer dungeon, attracting countless players to explore. At this point, many new players may ask how to adventure in such a unique game scene. Don't worry, the following will share with you the gameplay strategy of Stellar Resonance, providing a detailed answer. Let's take a look together.
[Stellar Resonance] Latest Version Reservation/Download
>>>>>#Stellar Resonance#<<<<<
To challenge the Goblin Nest, it's essential to make preparations before the battle. In terms of team role composition, a reasonable mix is crucial. It's recommended to choose the classic combination of tank, healer, and DPS. A four-person team can be arranged with 1 tank, 1 healer, and 2 DPS. The tank has high health and defense, able to attract the hatred of the boss and minions, creating a safe environment for teammates to deal damage. The healer is also indispensable, always paying attention to the HP of teammates, promptly restoring their health, allowing everyone to fight with peace of mind. The DPS role is the firepower of the team, tasked with quickly dealing high damage to eliminate enemies under safe conditions, divided into melee and ranged DPS.
Before entering the Goblin Nest, be sure to prepare various practical items. These items can play an unexpected role at critical moments, helping the team turn the tide of battle. One of the essential items is the group damage reduction potion, which should be used when the boss releases an AOE skill, significantly reducing the damage taken by team members and increasing the chance of survival. Instant purification scrolls are also very important, as they can remove the healing debuff caused by monster skills. Health and mana potions are equally necessary, ensuring that players' states are maintained by timely replenishment during battles.
A proper combination of each class's skills can make the battle go more smoothly. DPS roles should bring burst AOE skills, like the Thunder Shadow Swordsman's Lightning Slash, which can deal multiple high-damage hits to enemies in a fan-shaped area in front, playing a huge role in clearing minions and attacking the boss. Healers should select group shield skills, such as the Thundercloud Protection, which can add shields to absorb damage for team members, and also pair with purification skills to remove negative statuses from teammates, ensuring the team's survival. The combination of each class's skills needs to be adjusted according to their own characteristics and battle requirements, to maximize their power in combat.
Upon entering the instance, waves of minions will come one after another, among which the Forest Goblins and Fire Goblins are the most troublesome. Forest Goblins can heal and add shields; if not dealt with first, they will continuously heal other minions, prolonging the battle time and consuming team resources. Therefore, at the start of the battle, DPS roles need to quickly focus fire and kill them, interrupting the healing rhythm. Fire Goblins have extremely high group AOE damage, and their skills can easily cause the team to lose a lot of HP or even wipe out. Tanks need to use aggro skills to hold them, creating a safe environment for teammates to deal damage, while DPS roles, under the cover of the tank, should quickly focus fire and eliminate them to avoid greater threats. After successfully clearing the minions, players will face the real challenge: the powerful boss. This boss has a variety of unique skill mechanisms, each requiring careful handling by the players.
The Goblin Nest dungeon really tests the team's collaboration and familiarity with the mechanics. But when players overcome numerous difficulties and successfully clear the Goblin Nest, they will receive a series of generous rewards, making all the previous efforts worthwhile.
How to Clear the Goblin Nest in Stellar Resonance: A Guide to the Goblin Nest in Stellar Resonance
The Goblin Nest is a dungeon that many new players will encounter in the game Star Trace Resonance. However, since many players are not very familiar with the dungeon mechanics, they want to know how to successfully clear the Goblin Nest in Star Trace Resonance? In today's content, the editor has compiled a relatively complete guide for you. If you have recently started playing this game, then I believe today's guide will be very useful for you. Players facing the same challenge, please continue reading below.
This dungeon consists of three types of regular goblins and a boss, each with different attributes: healing goblins, burst goblins, and mechanism goblins. Players need to kill them in the correct order, starting with the healing goblin. When it exists, it not only restores health to other goblins but also increases their shields, weakening the damage from players. Next is the burst goblin, as its high output can lead to team casualties if left on the field too long. The mechanism goblin will only activate when the boss's health drops below 20%. After killing it, it will drop an item that needs to be picked up by a specific character.
Next, let's understand the boss's mechanics. Once the sword and shield protection mechanism is triggered, the entire team needs to quickly spread out on the field and first kill the two sword and shield goblins that appear. The tank class picks up the first shield, and the healer class picks up the second shield.
After completing this mechanism, the bouncing energy ball mechanism will be triggered. The two players who picked up the shields need to form a triangle with the boss, bouncing the energy balls back to the boss, causing it to enter a weakened state. When the boss's health is reduced to 10%, it will enter a berserk state, continuously releasing full-screen AOE. Players should reserve burst or invincible skills before this happens.

If you want to know how to clear the Goblin Nest dungeon in Star Trace Resonance, today's content provides a more detailed tutorial. For new players, learning to clear this dungeon is quite necessary. I believe today's content will help you. Interested players, come to the game and experience it for yourself.
Recommend


Strategy

A Guide to Zhetian Fanchen Yiyue Sharing Tips for New Players on How to Play Zhetian Fanchen Yiyue
Introduction to the Public Beta Time of Zhetian Fanchen Yeyi When is the public beta for Zhetian Fanchen Yeyi?
How is Zi Yue from Zhetian Fanchen? Introduction to Zi Yue from Zhetian Fanchen
What are the Luhida Origin redemption codes? Sharing of Luhida Origin mobile game gift codes
Lu Xida Origin Team Recommendations Lu Xida Origin Team Guide
Lu Xida Origin Strategy Sharing: Beginner's Guide to Lu Xida Origin
