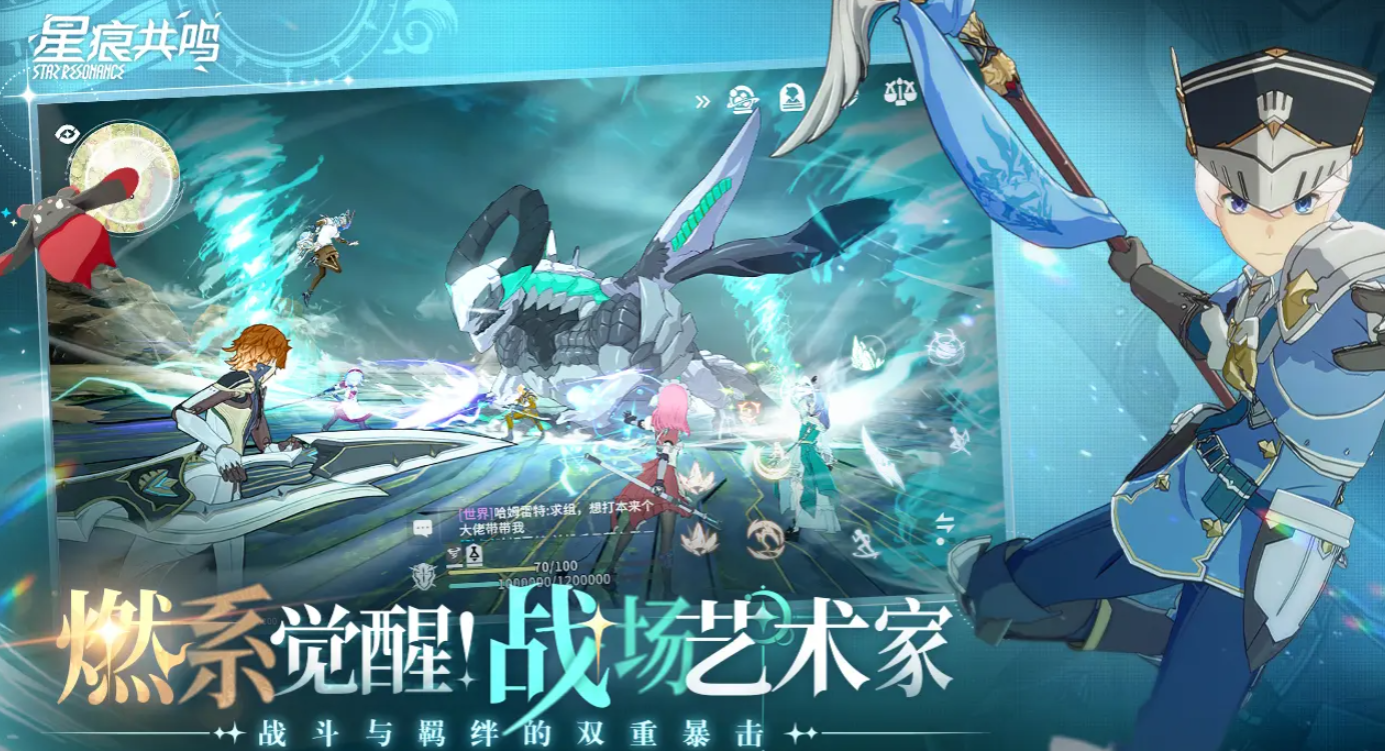
Air Hockey Challenge
Game Introduction


Hot Strategy
How to Clear the Star Trace Resonance Challenge Dungeon: A Guide to the Star Trace Resonance Challenge Dungeon
This guide brings you the Star Trace Resonance Challenge dungeon strategy. In this fantastic world, there are different dungeon challenges that not only hone your combat skills but also drop experience points, equipment, and other rich rewards. These are of great significance for your growth and becoming stronger. So, if you're a beginner who hasn't successfully passed yet, follow the strategies below to master the methods of clearing the dungeons.
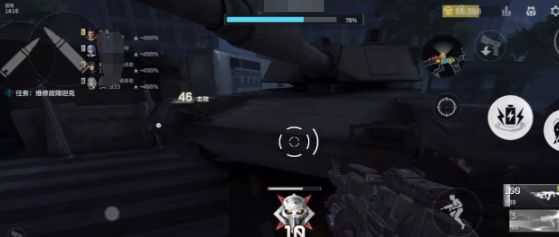
I. Goblin Nest
The elite monsters in the nest are stronger compared to those in other dungeons. The Fire Goblins have a wide range and high damage, while the Wood ones have a high healing amount. These two types of monsters need to be prioritized in battle. Compared to the minions, the boss's mechanism is more straightforward and brutal. Its first mechanism is the Thunder Ball. We need to eliminate the one with the elemental shield among the nearby minions, allowing the healer and tank to pick up two elemental shields. At this point, a randomly bouncing Thunder Ball will be triggered, which we need to guide behind the Goblin King to make it enter a weakened state. If unsuccessful, the Thunder Ball will explode, causing area damage, and it's almost certain death after being hit by this move, so make sure to communicate with your teammates in advance for guidance; its second mechanism is the Thunder Circle Rotation. At this time, the boss will divide the field into six parts, dealing clockwise damage to opposite areas. To pass, remember the trick: when the first circle appears on the ground, determine if you are within the range. If you are, jump clockwise because the lightning deals multiple hits, and jumping can effectively help avoid a lot of damage. After the damage ends, return to your original position. The final third mechanism is the simplest. Note that in the team, one DPS needs to face the boss directly, and the other needs to face away from the wind array behind the boss. This way, large-scale attacks won't form. Repeating this operation will allow for an easy clear.

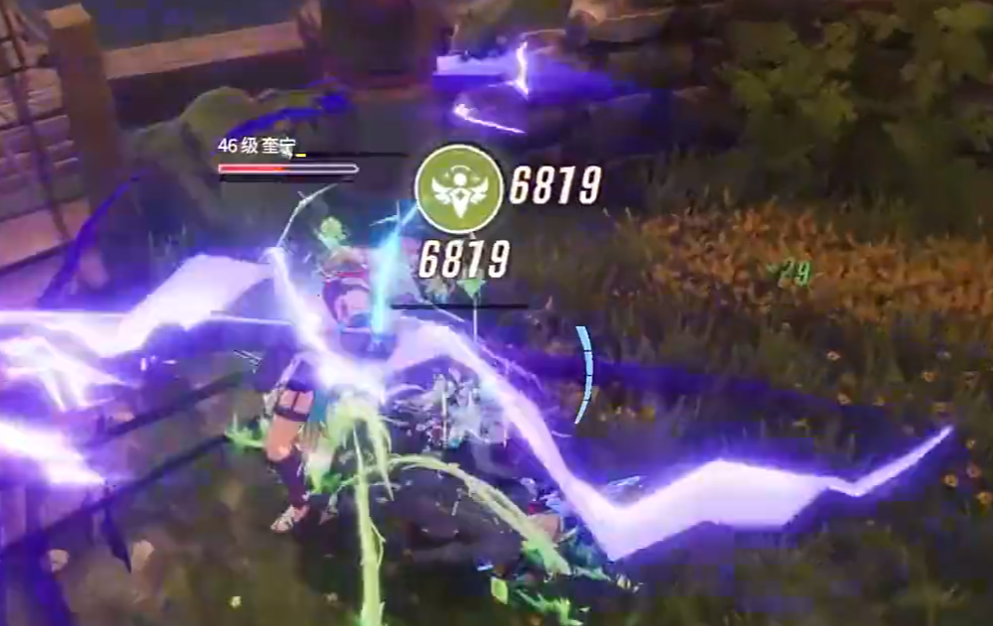
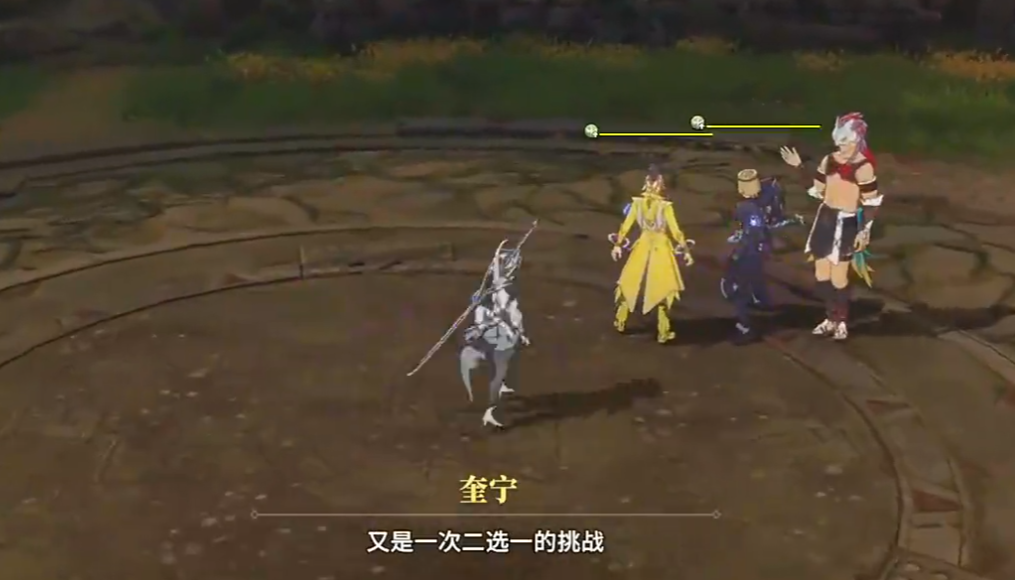
II. Kamanis Trial
Kamanis Trial is quite special as there is no running phase. You immediately face the elite monster Quinine upon entering. It has no particular mechanisms to deal with. The tank should attract the aggro at the front, and the DPS should avoid the large circles and focus on AoE damage. Then, you enter the first choice phase, where you can choose between Dark Radiance Dual Spirits and Storm Weaver. It's recommended to choose the simpler Storm Weaver, as Dark Radiance has troublesome displacement abilities, making it inconvenient to pull, and a slight mistake can lead to death. After defeating, you come to the second choice, which is either Will or Faith Trial;
Faith is slower but less likely to result in death. New players are advised to go for Faith, as long as you dodge the traps and have a tank to absorb the damage, you can pass. Those seeking speed and strength can choose Will, which requires escorting the warrior to the energy bar and killing all the minions along the way. Entering the boss phase, the boss's basic attack involves a sweeping strike with high damage. Remember not to output damage at close range. Melee characters can use dodges to avoid damage. After it summons the Soul Spear, first attack the spear until the third one is nearly destroyed, then use multi-hit skills or basic attacks to destroy them all. It will also perform a Soul Cut. Remember to place the soul far from your output to prevent being instantly killed by attraction.
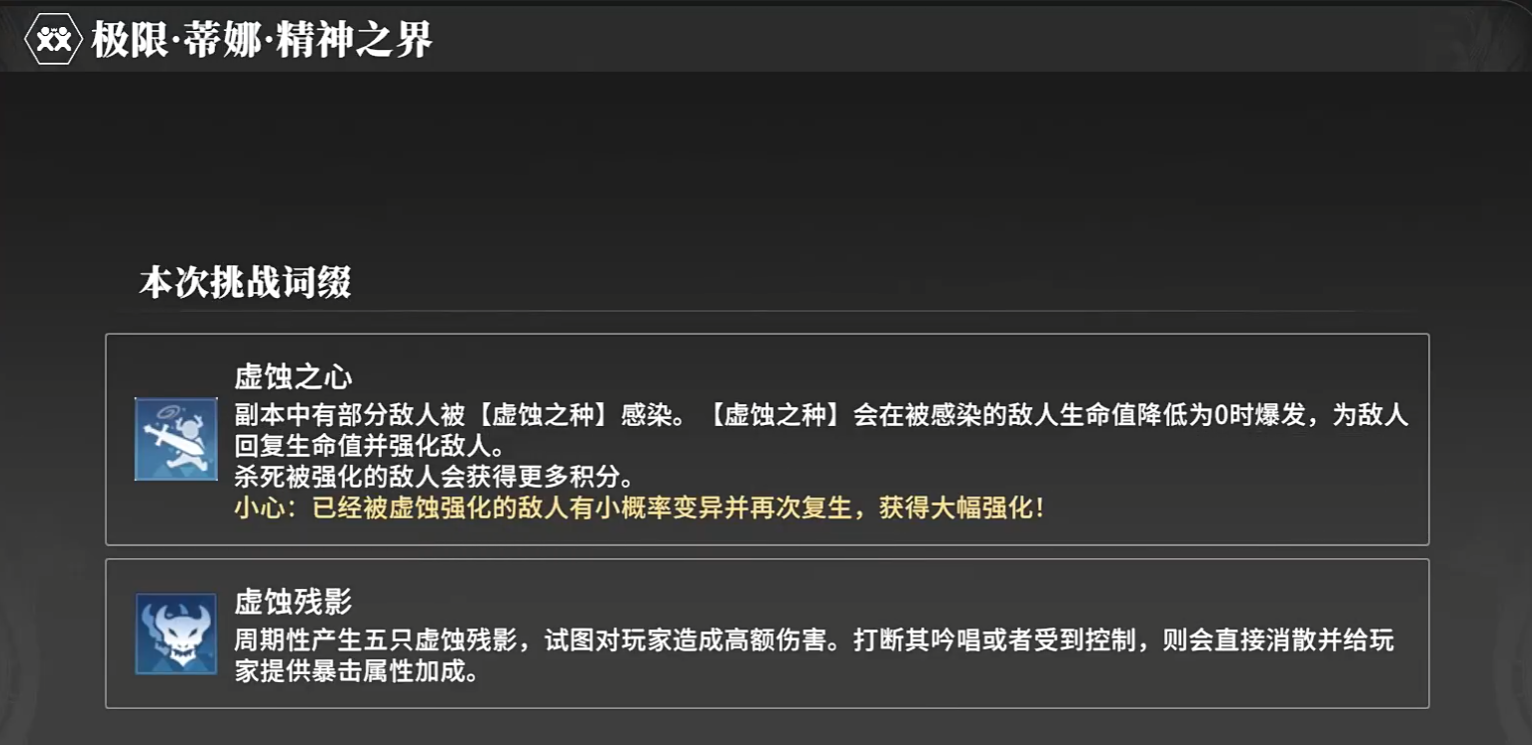
III. Tina's Spirit Realm
The recommended lineup for this dungeon is 1 tank, 1 healer, and 2 DPS. As long as this lineup is met, plus the ability to revive once, the difficulty is not high. Remember to pull all the minions to the elite's vicinity when playing as a tank. After attracting all the monsters, the DPS can then focus fire. If the tank's durability is insufficient, remember to dodge enemy attacks. Never step on the fire on the ground. When playing as a healer, pay attention to skill distribution. Use skills when the tank cannot withstand the damage. Players with a purple mark will suffer from tracking attacks. Pay attention to the timing to dodge. Then comes the boss, whose basic attack has a very noticeable pre-attack motion, making it easy to dodge. Other skills are also predictable and can be dodged. In the second phase, the boss will play a hide-and-seek game with us. Just teleport towards the cabinet on Tina's right hand. Be careful not to teleport too quickly, as the weapon's actual judgment range is large, and don't think about jumping over it.
That concludes the Star Trace Resonance Challenge dungeon guide. The different dungeons introduced above each have their unique mechanisms. Follow the strategies provided and coordinate well with your team, and you will surely defeat the bosses and obtain rich rewards to enhance yourself.
How to Play Ultraman Super Space-Time Hero Leader Challenge: Introduction to the Strategy for the Ultraman Super Space-Time Hero Leader Challenge
In this Ultraman-themed RPG action game, Time Hero, there are many unique and Ultraman-related gameplay features that have attracted countless players. Among them, how to play the Ultraman Super Time Hero Leader Challenge has garnered significant attention, becoming a popular choice for numerous players seeking ultimate challenges and showcasing their skills. After all, for characters in the initial stages of building up their combat power, challenging those overwhelmingly powerful leaders is much more enjoyable than repeatedly grinding through simple mission monsters.
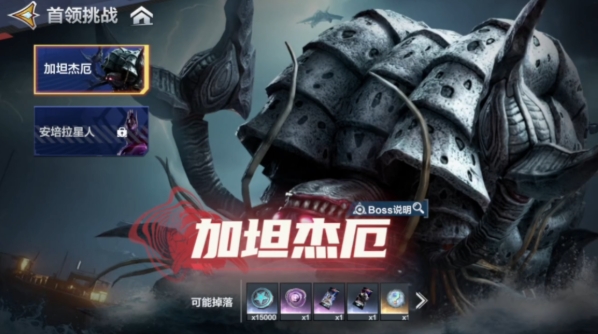
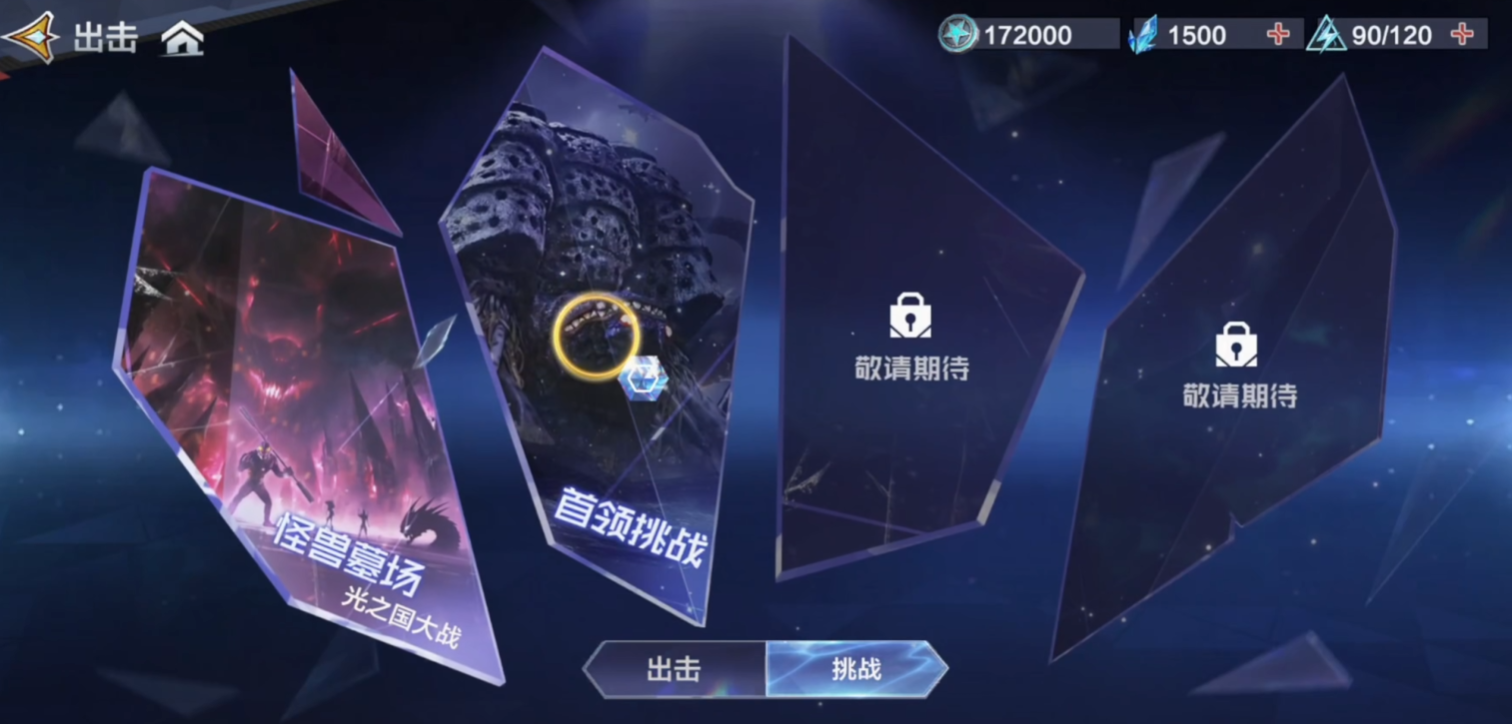
Participating in the leader challenge is not complicated. After entering the game, you just need to click on the prominent "Attack" option on the main page, then click on "Challenge." At this point, two distinctive gameplay options will appear before your eyes, with the second one being the leader challenge. As for the other unopened gameplay modes, they will be updated in subsequent versions, and at this time, players need to reach level 17 to participate. When a player clicks into the leader challenge interface, they will find two leaders available for selection to challenge.
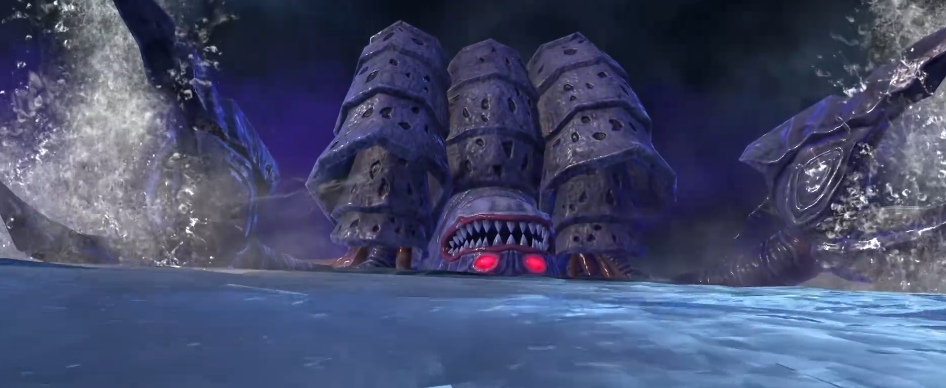
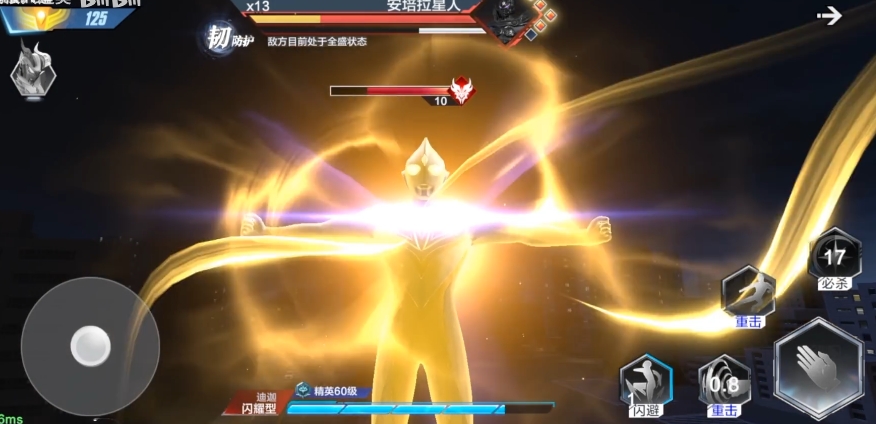
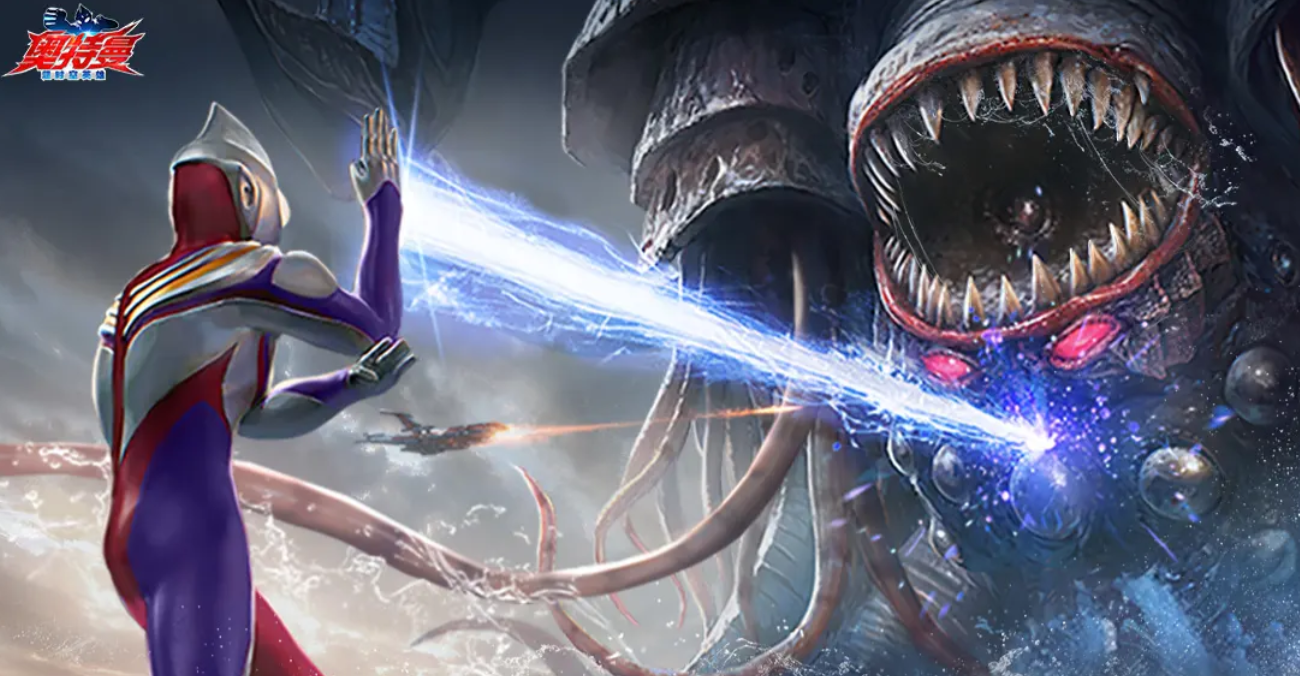
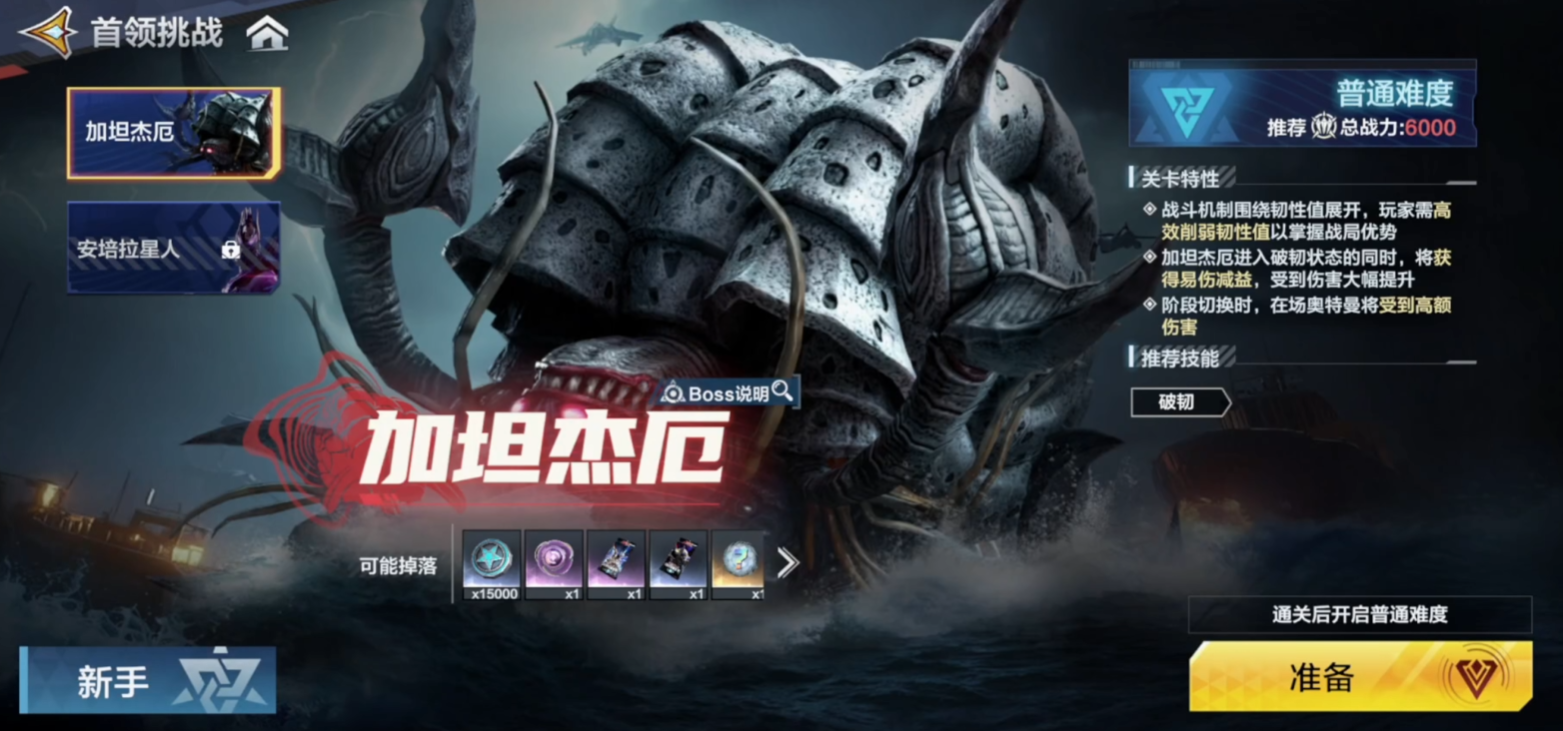
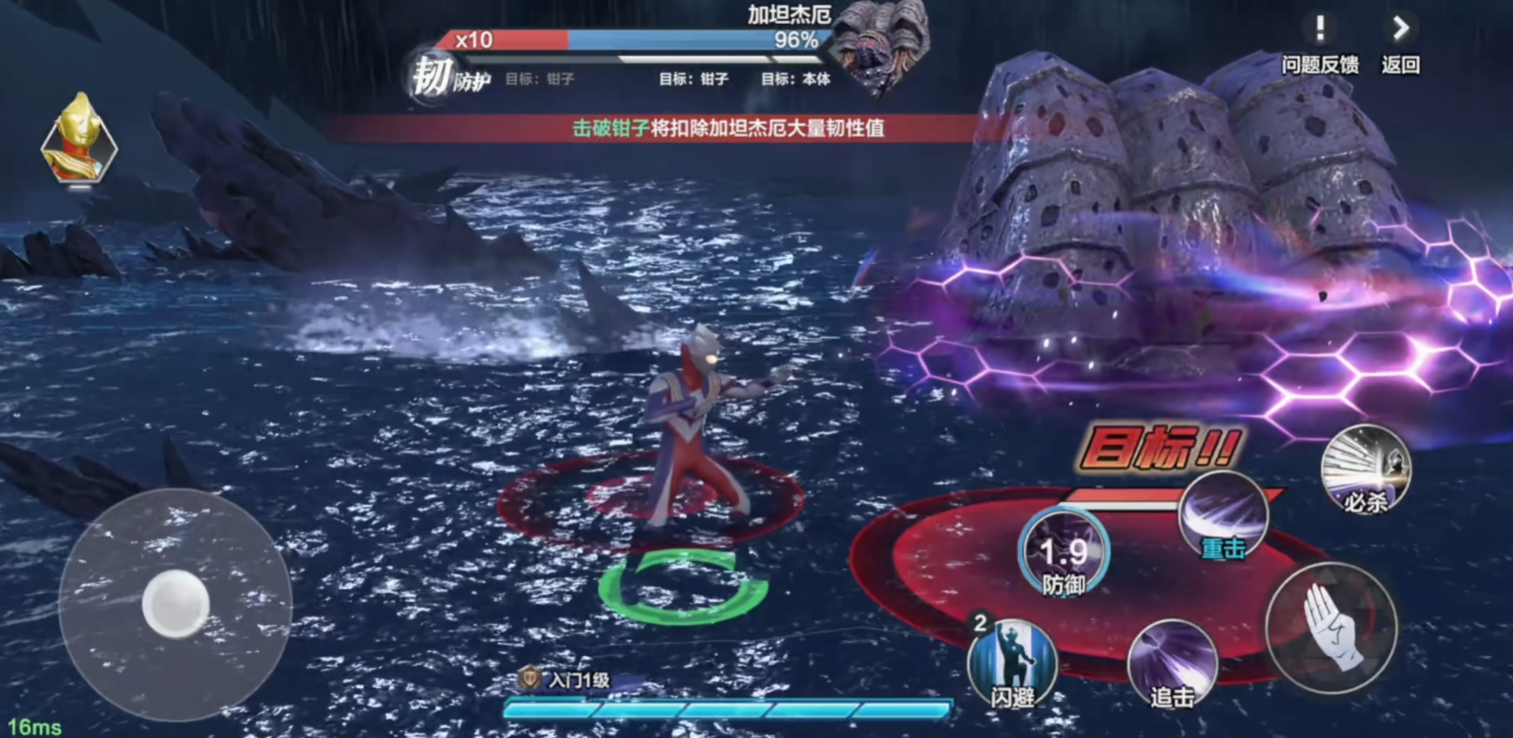
It should be noted that the unlock condition for the second leader is defeating the previous one. For example, the first boss, Gatanozoa, has a considerable difficulty level, and it's recommended that players reach a combat power of 6000 before attempting the challenge. Therefore, before the challenge, players might as well start from aspects such as character cultivation and equipment enhancement to comprehensively improve their personal combat power. Meanwhile, observant players will also notice that each level has its unique characteristics, such as this level which revolves around resilience value design.
Therefore, when choosing the Ultraman to fight, it's suggested to pick heroes with good resilience-breaking effects. The most recommended here is Shining Tiga, whose speed of breaking resilience is very fast, thus gaining the upper hand in battle. Once a player is determined to take on the challenge, they will enter a carefully prepared page. Here, due to the special restrictions of the level, players can only deploy one character at the beginning. However, with the continuous updates and development of the game, future leader challenges may open up more opportunities for character deployment, which will depend on specific changes and requirements of the game.
After everything is ready, the player just needs to click to go to the battle, officially starting the confrontation with him. It's worth mentioning that these bosses are much larger compared to the monsters in ordinary mission levels, and they also possess shocking full-screen ultimate moves. After successfully defeating the first boss, Gatanozoa, the player will unlock the next, even more challenging, high-intensity leader, Alien Empera. Facing such a powerful opponent, a reasonable role and tactical configuration become very important.
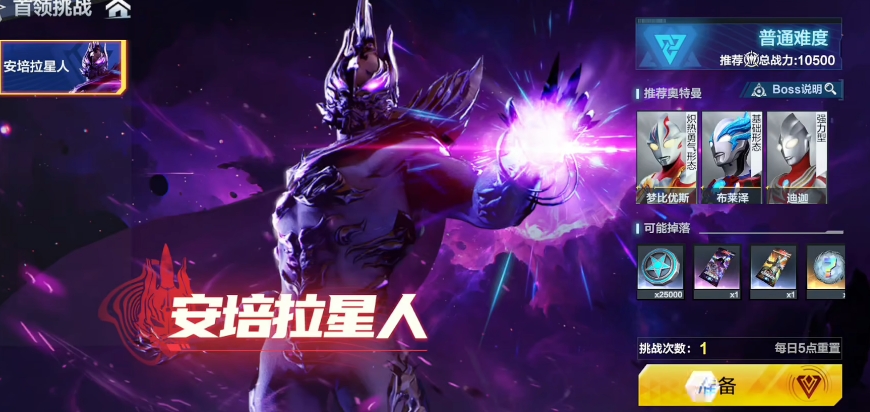
After all, Alien Empera has a lot of health and deals high damage, making it difficult to win with a single character. Therefore, it's recommended that players adopt a strategy of dual-character collaboration. A powerful combination recommended here is using Ultimate Zero as the main damage dealer, paired with Shining Tiga, which also has suppression and piercing capabilities. Then, perform the Phantom Sword Seven-Strike Combo, a series of connected skill combinations capable of reducing the target's health by about 1.2%.
At the same time, accumulate energy through regular attacks. When the energy bar is full, release the ultimate move, Ultimate Light Blade, which deals true damage based on 3.5% of his current health. Then, proceed with the combo loop: first, suppress - pierce - Phantom Sword, and finally, finish with a Light Blade. This output chain can gradually reduce Alien Empera's health to around 110 layers. When Ultimate Zero's energy is depleted, it's time for Shining Tiga to step in. Upon entering, Shining Tiga first uses the Shining Burst to break the enemy's invincibility, followed by the Shining Charge to knock back the target, creating favorable conditions for subsequent attacks.
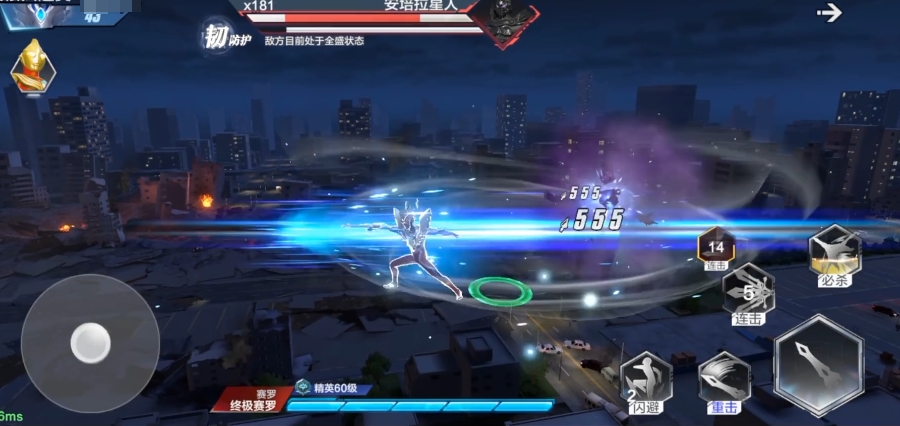
In the second phase, Shining Tiga should flexibly use the Shining Circular Shield to counter the enemy's area-of-effect skills, followed by the Shining Zepellion Ray for penetrating strikes. When the energy reaches a critical point, release the Shining Destruction AoE, thereby reducing the target's health from 110 layers to below 80. It's particularly important to note that when using a dual-character tactic, there are three key points to remember. First, Ultimate Zero should maintain a distance of three body lengths from the target during the attack to ensure the accurate release of skills and personal safety.
Second, when interrupting skills, Shining Tiga must accurately predict the 0.7-second pre-motion of Alien Empera and prepare for skill release in advance. Third, when the target's health is below 50 layers, Alien Empera will enter a berserk state; at this time, it's essential to save the Shining Form Shield to counter its frenzied attacks. So, this meticulously designed tactic not only works well against Alien Empera but is also practical when facing other high-difficulty leaders. Of course, to truly unleash the maximum power of this lineup, players need to continuously train according to the skill cycle.
This concludes the introduction on how to play the Ultraman Super Time Hero Leader Challenge. If players are ready to challenge these bosses, they can carefully review the leader challenge gameplay introduced in this article. Currently, only these two leaders are available, but more challengable leaders will be added in later updates after the game's official launch.
How to Play Ultraman Super Space-Time Hero Leader Challenge: A Guide to the Gameplay
As an Ultraman-themed RPG action game, Time and Space Hero has some unique gameplay, especially regarding how to play the Ultra Time and Space Hero Leader Challenge? Since everyone's goal is naturally to challenge even stronger entities, if it were just about defeating some simple mission monsters, it would seem not much fun. Therefore, the leader challenge gameplay was born. Next, I will teach you how to play.
If you want to experience the leader challenge, you can click on the sortie option on the game's homepage. Then click on the challenge, and two modes of play will appear, the second one being the leader challenge. As for the unopened mode, it may appear in later versions, so you can look forward to it in advance.
After clicking in, you'll see two leaders that you can challenge. The second leader requires you to defeat the previous one before unlocking, so you can start with the first boss - Gatanozoa. It is recommended that your combat power reaches 6000 before challenging this level, so players can start by improving their character, equipment, etc., to enhance personal combat power.
Before attacking, you can also check the characteristics of the level, such as this level revolving around resilience value. So, try to choose Ultramen with high resilience-breaking efficiency, like Shining Tiga. As long as the attack speed or frequency is high, the resilience-breaking speed will naturally be fast. After deciding to challenge, you can enter the preparation page; finally, cultivate your character well, and then come to challenge, it's never too late.
During the preparation process, due to level restrictions, only one character can be deployed. However, subsequent leader challenges might allow adding other characters, which depends on future changes and requirements. Afterward, click "Go to Battle" to start the fight. The boss's size is larger than in mission levels and can release full-screen ultimate moves. You can do your best to attack, and after defeating it, you will clear the stage and receive the first victory reward.

If you are preparing to challenge a more powerful entity, you can check out how to play the Ultra Time and Space Hero Leader Challenge. The gameplay of the leader challenge is not as complicated as imagined; as the name suggests, it's a place for you to challenge leaders. It reduces the lengthy process of clearing stages, allowing you to directly challenge the boss.
How to Clear the Future Challenge Dungeon in Contra: A Guide to the Future Challenge Dungeon in Contra
War of the Future not only has exciting player versus player battles, but also many PVE battles, such as story challenge dungeons, which can be understood as story levels in shooting games. This helps everyone understand the game's world setting and also serves as a kind of tutorial. So how do you clear the War of the Future challenge dungeons? Below, we will share the War of the Future challenge dungeon guide, telling you what to pay attention to in this story dungeon.
Preface:
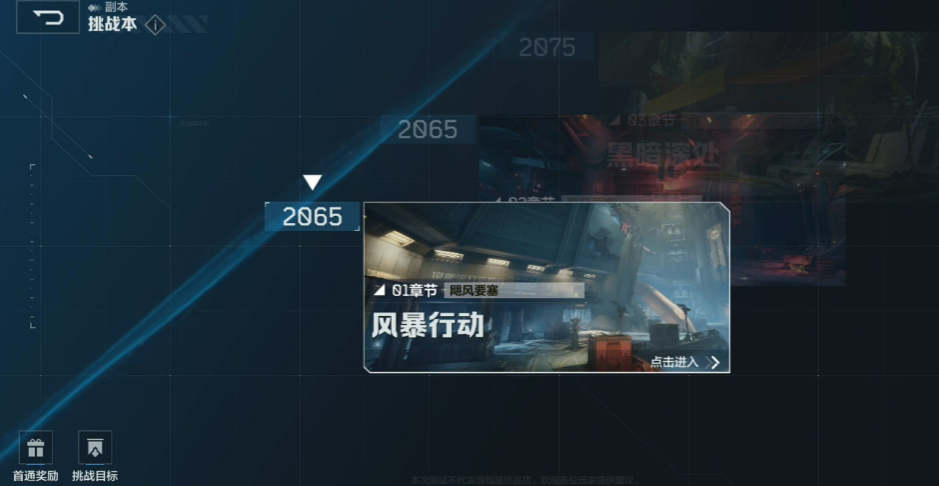
There are currently five major stages in the story challenge dungeons: Storm Operation, Morome's Gate, Depths of Darkness, Jade Ruins, and Shattered Sky. The entire process is basically about delving into a certain place, clearing out the enemies there, and only after clearing them can the blockade be lifted. Sometimes, you also have to "defend Athena" and wait for reinforcements. The whole process is mostly linear, with no complex puzzle elements, so the story dungeon challenges are not too difficult. They mainly help everyone get familiar with the use of firearms and mechs, informing players about some operational settings in the game. Once learned, you can freely play. Therefore, this time, we will share more about enemy mechanisms and ways to deal with them, so after reading, you'll know how to operate.
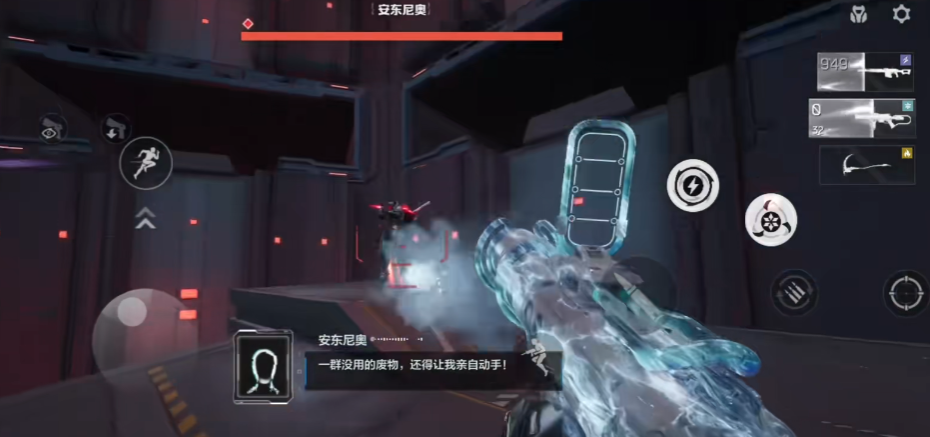
Chapter 1 boss: Antonio
In the boss battle scene, there are constantly falling elevators, and the boss hovers in the air, firing red energy balls. He can also teleport within the scene, release self-destructing drones, which can be dealt with using grenades, or if your aim is good enough, with guns. Sometimes he deploys suppressor cannons; compared to the boss himself, the units he summons pose a greater threat and should be prioritized.
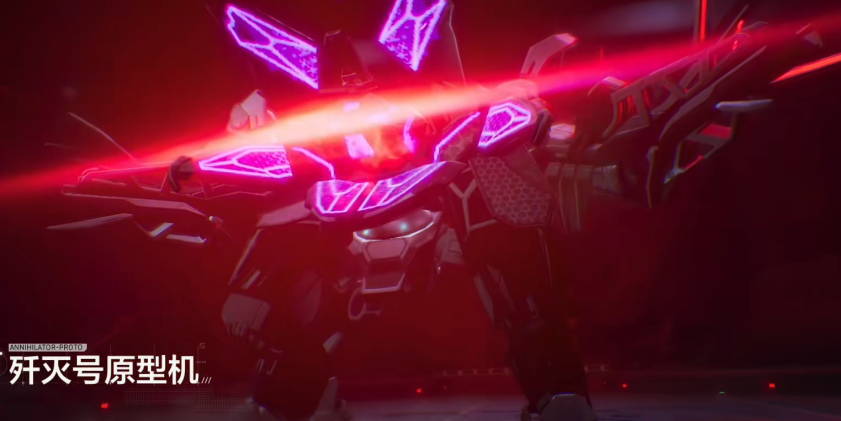
Chapter 2 boss: Annihilation Prototype
A super large and powerful mech, despite its size, it moves very quickly, using a red teleportation array to instantly move around the battlefield, then unleashing firepower in all directions. After teleporting close to the player, it will lift its right (left) foot and kick towards the player. At this point, dodge to the right (left) while shooting. The boss will also throw several green devices on the field, which continuously damage the surroundings, followed by a dense barrage of red projectiles. If you can't dodge in time, you can jump to avoid them. The boss's health bar has a layer of white armor, which must be broken before significant damage can be inflicted.
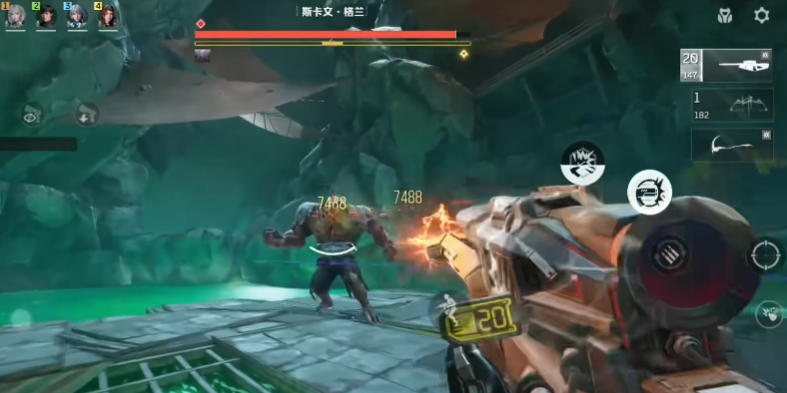
Chapter 3 boss: Rampaging Body
A very tough crystalline humanoid monster that starts by jumping and slashing at you. It then emits green energy waves around itself, jumps again, and slams down, creating an AOE damage zone on the ground. You need to retreat and jump in time. There will be many small monsters on the field that need to be cleared promptly, otherwise, it will be hard to handle. However, after clearing them, the boss will create new ones. It's recommended to use freeze bombs to limit the movement of the small monsters, freezing them and then retreating while attacking. Additionally, use grappling hooks to move quickly around the field.
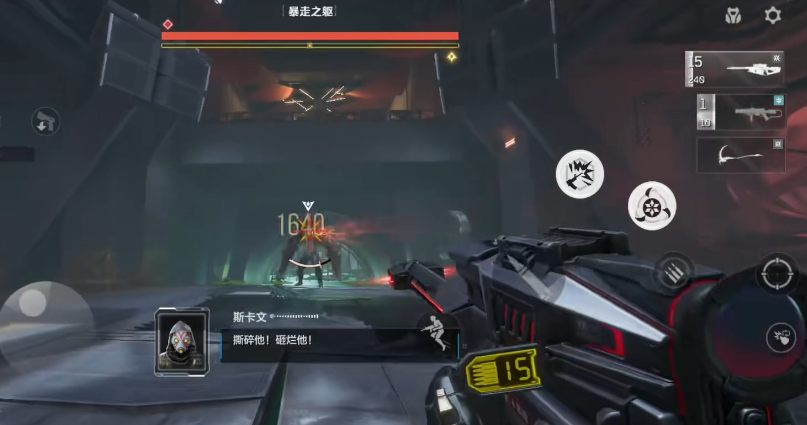
Chapter 4 boss: Skaven Gran
A giant muscular monster that bursts out of the ground and smashes the ground, looking very imposing. Its attack methods are also very brutal, such as slamming the ground with one hand or jumping and smashing with both hands. When fighting this boss, you can use NPCs to attract the enemy's fire while you attack from behind. However, the NPCs won't last long, and once they fall, the boss will turn its attention to the player. Overall, this boss is relatively easy to deal with, as it has a noticeable and long wind-up before each punch. Be particularly cautious of its red-light shielded charge attack.
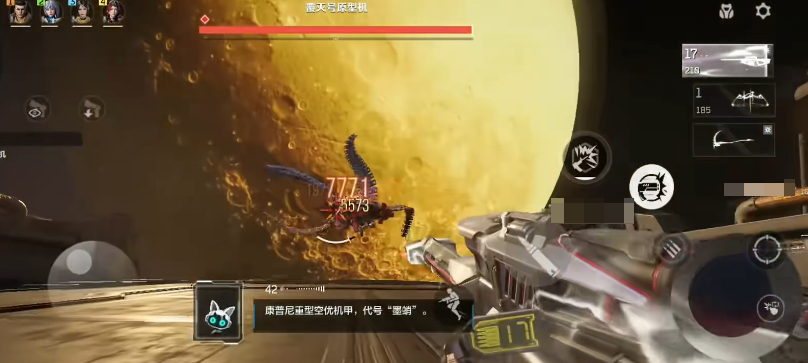
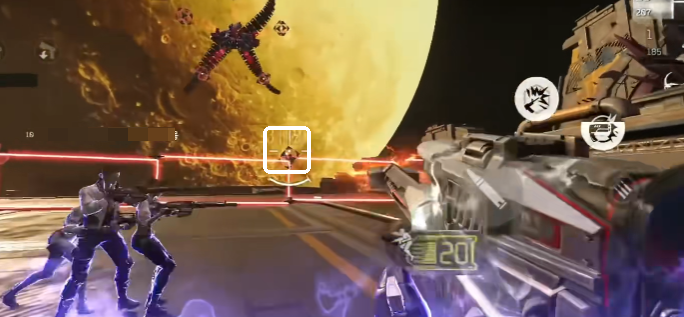
Chapter 5 boss: Annihilation Prototype
A boss with four mechanical ribbons, it releases slowly expanding multi-segment laser rings, which spread slowly and are relatively easy to dodge. However, due to the low perspective, it can sometimes be difficult to determine the right time to jump. It also opens a sky net that slowly descends, accompanied by a continuous stream of projectiles and long-lasting lasers. Above the laser matrix, there is a square device. Attacking this device can create a gap in the laser matrix, making it much easier to dodge.
The above is the related content of the War of the Future challenge dungeon guide. Currently, there are only these five stages in the story dungeons. The process before the boss fights is relatively simple, with only the boss fight sections being more challenging. However, as long as you follow the above guide to counter the boss's attacks, and if you really can't beat it, invite teammates to challenge together, it will be much easier.
How to Play the Future Challenge Instance in逆战未来挑战副本怎么玩 逆战未来挑战副本玩法指南 It seems there was a misunderstanding. Here is the correct translation: How to Play the Future Challenge Instance in NZ (逆战) - A Guide to the Future Challenge Instance Gameplay
When players experience the game, they often feel confused when encountering challenge dungeons, not knowing how to proceed. How should one play the future challenge dungeons in Contra? Players can read the following introduction to understand the specific gameplay. After mastering the techniques, they can also smoothly clear the levels; there is nothing too complicated about it, and I hope everyone can understand.
The dungeon being introduced today is the Dark Easter. Players can use the passive floating method to enter the first level at the speed of light. If you want to save time on the first level, naturally, you should go around from the fan on the side. You can also directly jump over at the scythe location.
If defeated in the second level, you can choose to organize an assault team, rush down without triggering traps. Directly choose to pull the switch and walk back. There are not many complex operations for players in this level; just pay attention to the details, and you can successfully pass through. Even newcomers can pass.
When entering the third level, there are multiple different methods. Even with the worst setup, you can first investigate the battlefield. Place all the containers together to form a passage.
When entering the fourth level, teammates are mainly responsible for fighting the bugs, while you should choose to run away directly. This place might have been a weapons lab before, so players need to be careful during the process.
How to play the future challenge dungeons in Contra? In this dungeon, players will see multiple different levels. Each different level has some difficulty when challenged. Players can effectively improve their chances of success by following the above tips.
Detailed Explanation of the Public Beta Timing for the Great Decompression Challenge: When Will the Great Decompression Challenge Be Released?
Relaxation Challenge is a casual decompression game that can help us relax our tired body and mind, and enjoy a relaxing and pleasant time. The following detailed explanation of the public test time for Relaxation Challenge is what I've organized for everyone today. You only need to refer to this guide to easily understand the public test launch time of the game, and it will also help you master the gameplay features. Come here and take a look.
>>>>>#Relaxation Challenge#<<<<<
This game officially received its license in March, which means it will have a long development process in the future. The official has not yet announced the public test and launch time, but if you want to experience it, you can now pre-register for the game. Clicking on the link above will allow you to complete the reservation quickly. Reserving has many benefits; it can help you keep track of the game's update progress at any time. For example, when the game launches later or releases new content, you can stay informed, and you can also download the game through the link, which is relatively simple.
This game mainly focuses on decompression, where players need to complete various challenges, such as eliminating blocks, breaking bottles, etc. The ultimate goal is to release their own stress. The game not only has a clear and concise visual content, but the controls are also quite simple, suitable for players of different age groups. The visual design is also quite exquisite, giving us a refreshing feeling, with bright colors, which is very friendly for relieving pressure.
Moreover, the duration of a single game session is very short, so we can play a round during our spare time, easily releasing stress and bringing players the joy of decompression. Even if you have never played such games before, you can get started easily. The interface will have various challenge tasks, and players just need to complete them according to the tasks. This allows us to easily release pressure and relieve our mood during the challenge.

That's all for the detailed explanation of the public test time for Relaxation Challenge that I've brought to you today. Everyone can look forward to it, and once the game starts the public test, you can participate and try it out. It will help us better release our pressure.
Code Name Kill Newbie Challenge Introduction and Strategy Guide Explanation
Code Name Slaughter is a card game that many players have mentioned recently. The gameplay isn't particularly difficult to get into. However, acquiring it does require some effort. Overall, the game leans towards PVP and has a very high level of playability among current games. Below is an introduction to the Code Name Slaughter beginner challenges. Many players do not know much about the beginner challenges, which is why they ask online.
The difficulty of the game's beginner challenges is actually quite low; this is mainly to help players become familiar with the basic operations and the functions of the cards. In the first stage, the enemies we face only have two health points, and players need to work with their teammates to attack both sides simultaneously. Then, in the second round of the game, by coordinating with equipment cards, you can take out all the enemies, after which you can move on to the second stage.
Starting from the second stage, the difficulty will begin to increase. Essentially, we need to defeat the enemy within one turn. When dealing with this, in addition to checking the skills of both our and the enemy's generals, we also need to pay attention to the weapon's skills. In many cases, we need to use the weapons to defeat the enemies.
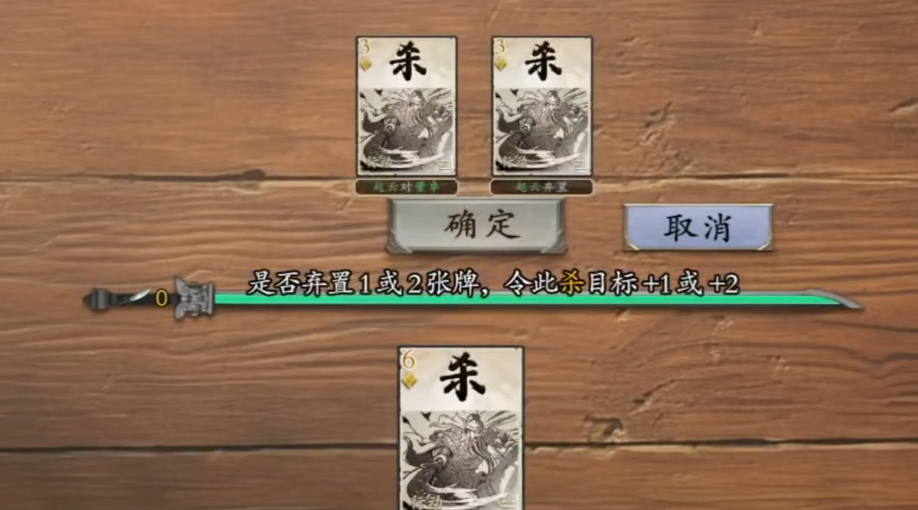
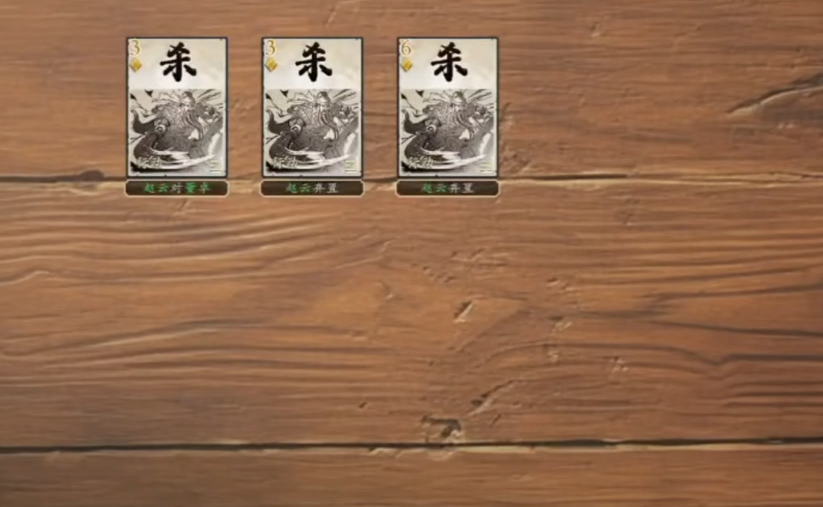
For example, in the beginner challenge against Lü Bu, many players choose the Zhuge Repeating Crossbow for continuous attacks to defeat him. However, in reality, choosing the Zhuge Repeating Crossbow doesn't provide enough "kills," and since Lü Bu has the Black Tortoise Shield, players cannot defeat him.
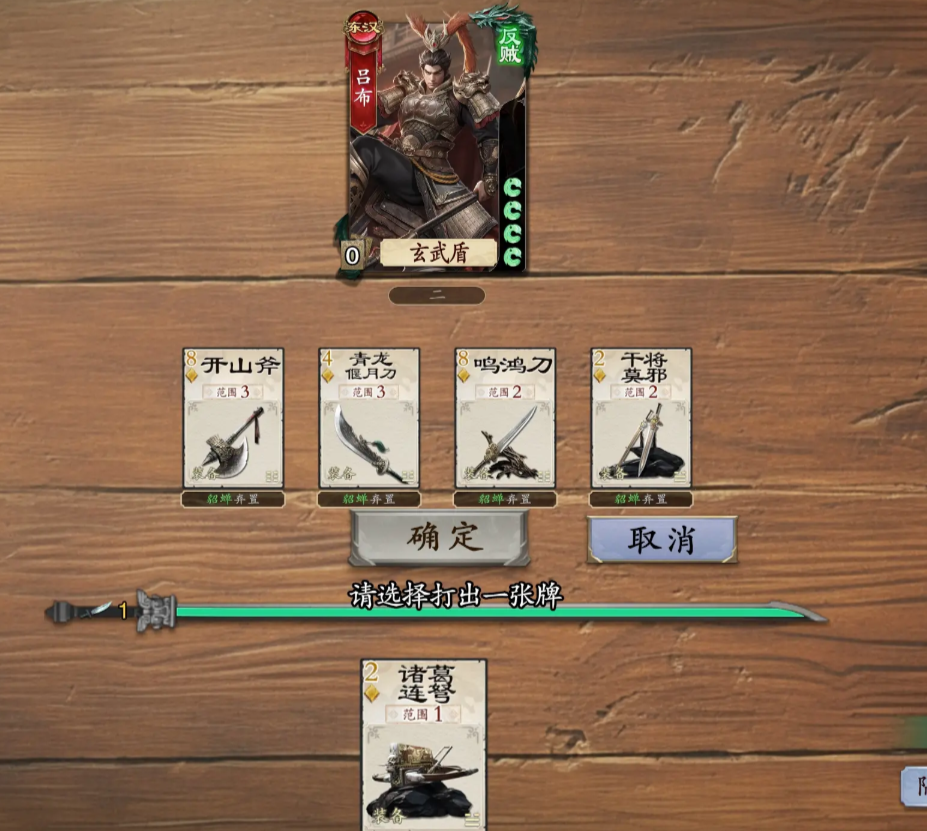
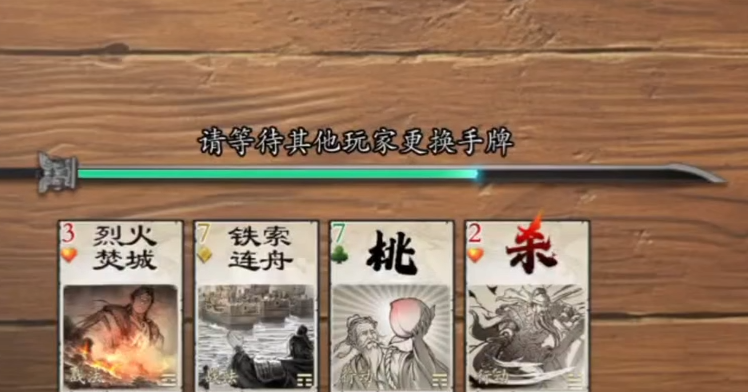
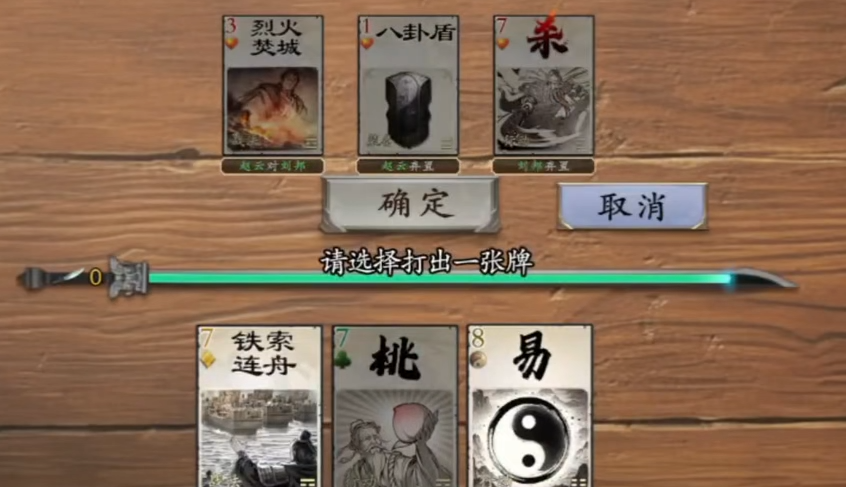
First, we need to select the Long Spear, which provides 2 "kill" cards. After that, we need to equip two "kill" cards to counteract. Next, ignore the armor-piercing sword, then discard cards to gain increased damage, and finally, pass through.
The above is an introduction to the Code Name Slaughter beginner challenges. Except for the first stage, the difficulty of each subsequent stage in the beginner challenges is not low. If players want to pass smoothly, they will need to put in some effort, carefully examining the conditions and given cards for each stage.
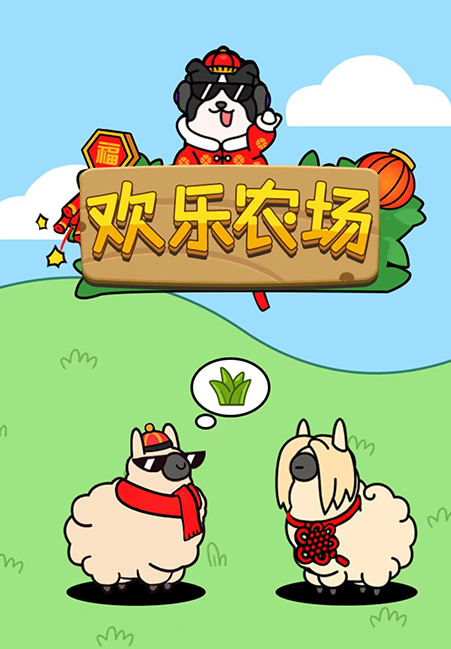
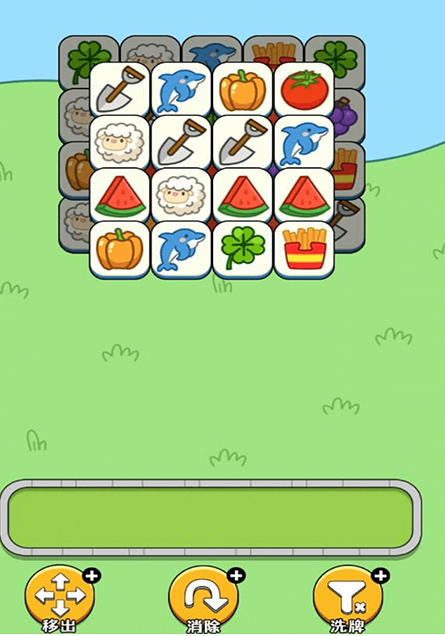
When is the public beta test time for Happy Farm Challenge? Prediction of the release date for Happy Farm Challenge
Joyful Farm Challenge is a farm management game where players can take on the role of a farmer, raising various types of animals on the ranch. At the same time, they can use a match-3 mode to level up the farm's creatures, accelerating the overall breeding process. Therefore, some people may ask when the public beta of Joyful Farm Challenge will be. Here, I'll provide an approximate release date and gameplay for Joyful Farm.
【Joyful Farm Challenge】Latest Version Reservation/Download Address
》》》》》#Joyful Farm Challenge#《《《《《
Joyful Farm Challenge integrates match-3 and simulation management gameplay, which is relatively leisurely. The estimated release time of the game should be around July to August 2025. Once the game officially launches, players can join the farm and start working.
The art style of the game is quite simple, basically a small ranch with many cute animals. Players need to take care of the daily diet of these animals, thereby earning substantial funds through breeding and selling, enhancing the commercialization of the ranch, and even creating a premium ranch.
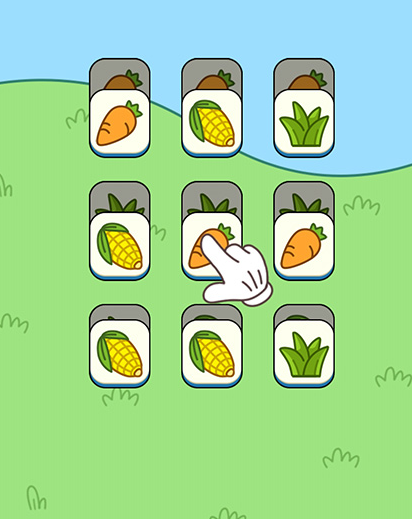
During the breeding process, players mainly complete a series of activities through match-3, such as feeding. They can directly match-3 food patterns, so all the animals can get food without needing to click on each one individually. Almost all daily activities can be done through match-3, making the overall gameplay very easy to pick up.
Moreover, as more tools are provided through match-3, the animals will also give extra rewards, such as exclusive tools to increase their production speed. Players can also earn diamonds to unlock more advanced species, thus getting better feedback, emphasizing a leisurely experience.
When the ranch's economy reaches a certain level, you can expand your farm and the variety of animals. This will significantly increase the resources you can obtain from daily logins, and there might also be random items dropped, which can be used to make goods and exchange for high-level items.
Currently, this is all the information I have about when Joyful Farm Challenge will be released. The overall difficulty of the game is very low, and most daily activities can be completed directly through match-3. The art style is also simple and comfortable. Players who enjoy simulation games can give it a try!
How to Tackle the Ore Vein Challenge in Epoch of Galaxies: A Guide for the Ore Vein Challenge
In the Era of Stars, there are four different ways to obtain resources. Among them, the most important way to get city-building resources is through mine challenges, which are crucial for upgrading and building various structures. For players who haven't unlocked this feature yet and want to learn more about it, the following will provide a detailed introduction to this gameplay, as well as some tips on how to play more steadily!
I. Introduction to Mine Challenges
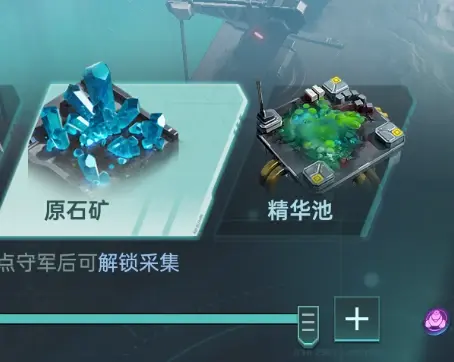
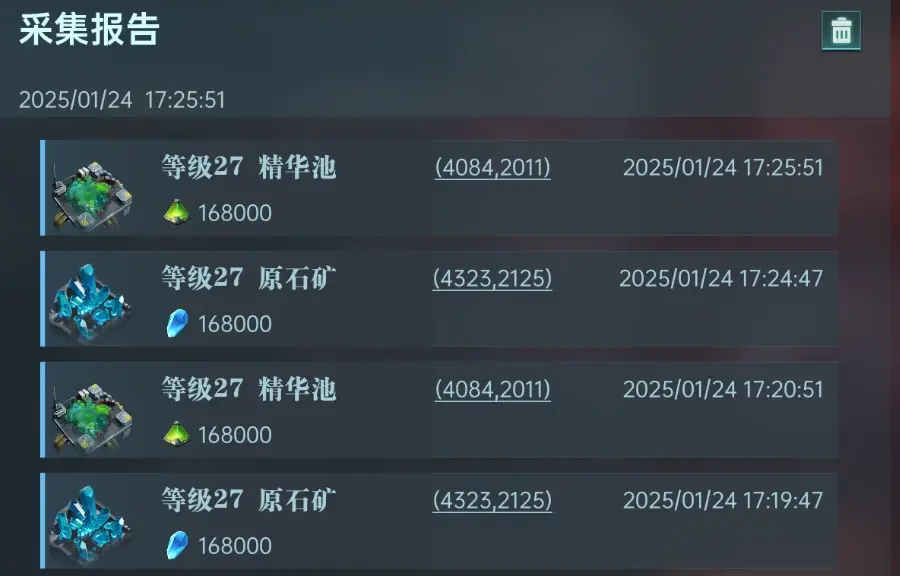
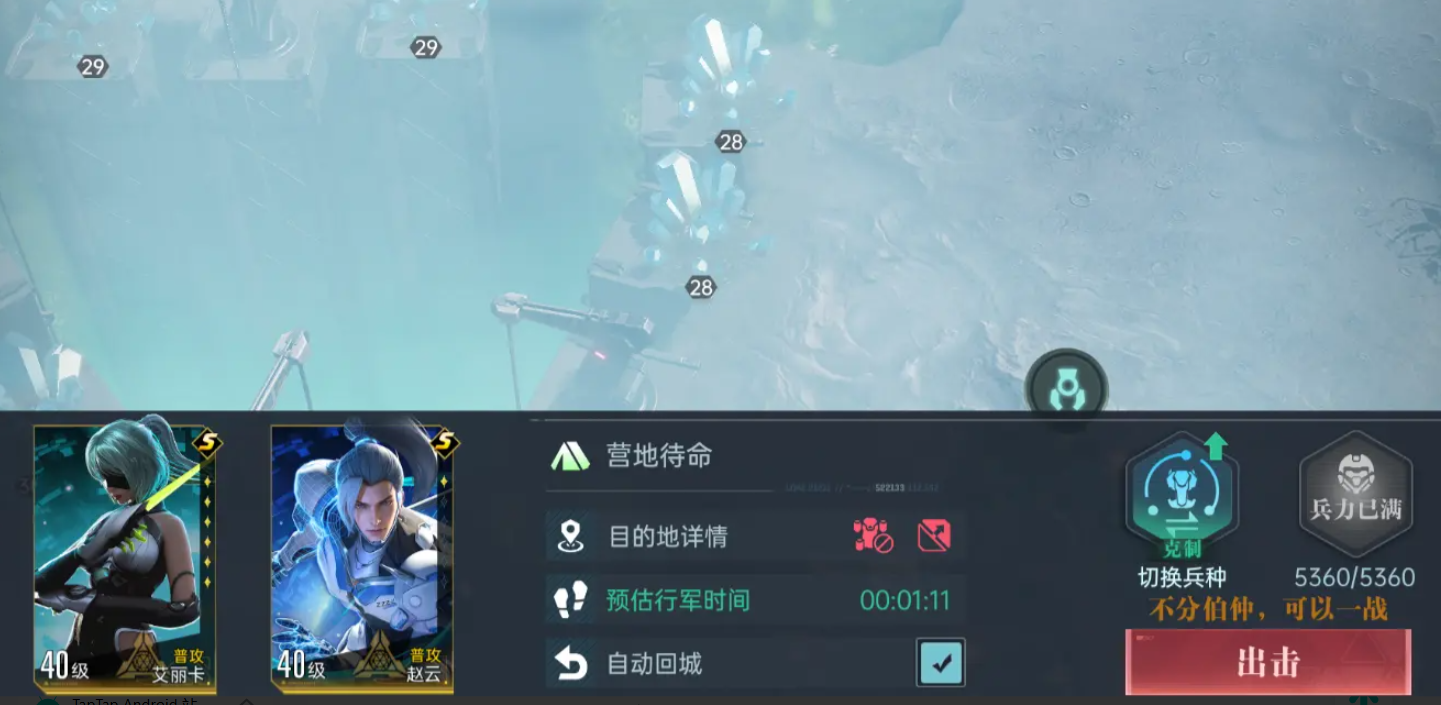
There are two types of mines in the game: the first type is called Original Stone Mines, and the other is Essence Mines, producing original stones and essences respectively. Both are essential resources for upgrading different buildings later on. The mines have different levels, and you can only unlock the next level by defeating the current level's guards. The higher the level, the more resources produced per challenge, and correspondingly, the stronger the guards. Each mine challenge is a one-time battle that does not consume your real troops, but also does not support relay battles; only one team can be dispatched to decide the outcome in one round. If you fail to challenge the next level, you can directly sweep the current level's mine, with each collection taking five minutes.
II. Strategy Guide
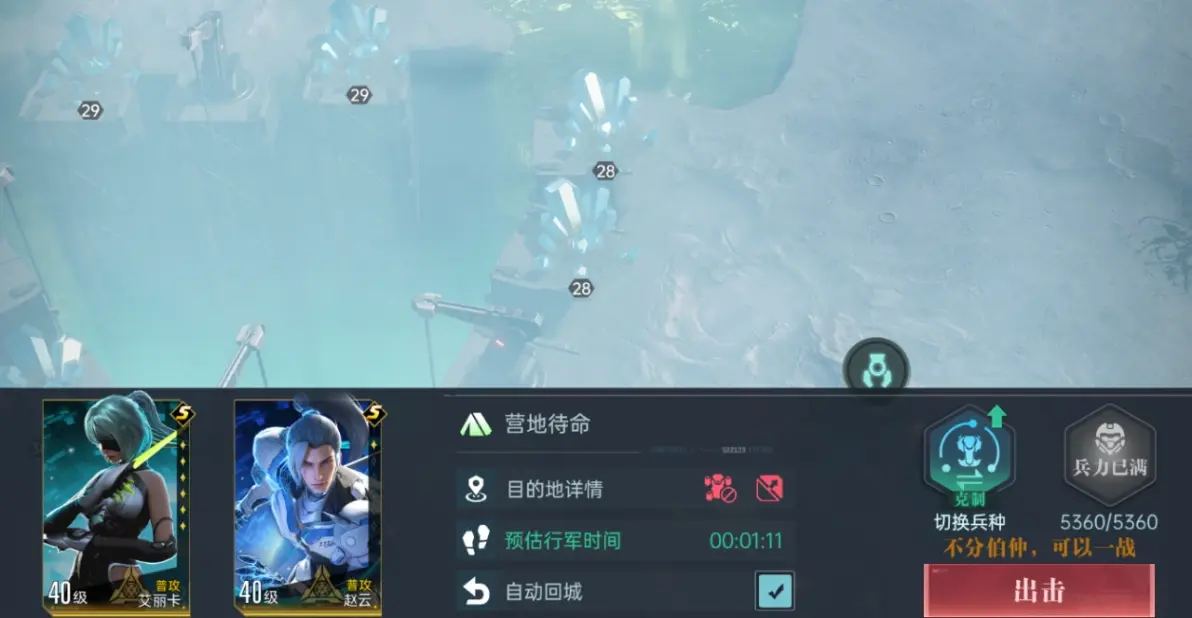
Firstly, since mine challenges do not consume troops and you only have one chance, it is recommended to send out your strongest team to ensure victory over the guards. After level 20, each subsequent level significantly increases in difficulty. You can first open the corresponding mine to see the type and specific strength of the stationed guards, then choose the troop type that can counter them, which will greatly increase your chances of winning. Under a counter relationship, even if the dispatched force has a slightly lower combat power than the guards, there is still a good chance of winning.
Secondly, when challenging, try to choose mines that are closer to your base. This reduces the marching time when dispatching troops, avoiding being ambushed by malicious enemies. Additionally, if possible, activate the monthly and weekly cards, which significantly reduce the time required for resource collection. This not only improves development efficiency but also prevents attacks from opponents' main forces. You can also send your own teams to raid those who are currently mining, allowing you to acquire more resources faster.
The above content introduces how to play the mine challenges in the Era of Stars. This challenge must be completed daily, especially on servers where wars are frequent. Accumulating more resources quickly allows players to establish a foothold. Those who haven't started yet should hurry up and begin!
Era of Stars Map Challenge Guide Introduction to Era of Stars Map Challenge Gameplay
In the game, apart from the daily city sieges with the alliance, participating in the Epoch of Stars map challenges is also a crucial part. It is the main source for players to obtain various key resources, which can be used for city construction or equipment later on. However, many newcomers may not be very familiar with the challenge gameplay. The following content provides an analysis of the challenge gameplay to help everyone gain a comprehensive understanding and acquire more resources.
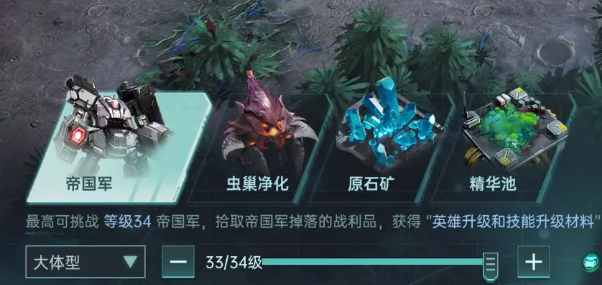
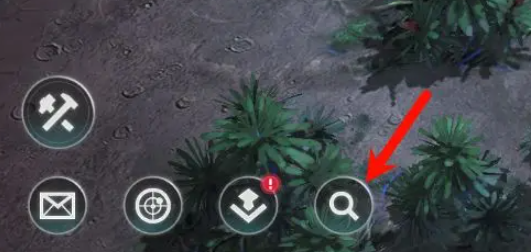
I. Challenge Categories
The map challenge gameplay can be found by clicking the magnifying glass icon at the lower left corner of the main interface. Currently, there are mainly 4 types: World Boss, Ore Veins, Nest Purification, and Imperial Army Challenge. Among them, the first one, the World Boss, has a relatively unique challenge method that requires opening the map to view.
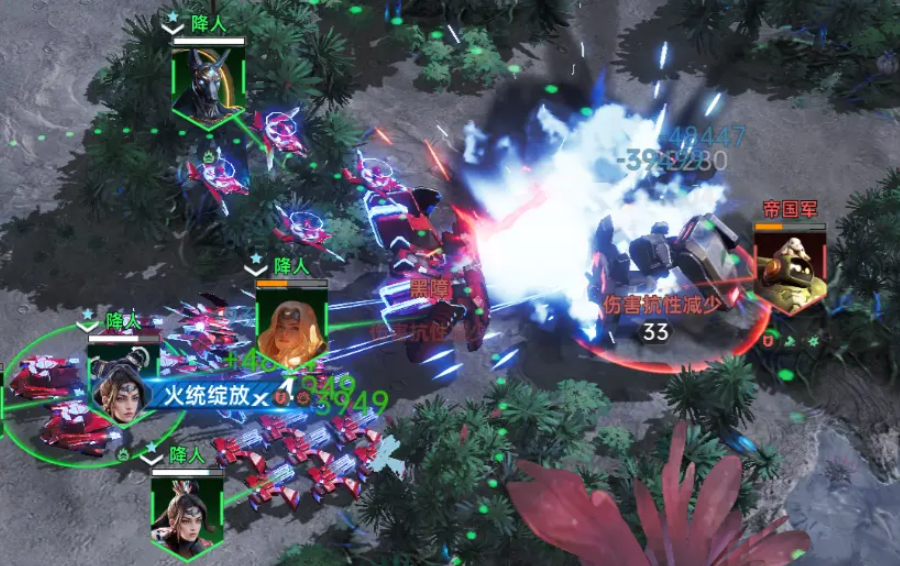
II. Imperial Army Challenge
After clicking in the challenge interface, an Imperial Army of the corresponding level will be generated near your base. Since you can choose different sizes of the Imperial Army before entering, you can select based on your troop situation. For example, directly choosing a size that your troops have an advantage over can significantly increase the success rate of the challenge. After successfully defeating the enemy, you can obtain Imperial Army loot, mainly experience potions and primal energy crystals. The higher the level of the enemy, the more resources it drops.
Note that the loot here needs to be manually picked up, and picking up each item consumes 1 point. This point recovers 1 every 90 minutes, and once all points are consumed, you cannot pick up anymore. After successfully completing the challenge of the previous level of the Imperial Army, you can unlock the next level. Additionally, when challenging, all teams can participate, and allies can also be invited. This means if you get stuck at a certain level, members within the alliance can provide assistance, which not only increases the success rate but also helps reduce the consumption of military supplies.
III. Nest Purification
The Nest Purification challenge is similar to the Imperial Army, but with a higher difficulty. A nest consists of multiple enemies, making it difficult for one person to defeat alone, so it's best to gather helpers to challenge together. The purification is divided into 4 levels, and you can choose the corresponding challenge. Each level has a fixed refresh area, and you need to relocate your base to the corresponding area to start.
For example, level 20 only refreshes in the areas of Watch, Barrier, Dawn, and Navigator, so you must relocate yourself. After successfully completing the purification, you can obtain reinforcement materials such as quantum alloy, and chests will also drop. These can be picked up by all members of the alliance. The chests contain random equipment, and opening them requires a key, which can be purchased from the alliance store or obtained by accumulating online time daily through the material collection page in the activity space. This challenge is the main way to obtain equipment in the early stages, so if you lack equipment, you should definitely give it a try.

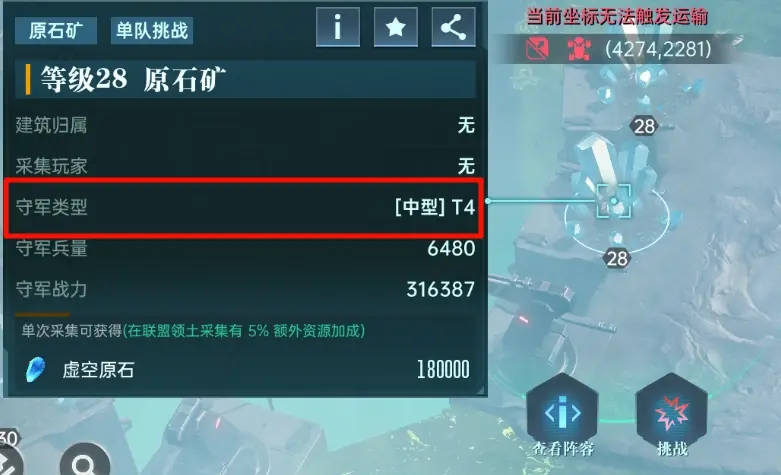
IV. Ore Vein Challenge
The Ore Vein Challenge is divided into two types: Raw Stone Mine and Essence Pool. Both play similarly to the Imperial Army, where completing the previous level unlocks the next. However, the rewards are completely different. The Raw Stone Mine rewards Void Stones, while the Essence Pool rewards Dark Essence. Both are important materials for city construction, and adjusting to higher levels as needed can speed up base construction.
When you enter, note that only one team can be selected to attack, and you can see the type of guard before the challenge. Therefore, choosing a troop that has an advantage and your strongest team can increase the success rate. After successfully defeating the guard, you can start mining, with a fixed duration of 5 minutes per session. If necessary, you can purchase monthly cards to reduce the mining time. In addition to time, each mining session consumes 1 mining point, which recovers 1 point every 2 hours.
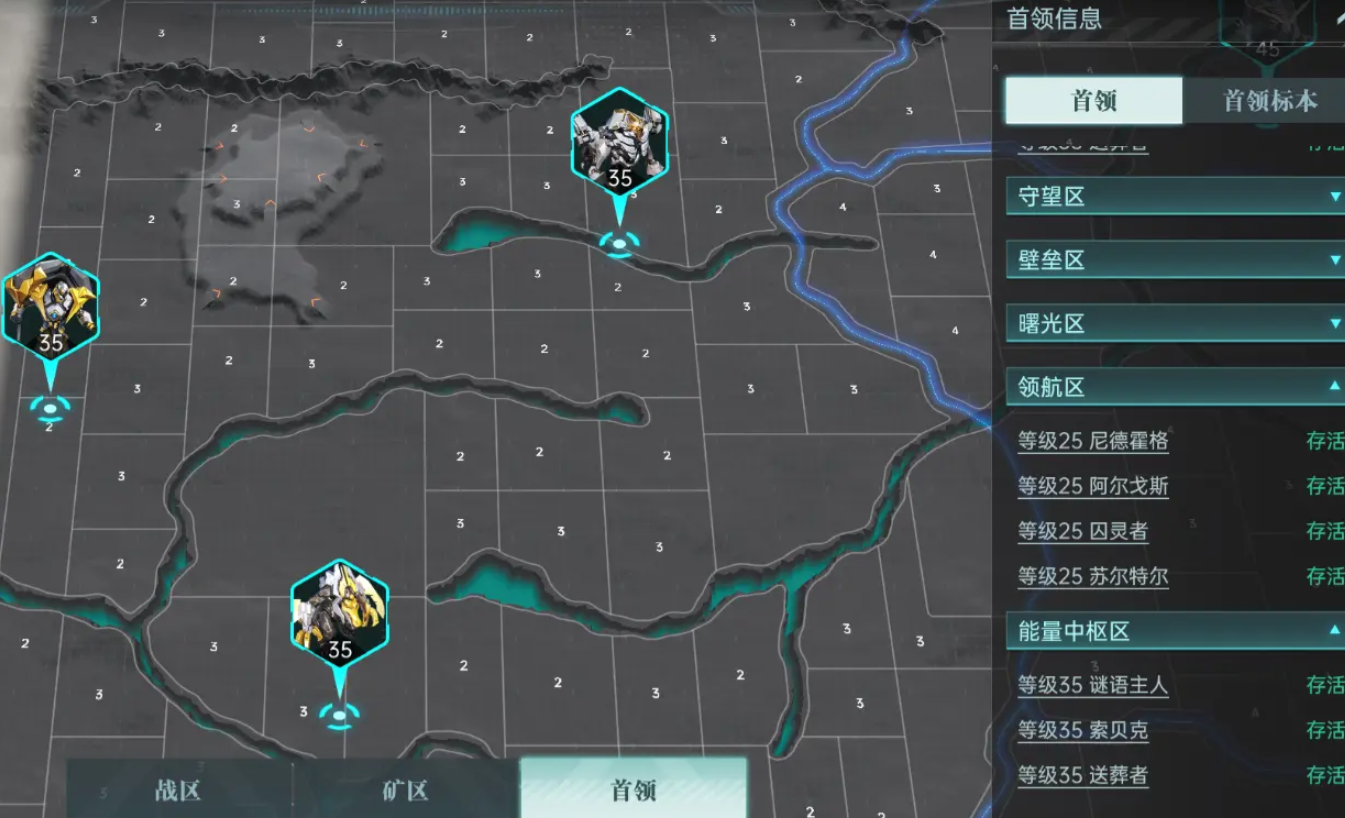
V. World Boss
The World Boss is the most challenging gameplay, requiring the majority of the active members in the alliance to participate to succeed. The World Boss is divided into levels 25, 35, 45, and 50, and each level's boss only appears in specific areas. Before attacking, you can check the survival status of the boss on the map. After being defeated, it takes some time to respawn. Each boss has unique skills, and checking them beforehand can greatly increase the success rate. In practice, most of its attacks will have a red range indicator, and timely dodging should not be a major problem. Successfully defeating the boss will reward you with personal merit and other generous rewards, with higher individual damage ranking leading to more rewards.
The above is the analysis of the Epoch of Stars map challenges. After reading this, you should have a good understanding of the rules and precautions of these four different challenges. Next, you can choose to participate in the challenges based on the resources you need and obtain the rich resources you desire.
Recommend


Strategy

A Guide to Zhetian Fanchen Yiyue Sharing Tips for New Players on How to Play Zhetian Fanchen Yiyue
Introduction to the Public Beta Time of Zhetian Fanchen Yeyi When is the public beta for Zhetian Fanchen Yeyi?
How is Zi Yue from Zhetian Fanchen? Introduction to Zi Yue from Zhetian Fanchen
What are the Luhida Origin redemption codes? Sharing of Luhida Origin mobile game gift codes
Lu Xida Origin Team Recommendations Lu Xida Origin Team Guide
Lu Xida Origin Strategy Sharing: Beginner's Guide to Lu Xida Origin
