
Hungry Shark Evolution
Game Introduction


Hot Strategy
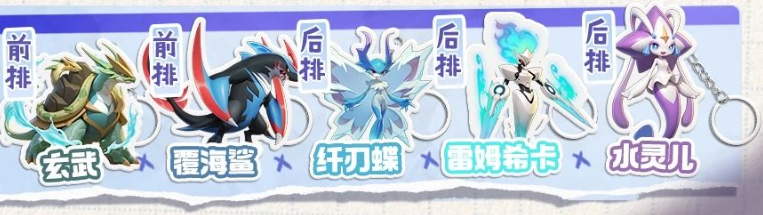
Dawn Revisited: Sea-Covering Shark Team Composition Guide How to Build the Sea-Covering Shark Team in Dawn Revisited
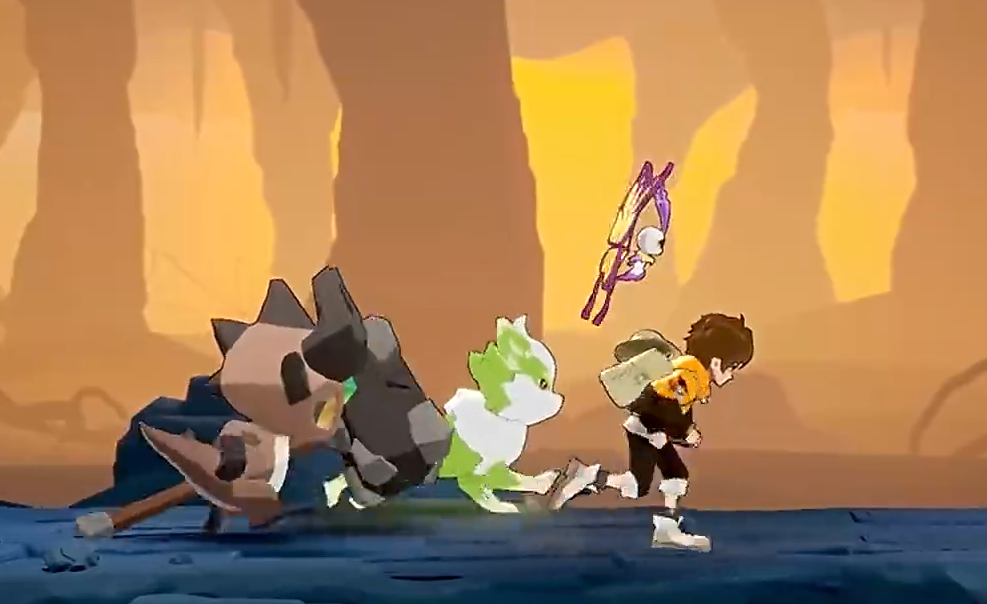
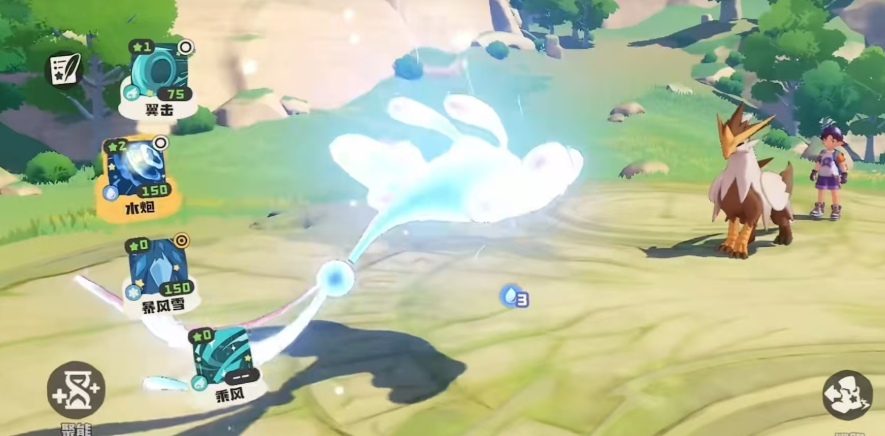
Oversea Shark is a physical defense warrior that can withstand various types of damage and becomes even more powerful after taking damage, earning it the nickname "low-health war god." However, many players, after successfully capturing it, are unsure how to assemble a team for Oversea Shark in Dawn Reborn. To help everyone build a strong lineup, the following team combination guide will share two suitable teams for direct reference.
I. Mixed Team
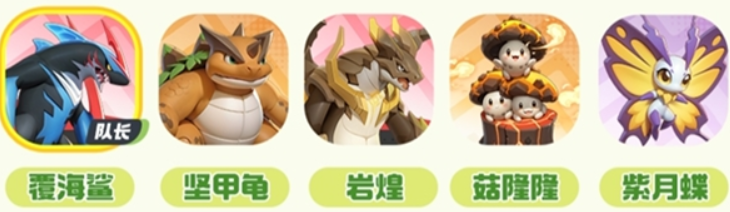
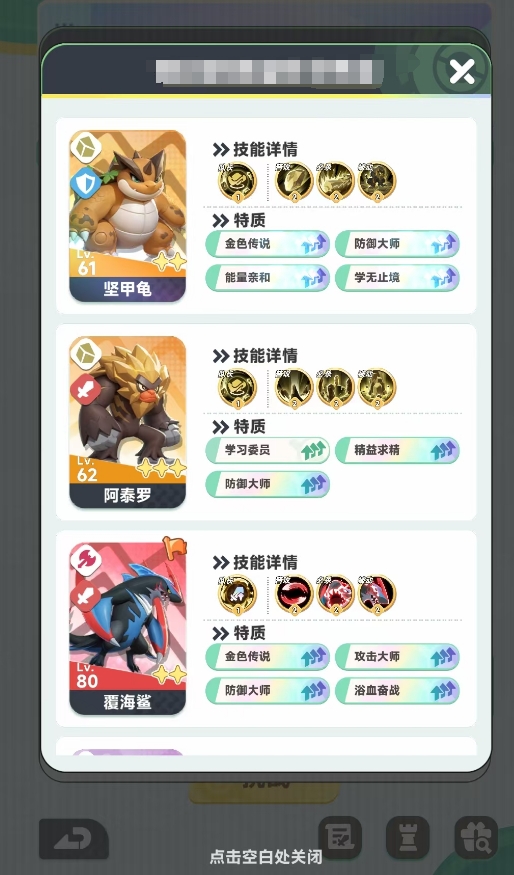
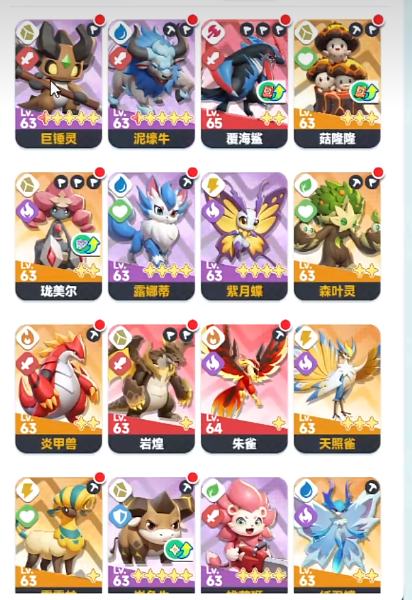
The members of this team include Oversea Shark, Hardshell Turtle, Rockglow, Fungolong, and Purple Moon Butterfly, with Oversea Shark as the leader. Its leader skill grants increased damage and reduced incoming damage when there are 3 different attributes among the team members, enhancing both defense and offense. Hardshell Turtle has good control and shield abilities; it can pair up with Oversea Shark in the front line to absorb damage. Fungolong, as a support, provides energy and shields to teammates. Rockglow, an assassin, can directly cut into the enemy's backline, while Purple Moon Butterfly deals damage from the back row. Alternatively, Purple Moon Butterfly can be replaced by other damage dealers like Flame Feather Monkey.
II. Water Team
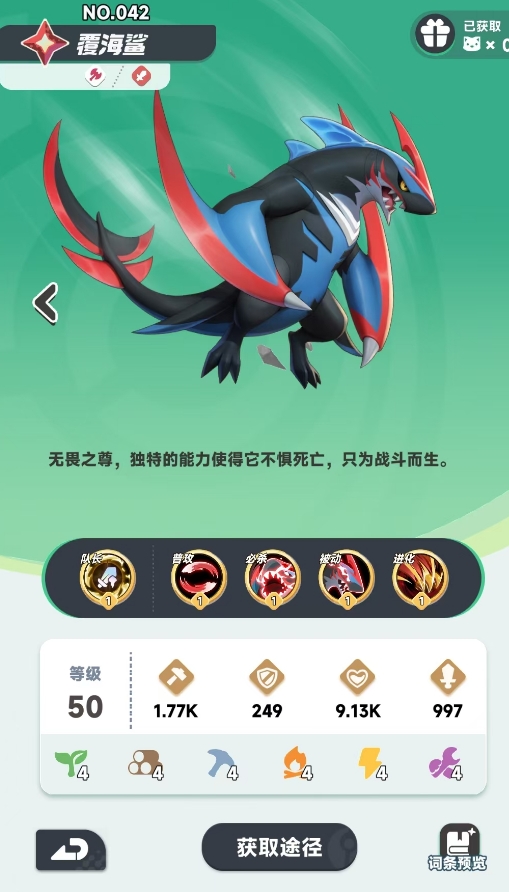
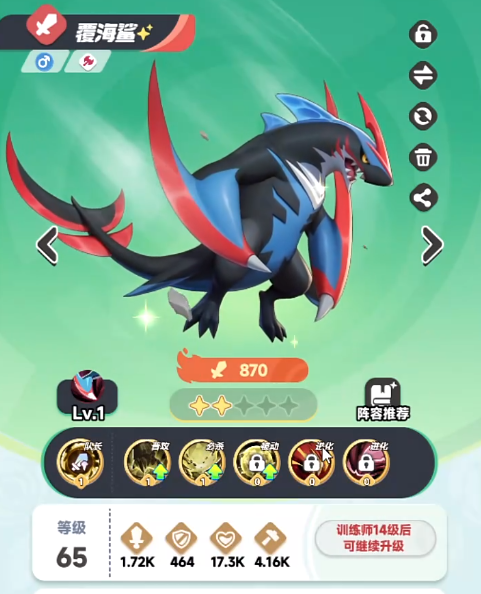
This lineup includes Water Spirit, Slender Blade Butterfly, Rem, Oversea Shark, and Black Tortoise. This team focuses on attack speed, with Water Spirit providing buffs that increase attack speed and energy. Both Oversea Shark and Black Tortoise take the front line to absorb damage. Oversea Shark's ultimate skill increases its basic attack output for 3 seconds after dealing damage based on the amount of health lost; after receiving the attack speed buff, it can also deal considerable damage. Slender Blade Butterfly is the main damage dealer and should be equipped with gear that boosts attack speed and damage. Rem can both tank and deal damage, so it's best to equip it with defensive gear to ensure sustainability.
This concludes the guide on team combinations for Oversea Shark in Dawn Reborn. Oversea Shark is an excellent front-liner, capable of absorbing damage while also dealing significant damage. The two teams shared above are very effective. You can choose one based on the characters you have available.
How to Build the Sea Covering Shark Team in Dawn Reborn: A Guide to Team Composition
Many people have questions about how to build a team with the Fuhai Shark in the game Dawn Reborn. In fact, the Fuhai Shark is relatively easy to team up with and its captain skill provides a high bonus, so it's usually paired with a monochromatic team. However, currently, the elements that work best with the Fuhai Shark are Electric, Water, and Rock, so it often teams up with them.
1. Fuhai Shark Electric Team
An Electric team centered around ultimate moves, when paired with the Fuhai Shark, will deal even more damage overall, but the choice of pets is rather fixed. A common lineup includes the Fuhai Shark, Leilupa, Tianqi, Lei Yuan Gu, and Purple Moon Butterfly. Among these, Leilupa and Tianqi, like the Fuhai Shark, are core members and cannot be replaced until you get higher-tier pets. Lei Yuan Gu and Purple Moon Butterfly can be substituted with other Electric pets.
2. Fuhai Shark Water Team
The Fuhai Shark can form a Water team with Bubble Dragon, Water Sprite, Slender Blade Butterfly, and Overlord Wave Serpent. By using its own captain skill, it can boost the damage of Slender Blade Butterfly and Bubble Dragon, enhancing the team's overall output, which performs exceptionally well in the arena. Of course, if players have already acquired Xuanwu, they can replace the Overlord Wave Serpent with Xuanwu to raise the team's potential.
3. Fuhai Shark Rock Team
There aren't too many Rock element pets, so the choices for pairing with the Fuhai Shark are quite fixed, such as the combination of the Fuhai Shark, Hardshell Dragon, Ataro, Longmeier, and Gulonglong. When positioning the pets, you can place the Fuhai Shark and Hardshell Dragon in the front row, while the other three pets provide support and buffs from the back row, creating a very solid formation.
This is the introduction to building a team with the Fuhai Shark in Dawn Reborn. Actually, teaming up the Fuhai Shark isn't complicated. First, decide which element's pets you want to pair it with, then select from the list of pets within that element. Players can try out different combinations on their own.
Introduction to the Rebirth of Dawn Sea Shark and Team Recommendations for the Rebirth of Dawn Sea Shark
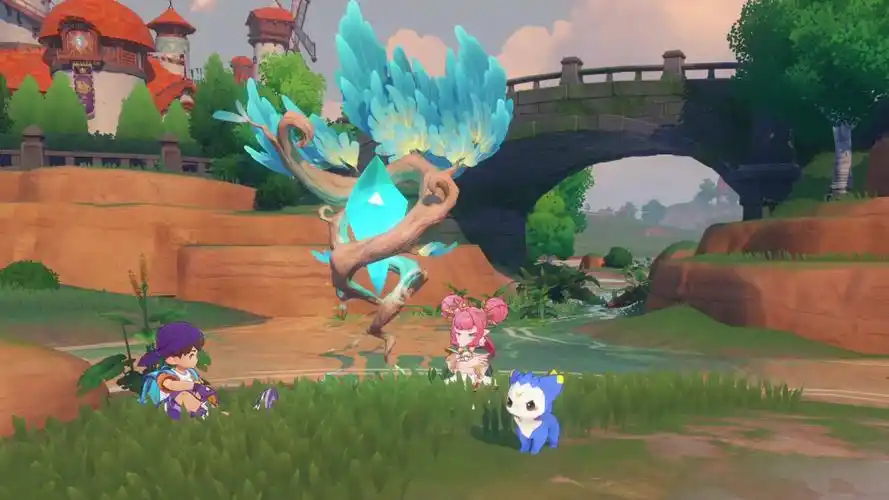
Dawn Reborn uses a very interesting cartoon world, where each player can catch and cultivate pets. In addition, in the game, players can also choose to lead these pets into battle. There are a total of 5 categories of pets in the game, and the introduction of the Oversea Shark in Dawn Reborn is what will be shared next. This is one of the pet characters in one of the 5 major categories, and the following content will provide a detailed introduction to this pet.
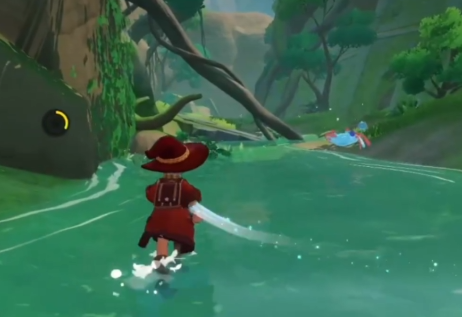
The Oversea Shark is a relatively high-level character in the game, a powerful red-level pet, mainly focusing on close-range combat output. Although it is a high level, for new players, it's not too difficult to control, mainly because, in addition to its output, this character also has a high amount of health. Even when at low health, it still possesses excellent output capabilities.
Firstly, the character's basic attack can deal damage to opponents during battles. If an opponent dies, the player can then restore their own health. Additionally, the character has a special move that, upon dealing damage to enemies in front, increases the basic attack damage, but this comes at the cost of self-inflicted damage. The character's passive skill is also very strong; during battles, even when taking damage, the damage received is reduced, and the player's attack speed also increases.
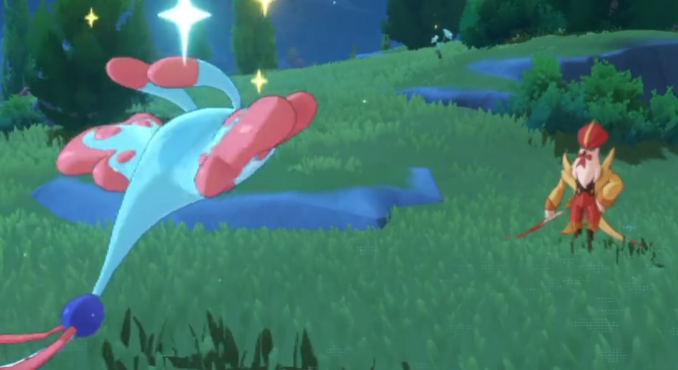
If you want to use this character, you can obtain it by completing activities in the game. After obtaining it, consider pairing it with Purple Moon Butterfly and Rock Horn Bull. These two characters can be placed in the front and back rows respectively, allowing one to assist in battle and the other to provide continuous output. Players may also choose to place Gulonglong in the front row, which can release a shield to protect the Oversea Shark and other rear-row characters.
The content introduced above is about the Oversea Shark in Dawn Reborn. Relatively speaking, this character is highly recommended for use, especially for newcomers and casual players, as it may not pose too much difficulty and is relatively easy to cultivate. It's important for players to note that the character's combat power is linked to its health, so it's necessary to choose characters that can heal, ensuring the Oversea Shark can continue fighting on the field.
Where to catch the Blue Butterfly Shark in洛克王国世界蓝蝶鲨在哪抓 洛克王国手游蓝蝶鲨抓捕攻略 Translation: Where to catch the Blue Butterfly Shark in Rock Kingdom World and the guide for catching the Blue Butterfly Shark in the Rock Kingdom mobile game
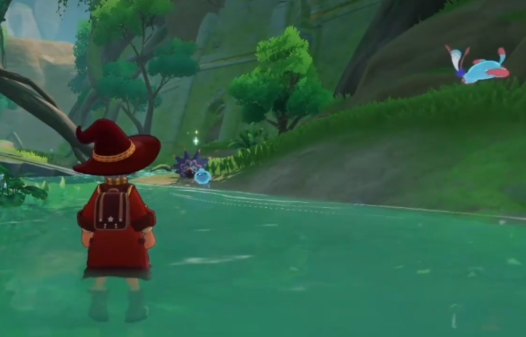
In the world of Rock Kingdom, there is a water-type spirit named Blue Butterfly Shark. Although it is said to be an ordinary type of spirit, it is still necessary to catch it because it is quite useful among water-type spirits. So, when it comes to catching this spirit, where can one catch the Blue Butterfly Shark in the Rock Kingdom world? Many people are still unaware of how to catch this spirit. To help everyone understand the catching method, the following will tell you how, just keep reading.
If you want to catch this spirit, you need to prepare a grass-type spirit, with a level above 30 but not exceeding 50. After preparing the spirit, you also need to bring capture balls. There's no special requirement for the balls; the most common ones will do.
After preparing, next, you can head to the spawn location of this spirit, which is the Wind Rest Mountain Pass. Upon arriving at this spot, you need to go to either the Atlantis Acropolis area or the Ancient Road area within this region, as the spirit spawns in both these areas. You can choose one of them.
Then, after entering and encountering the spirit, you can send out the previously prepared grass-type spirit. After sending it out, normally deplete its HP, aiming to control its HP around 10%. Once it reaches this HP, you can start capturing it by throwing the ball.
There's a chance that the ball throw might fail, but don't worry, try a few more times, and you will catch the spirit. After catching it, if you have higher aspirations, you can check the spirit's nature. For this spirit, the best nature is the conservative one, which is the most suitable and effective.
The above is all about where to catch the Blue Butterfly Shark in the Rock Kingdom world. The method of catching this spirit has already been told in the text. After reading the above, once you know how to catch it, you can follow the instructions given to catch it.
How is the hammerhead shark in Seven Days World? Detailed introduction to the hammerhead shark in Seven Days World.
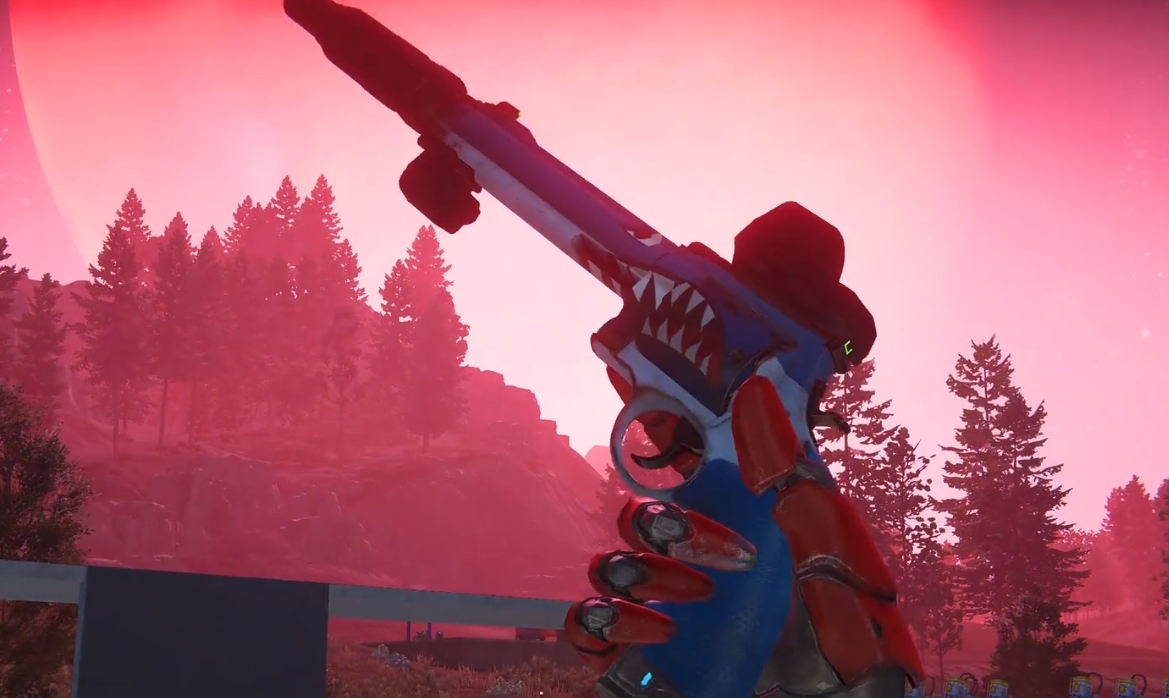
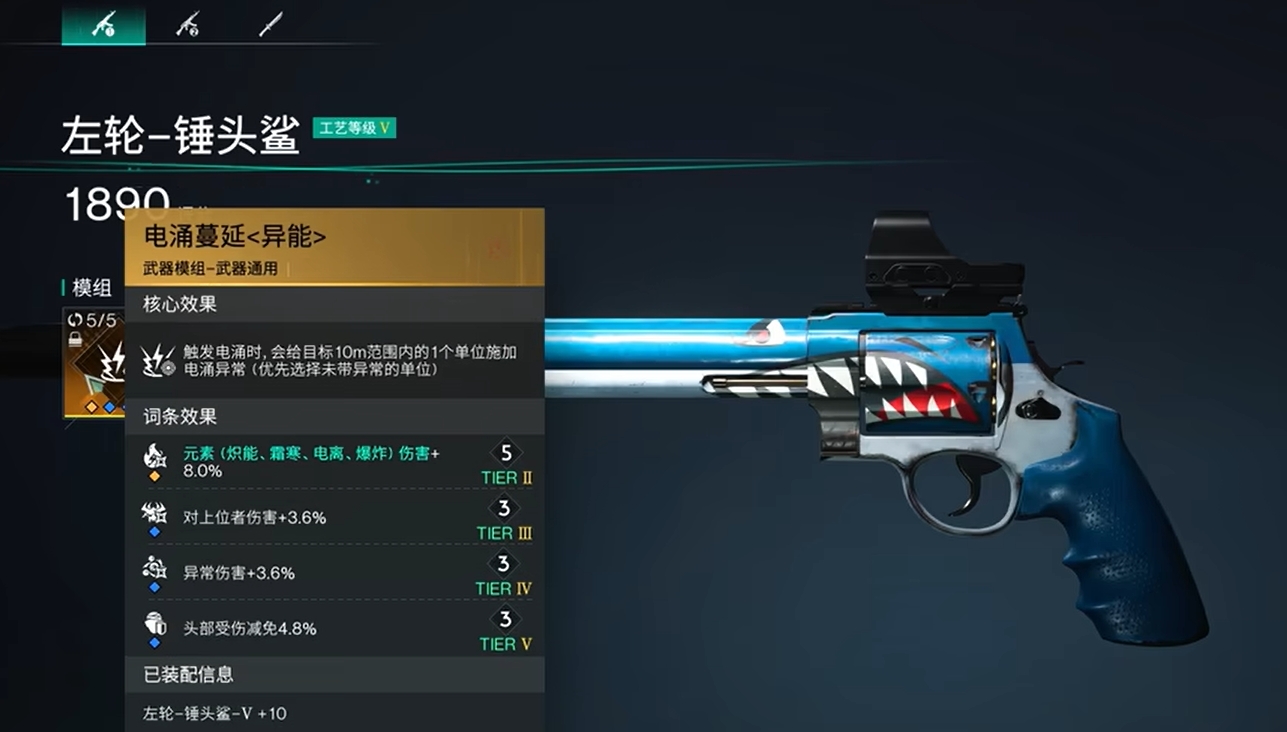
Presumably, everyone has also noticed that there is a wide variety of weapon types to choose from in the game, and they offer different abilities and effects. In this article, I mainly want to introduce the Seven Day World Hammerhead Shark to players. As an electric left-wheel pistol, it focuses on high burst and area damage, making it suitable for dealing with multiple targets or exploiting weaknesses, and its effect is quite impressive. If you are interested, let's take a look together.
The single-shot damage of this weapon is very high, especially when triggering electric special effects, which can cause chain area damage. The magazine capacity is usually 6 rounds, requiring manual reloading by the player. However, at that time, you can also consider pairing it with "Explosive Bullet Boost" to increase output. Electric damage can trigger paralysis or conduction, having a very significant effect on groups of enemies.

In the game, this weapon is primarily positioned as an electric spread weapon, capable of attacking multiple targets with a single hit. Its high critical hit rate, combined with electric damage boost, makes it very suitable for quickly clearing elite monsters or exploiting boss weaknesses.
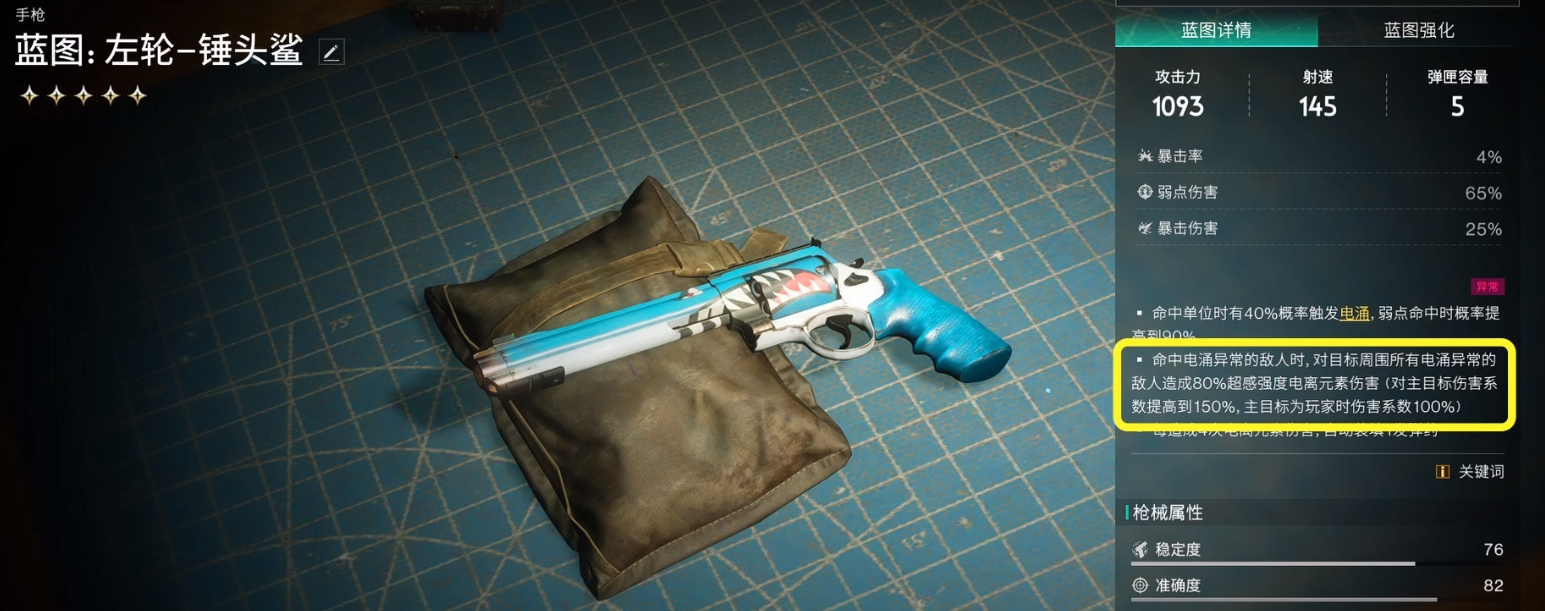
If players want to obtain this weapon, they need to unlock it through the game's meme system. This involves collecting metals, parts, and electric core materials. Locations like the Research Institute and the Filthy Water Camp have a chance to drop the finished product or corresponding blueprint fragments directly.

When using this weapon, it is recommended to prioritize increasing electric damage. At this point, you can pair it with Anomaly Energy Recovery to enhance sustainability. For ammunition, Lightning Bullets would be a good choice, further enhancing its paralysis effect and area damage. After learning about the Seven Day World Hammerhead Shark, everyone should have a new understanding of it. If you like it, hurry up and give it a try.
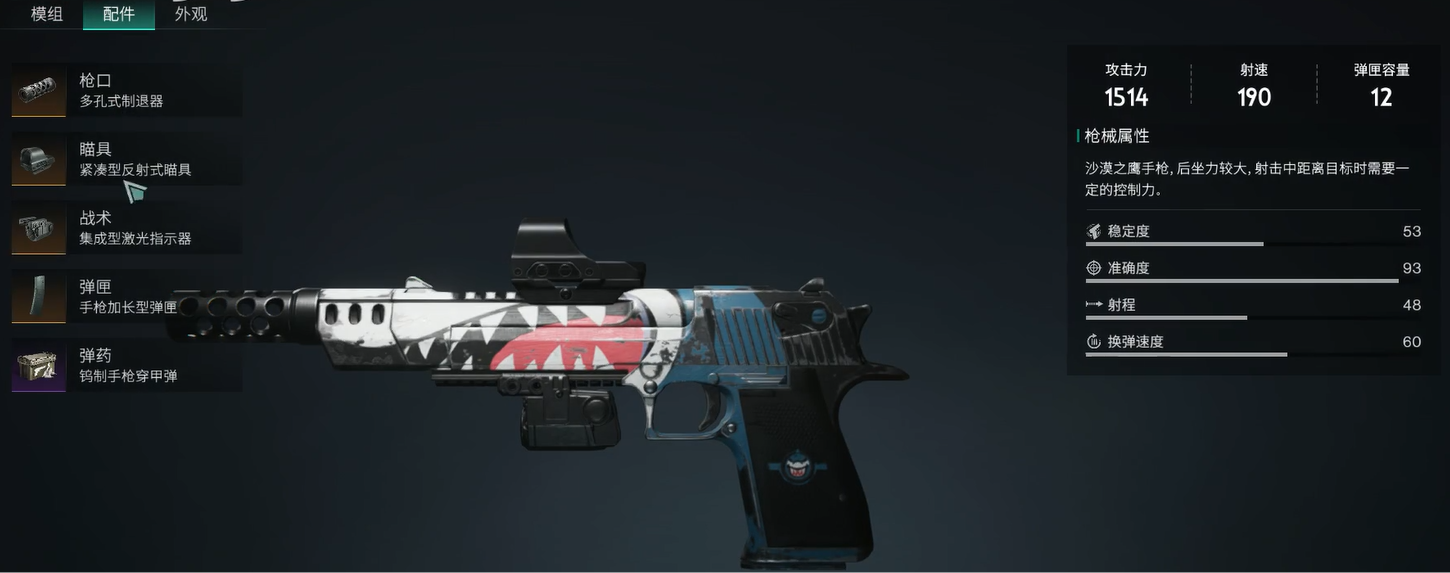
Seven Day World Great White Shark Mod Combination Guide How to Combine the Seven Day World Great White Shark Mod
The Great White Shark is a piece of equipment in the game that garners a lot of attention from players. Many players are interested in this equipment. To effectively utilize it, one needs to focus on the right combination. You can learn about the Seven Days World Great White Shark mod pairing guide. How should one correctly pair it? Players can refer to the following introduction.

In terms of equipment, if you're planning to go for a violent route, you can choose three Moku and two Lone Wolves, which can effectively provide 50% gun damage and 50% abnormal damage. The two Lone Wolves can increase magazine capacity and critical hit rate, preparing for the subsequent use of the Great White Shark.

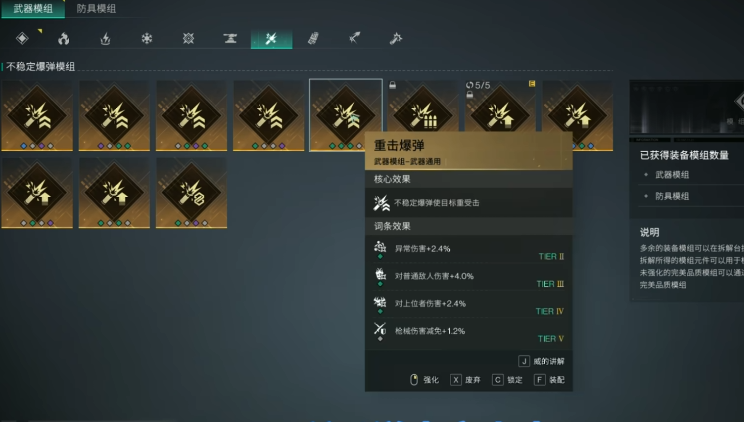
For mods, there are two options: Explosive Art and Bomb Strategy. Explosive Art causes higher damage but requires frequent reloading. Bomb Strategy offers a relatively good experience in practice, but after using it, the magazine capacity must be directly stacked to 20 rounds. For head mods, Anomaly Expert should be chosen; the Great White Shark has sufficient critical hit rate, and this mod can bring shooting speed and abnormal damage.
For masks, you can choose Full Bounty or Solo Blast. For clothing, you can select Desperate Survival or Shielded Protection. For pants, Critical Frenzy can be chosen, and for gloves, the choice depends on the panel's critical hit rate. If it's above 30%, you can choose Burst Damage Enhancement; if below 30%, choose Critical Hit Enhancement.
The above is an introduction to the Seven Days World Great White Shark mod pairing guide. When pairing, if you consider these aspects, you will naturally have a better advantage. For blueprints, you can choose Rapid Fire with Double Critical Hit Rate, and for containment, you can choose Girl AI.
How to Use the Hammerhead Shark in Seven Days World: A Guide to Pairing the Hammerhead Shark
How to use the Hammerhead Shark in Seven Day World? The Hammerhead Shark is a handgun weapon in the game, known for its good shooting feel, decent damage capability, and relatively easy acquisition. Many players even use it to solo clear dungeons, making it one of the most useful weapons in the game. This article will introduce how to equip the Hammerhead Shark so that everyone can better unleash the power of this weapon.
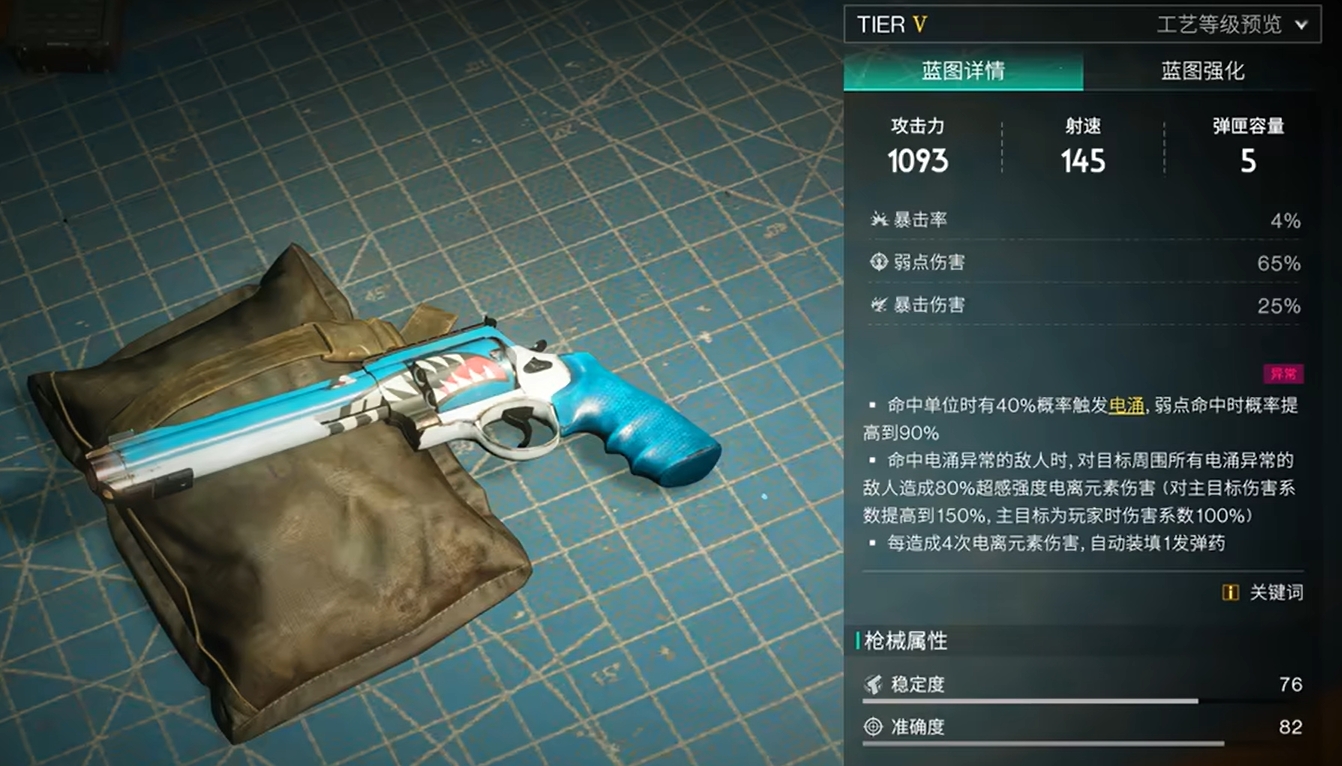
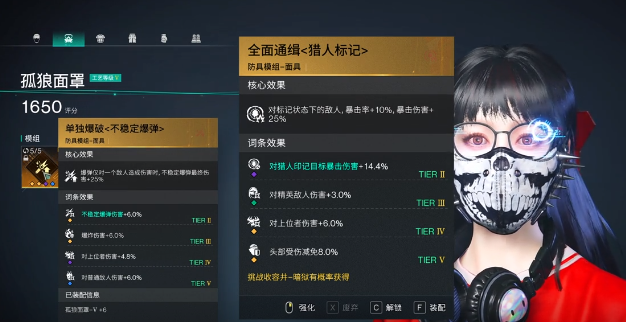
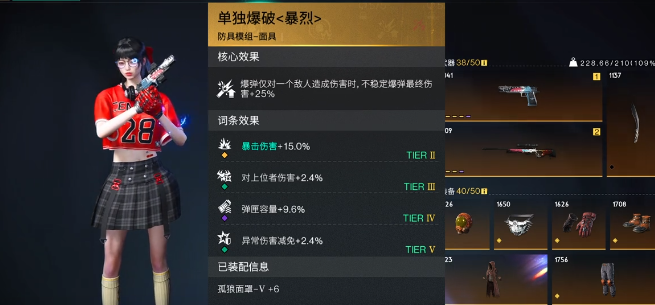
To better use the Hammerhead Shark, you need to pair it with suitable equipment. First, you can choose your secondary weapon and melee weapon according to your own preference. For armor, it's best to select the Mayfly Goggles for the head, as the characteristic of adding 1 to surge trigger times can make it work well with the Hammerhead Shark. For other parts, just aim for four heavy armors and one simple piece, or you can use the traditional setup of two sanctuary pieces and three end-earth pieces for the pressure blood flow.
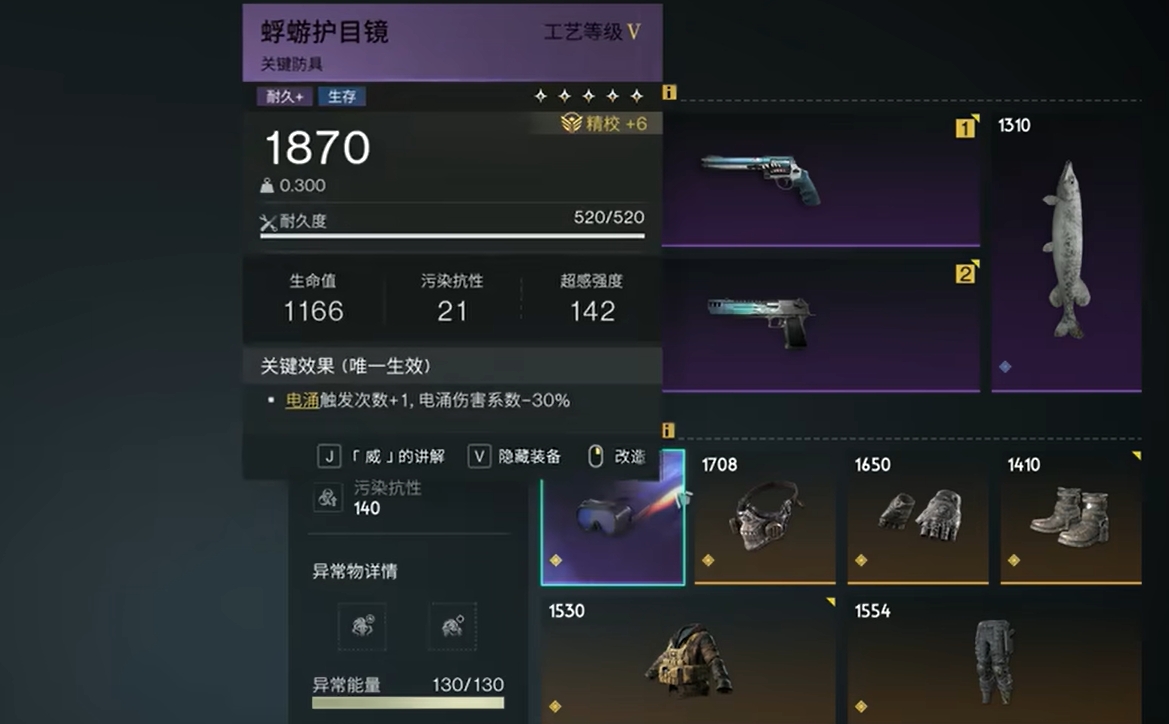
In terms of mod selection, the Hammerhead Shark should naturally be equipped with the Anomaly Surge Spread. If you want to increase the single-target damage of the Hammerhead Shark, you can also equip the Transient Overload from Anomaly. For the head, you can choose the Abnormal Expert from Moon Sign; for the mask, the Kirin Thunder from Surge; for the top, the Shield Protection from Moon Sign; for the pants, the Replenishment from Anomaly; for the gloves, the Elemental Enhancement from Anomaly; and for the shoes, the Peak Time from Anomaly.
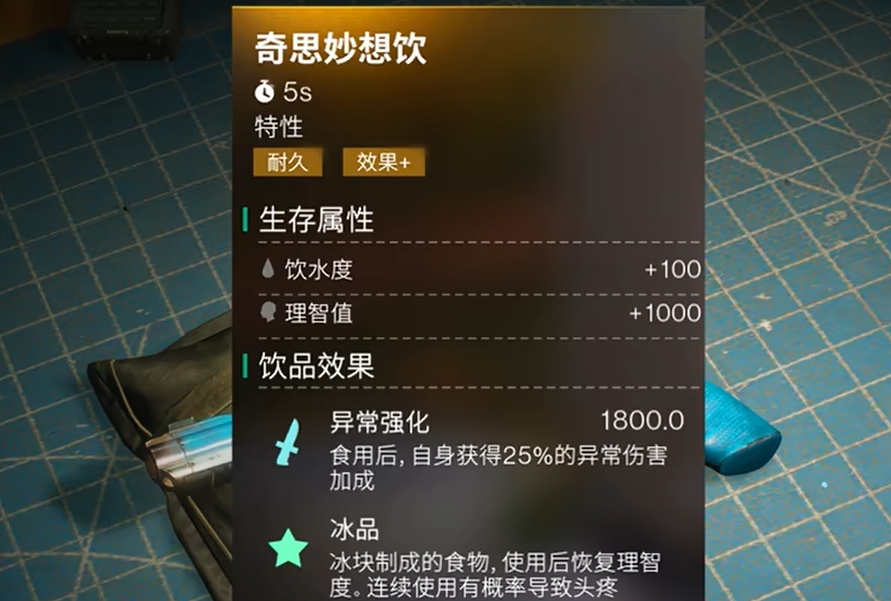
In addition, choosing the right cooking is also very important. There are quite a few dishes in the game currently that are suitable for the Hammerhead Shark, such as the Whimsical Drink which boosts anomaly damage, the Stardust Meatball which increases mark damage, or the Surprise Spring Roll which enhances elemental damage. There are many options to choose from.
This is all about how to use the Hammerhead Shark in Seven Day World. The Hammerhead Shark is quite strong, and by equipping it with the right mods and gear, you can achieve high output thanks to its unique characteristics. If you're interested, why not give this weapon a try?
How to Improve Great White Shark Damage in Seven Days How to Equip the Great White Shark in Seven Days
Today, the editor is bringing you content on how to improve the damage of the Great White Shark in the Seven Day World, as a highly regarded golden quality Desert Eagle pistol in the game, with its unique attributes and powerful potential, it has become a trusted weapon for many players eager to fully unleash their strength. Damage improvement involves multiple complex and interrelated aspects, each of which has an impact on the Great White Shark's damage performance that cannot be ignored. Let's take a closer look with the editor.
Upgrading the Great White Shark can directly increase the base attributes of the weapon. As the star level increases, key attributes such as attack power will also gradually strengthen, thereby enhancing overall damage output. This is an important basic step in improving weapon performance. The choice of ammunition significantly affects the Great White Shark's damage. Purple Tungsten Armor-Piercing Rounds are an excellent choice. Even if the Great White Shark is at full stars and already has a high gun damage ratio, Purple Tungsten Armor-Piercing Rounds can still further enhance the damage effect. Compared to golden bullets, they offer better value for money in terms of damage enhancement, so there is no need to use golden bullets.
The reasonable use of buffs and consumables can significantly boost damage. It is recommended to activate the Ingenious Buff. In terms of consumption order, eat the Fish and Shellfish Can first, followed by Pumpkin Pie. The advantage of Pumpkin Pie is that it simultaneously increases critical hit damage, explosive bullet damage, and gun damage, achieving the optimal damage enhancement effect. By comparison, Bread only increases gun damage, offering a relatively single benefit. It is typically considered only when soloing against Corrupted Shadows and using a machine gun to increase gun damage.
In terms of armor set selection, the Lone Wolf set is the top choice. A three-piece Lone Wolf set not only increases magazine capacity, ensuring sustained output, but also provides additional critical hit attribute bonuses. Moreover, its set effect increases critical hit damage. These series of bonuses complement the high burst characteristic of the Great White Shark, greatly enhancing its output capability, making its performance in combat almost comparable to that of a rifle. Whether dealing with groups of small monsters or challenging bosses, it can handle them with ease. If the Lone Wolf set is not available, the Protector set combined with the Heavy Armor set can serve as a temporary solution. For players with lower critical hit rates, replacing the Heavy Armor set with the Falcon set is a good option, as the Falcon set effectively increases the critical hit rate, helping to stabilize the overall damage output of the Great White Shark.
The editor has now introduced the content on how to improve the damage of the Great White Shark in the Seven Day World, through the detailed introduction of comprehensive equipment for the Great White Shark, players can systematically enhance the damage output of the Great White Shark in the Seven Day World, from strengthening base attributes to optimizing details during combat, every step is closely centered around the weapon characteristics of the Great White Shark.
Seven-day World Great White Shark Gear Guide: How to Best Equip the Great White Shark
In the Seven Days World, the Great White Shark, as an extremely lethal weapon, can unleash even greater power if properly equipped. This guide on equipping the Great White Shark in the Seven Days World is to prevent the excellent potential of this weapon from being overlooked, allowing you to easily dominate. After all, the monsters and players in the Seven Days World are very strong, and if any part of your setup is not well done, even with a powerful weapon, you won't be able to defeat others.

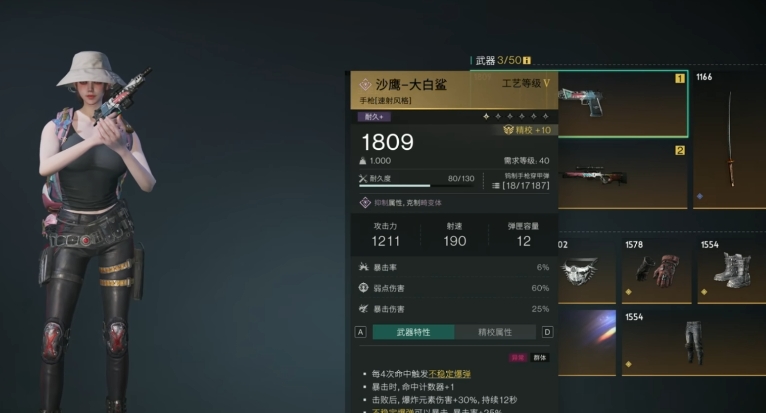
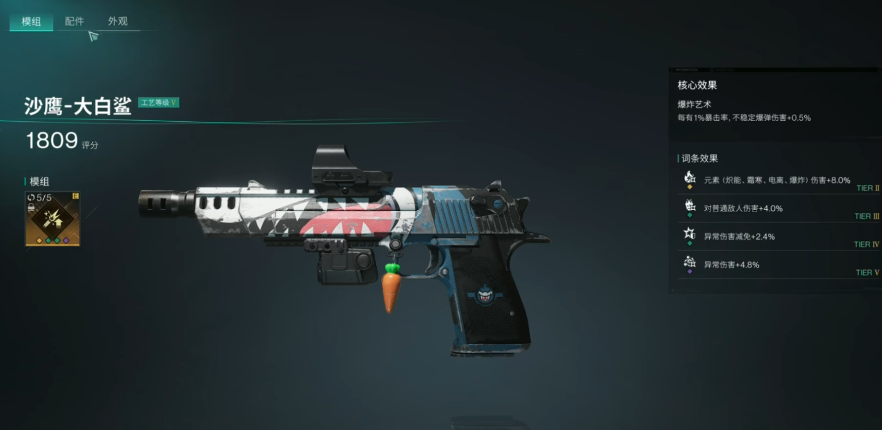
1. Weapon Introduction
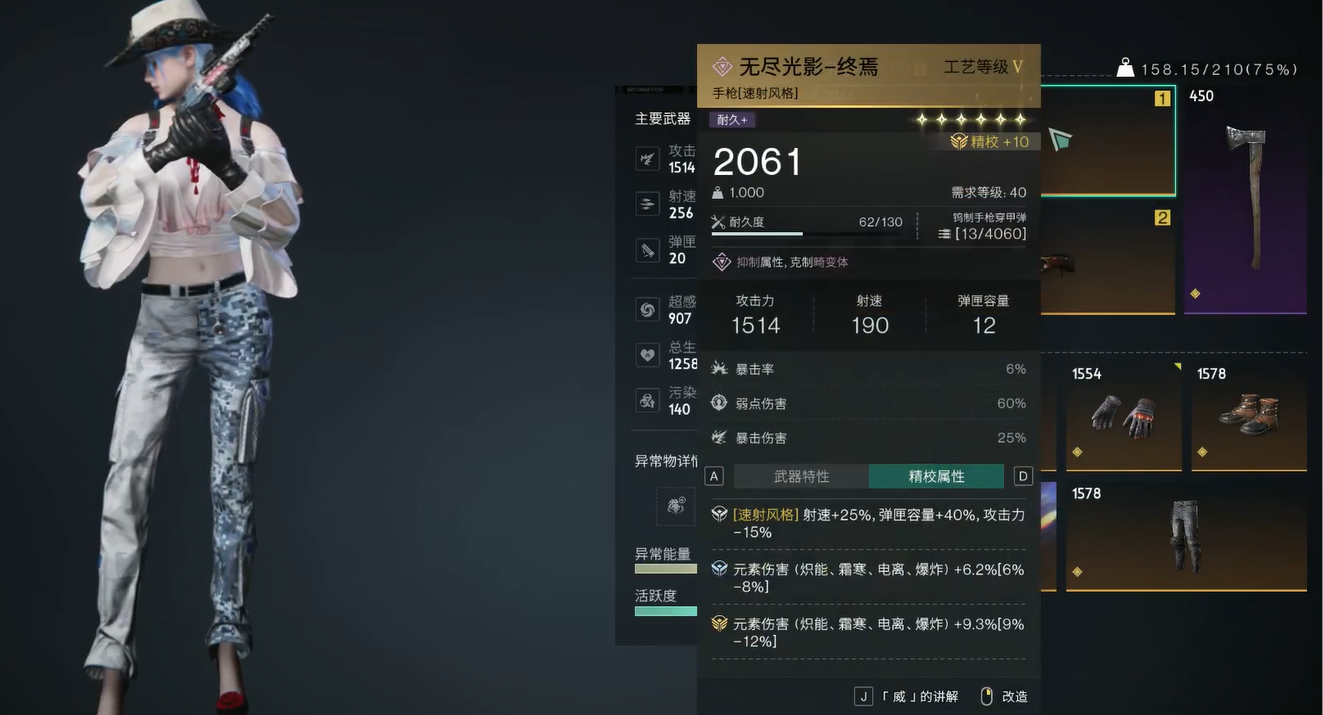
The full name of the Great White Shark is the Endless Light and Shadow - Finale. It got its name because it looks like a great white shark. Its weapon characteristic allows it to trigger unstable bombs when hitting enemies, increasing explosive elemental damage and critical hit rate, making it a weapon with particularly high burst damage. In terms of attributes, it has a rapid-fire style, which increases magazine capacity and allows for quick shooting.
2. Weapon Mod
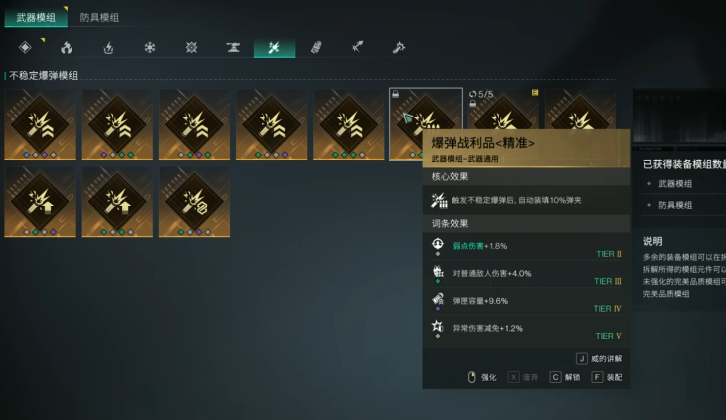
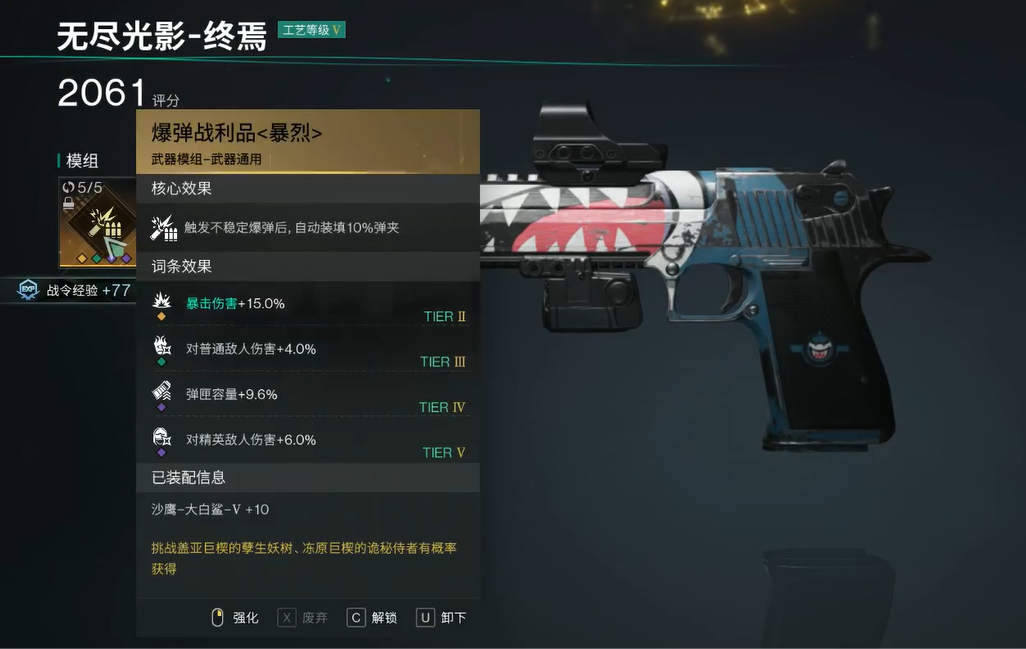
For the weapon mod, it is recommended to use the Explosive Loot <Fierce>. When you trigger an unstable bomb, it automatically reloads 10% of the magazine, enhancing sustained combat capability. Additionally, it provides a significant increase in critical hit damage and extra damage, further strengthening firepower, making it terrifyingly effective.
3. Weapon Attachments
For weapon attachments, you can use a multi-hole muzzle brake + compact reflex sight + tactical integrated laser pointer + extended pistol magazine + tungsten armor-piercing pistol ammunition. Due to its high recoil, some control is needed when shooting at medium-range targets, so it's necessary to improve its stability and accuracy, as well as increase range and reload speed.
4. Secondary Weapon
For the secondary weapon, it is recommended to use Bullseye. This is a weapon that can deal 100% high critical damage, which can compensate for the Great White Shark's lack of long-range capability and also increase critical hit damage, making it a good fit with other equipment or mods.
5. Gear Recommendations
For gear, it is recommended to use three pieces of the Doomsday set, including helmet, shoes, and gloves. These provide a significant increase in damage reduction, enhancing your survivability; they also greatly increase explosive and firearm damage, with higher damage bonuses as your sanity and health decrease, allowing you to easily turn the tide in a losing situation.
You can also pair it with the Lone Wolf two-piece set (mask + pants), which gives a 10% magazine capacity bonus, enhancing sustained output. It also further increases the critical hit rate, making it easy to deal multiple critical hits. A key piece of armor to use is the Shaman Vulture Top, which, when an unstable bomb is triggered, increases the critical hit rate by 35% for 3 seconds.
If you like the Great White Shark weapon and want to further increase its damage, you should check out the Great White Shark equipment guide for the Seven Days World. The output efficiency of this weapon is actually very high, capable of rapid close-range shooting and dealing high burst damage. Therefore, you can take advantage of these characteristics to make a reasonable and efficient setup.
How is the Colorful Butterfly Shark in洛克王国世界彩蝶鲨怎么样 洛克王国世界彩蝶鲨玩法分享 Translation: How is the Colorful Butterfly Shark in Rock Kingdom? Sharing of the Colorful Butterfly Shark gameplay in Rock Kingdom.
Rock Kingdom World Colorful Butterfly Shark, as a water-attribute pet, has garnered a lot of attention from many players. In fact, it possesses numerous skills, and when players are experiencing the game, they want to know how the Colorful Butterfly Shark performs. If they have already caught the Colorful Butterfly Shark, how should they play with it? Below is an introduction to these aspects, to help players gain a deeper understanding of the Colorful Butterfly Shark.

The base stats of the Colorful Butterfly Shark are 538. As a pet with relatively strong overall capabilities, it has quite a few skills, mainly water-based. For example, when using its skills, it can poison the opponent, continuously damage the opponent's HP, causing harm, and also lower the opponent's attack level.
When playing the game, if you have already obtained the Colorful Butterfly Shark, then you need to make reasonable use of its skills, such as Water Wing Thrust, which can effectively reduce the consumption of water-based skills. Of course, during the game, you can also combine other water-based skills for combat.

Actually, its base stats are quite high, allowing it to display powerful strength in battle. For players, when experiencing the game, regardless of what kind of pet they obtain, they need to develop appropriate tactics and strategies based on the pet's characteristics, and also find suitable methods to catch them. In fact, the Colorful Butterfly Shark evolves from the Blue Butterfly Shark at level 55.

The performance of the Rock Kingdom World Colorful Butterfly Shark and how to play with it after obtaining it are shared with many players. The Colorful Butterfly Shark is particularly powerful and is the highest form of the Charm Shark. When experiencing the game, players should fully understand the characteristics and skills of these pets, and then let them perform to their maximum potential.
Recommend


Strategy

A Guide to Zhetian Fanchen Yiyue Sharing Tips for New Players on How to Play Zhetian Fanchen Yiyue
Introduction to the Public Beta Time of Zhetian Fanchen Yeyi When is the public beta for Zhetian Fanchen Yeyi?
How is Zi Yue from Zhetian Fanchen? Introduction to Zi Yue from Zhetian Fanchen
What are the Luhida Origin redemption codes? Sharing of Luhida Origin mobile game gift codes
Lu Xida Origin Team Recommendations Lu Xida Origin Team Guide
Lu Xida Origin Strategy Sharing: Beginner's Guide to Lu Xida Origin
