Pro League Soccer
Game Introduction


Hot Strategy
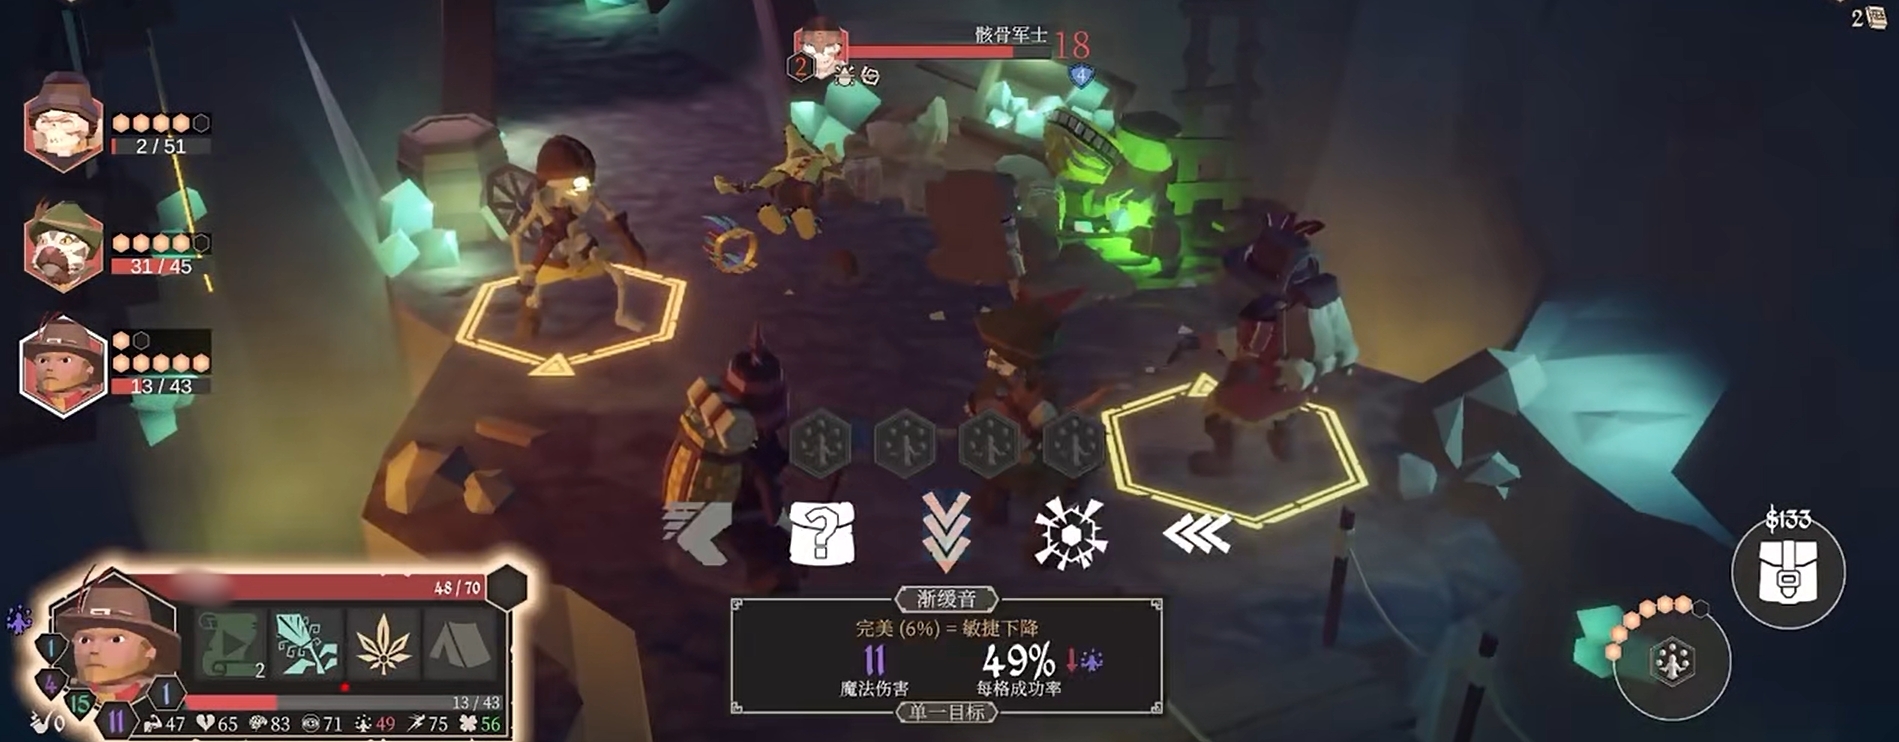
Recommended Class Combinations for For the King's Dungeon and How to Pair Classes in the Mobile Version of For the King
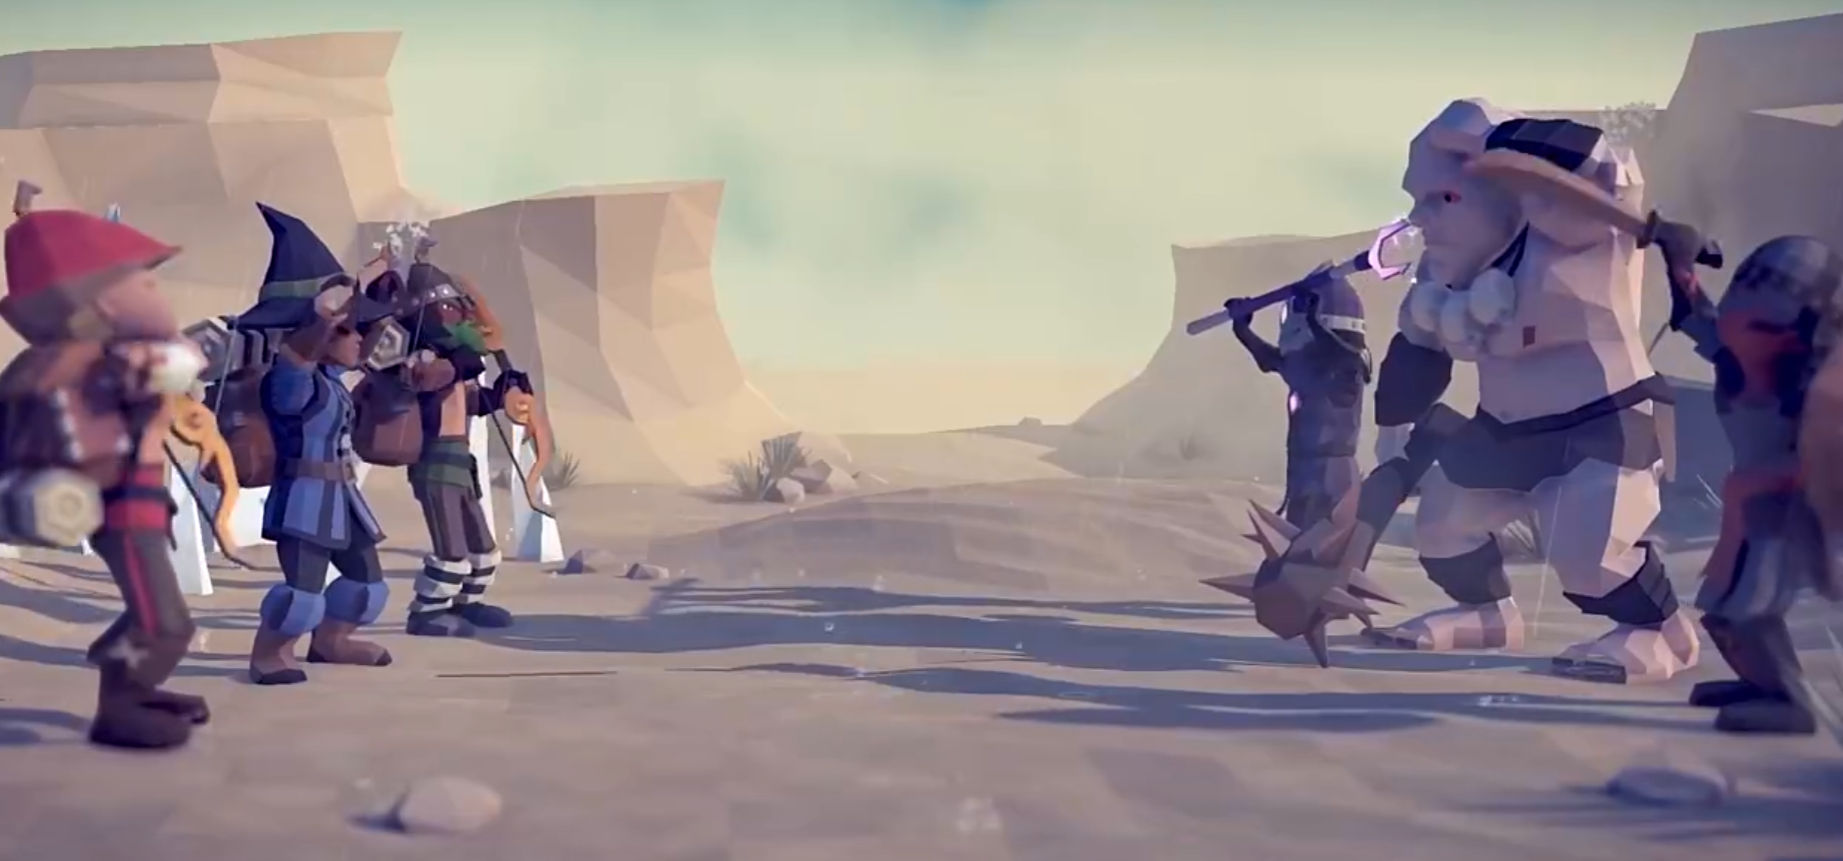
This issue brings you recommendations for dungeon class combinations in For the King. As an important and unique gameplay, the dungeon will see increasingly stronger monsters as the levels progress. To successfully clear the stages, players must form a team of three, with a powerful lineup. Many newcomers are troubled by not knowing how to combine their classes, so if you also want to know how to do it, check out the recommendations below.
First set of combinations:
The first combination consists of the Monk, Blacksmith, and Hunter. The Monk starts with a group healing ability and is proficient in both physical and magical attacks, providing support to the team while also contributing to the damage output. It's worth noting that when the Monk wields a Glass Sword, they can almost trigger Discipline every turn, leading to critical hits;
This setup is very useful in the early stages, so make sure to check if there are any quests for the Glass Sword in the first two towns. The Blacksmith serves as the tank of the team, and remember, they must carry a shield with taunt skills. Finally, the Hunter, as a DPS role, is extremely fast and often takes the initiative, suppressing opponents.
Second set of combinations:
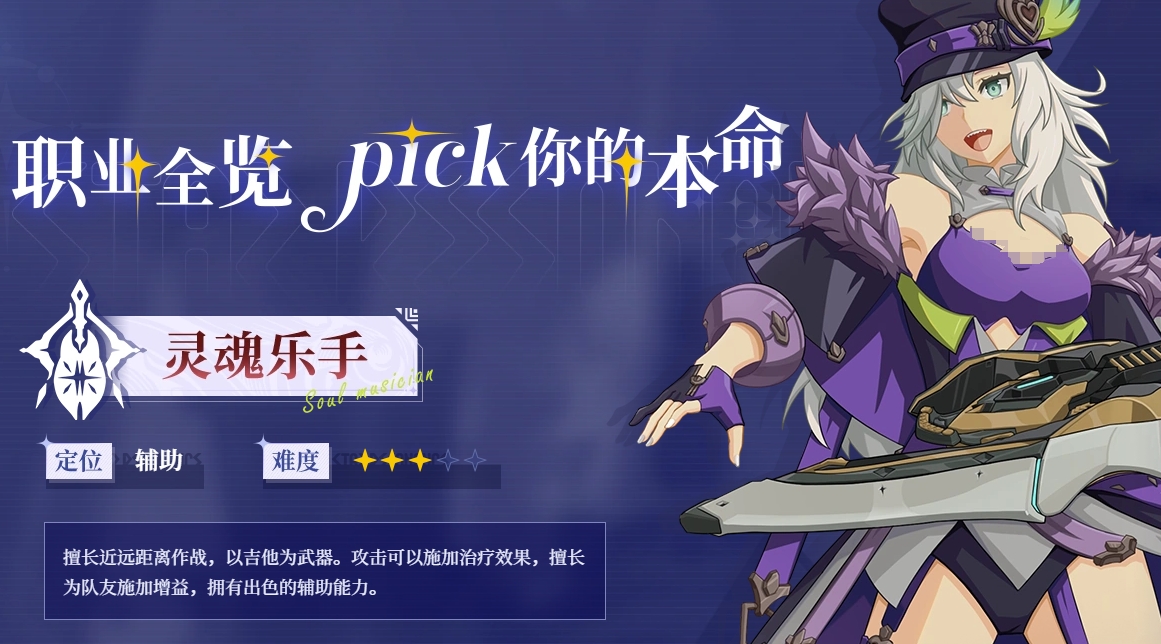
This set includes the Scholar, Jester, and Bard. The Jester's attributes mainly focus on talent, with decent strength, generally leaning towards support. Their innate "Escape Mastery" allows them to quickly leave combat in sudden battles or difficult situations, avoiding a total party wipe.
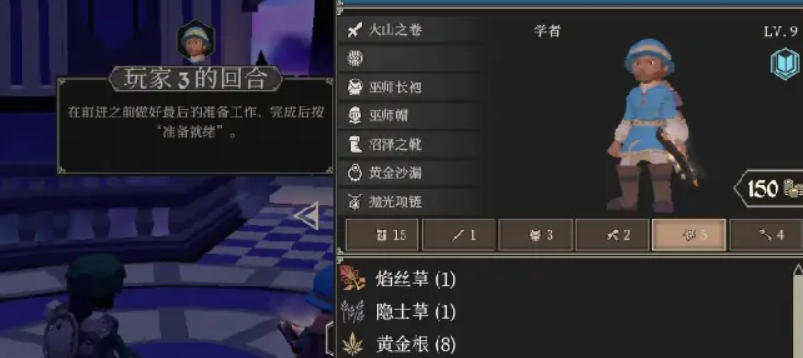
The Bard is quite versatile, capable of boosting morale and removing debuffs from the team. The Scholar, a mage-like character, has extremely high skill points and intelligence, making their late-game burst damage quite terrifying. For this setup, it's important to get the Jester weapons like the Royal Hammer later on, or else combat in the mid to late game might become challenging.

That concludes the recommended dungeon class combinations for For the King. Both sets shared above are very suitable for dungeon runs, and they can handle various monsters effectively. However, it still requires good play and equipping the characters properly to advance further in the dungeons.
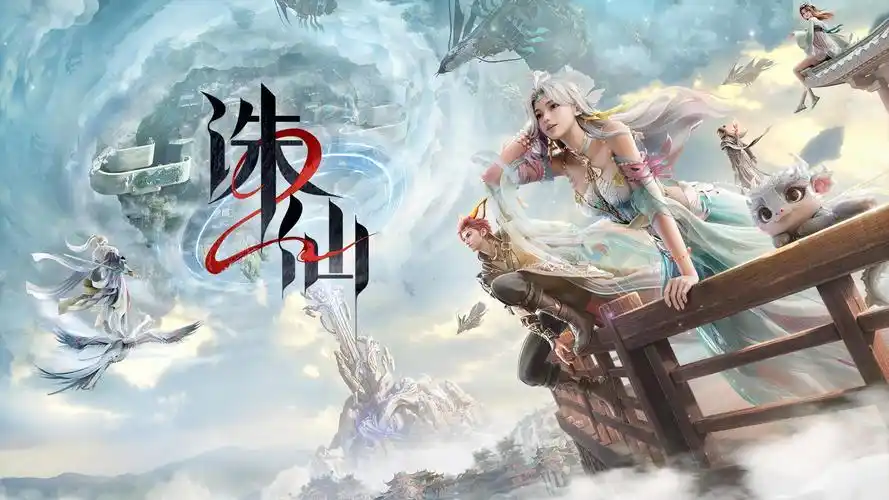
What are the strongest classes in Jade Dynasty 2? Jade Dynasty 2 Mobile T0 Class Rankings
In the world of Zhuxian 2 mobile game, choosing a profession is often the first major decision players face, which will directly affect your gaming experience, growth path, and team positioning. What profession is powerful in Zhuxian 2? Faced with the four major professions of Qingyun, Ghost King, Huan, and Shen Zhu, many players are confused: which profession has the strongest overall strength? Which professions are suitable for beginners? How should big spenders and ordinary players choose? This issue will be based on the latest game data and player feedback to comprehensively analyze the profession strength ranking in Zhuxian 2 mobile game, from PVE dungeon efficiency to PVP competitive performance, from operational difficulty to cultivation cost, analyzing the characteristics of each profession from multiple dimensions to help you find the most suitable path to immortality.
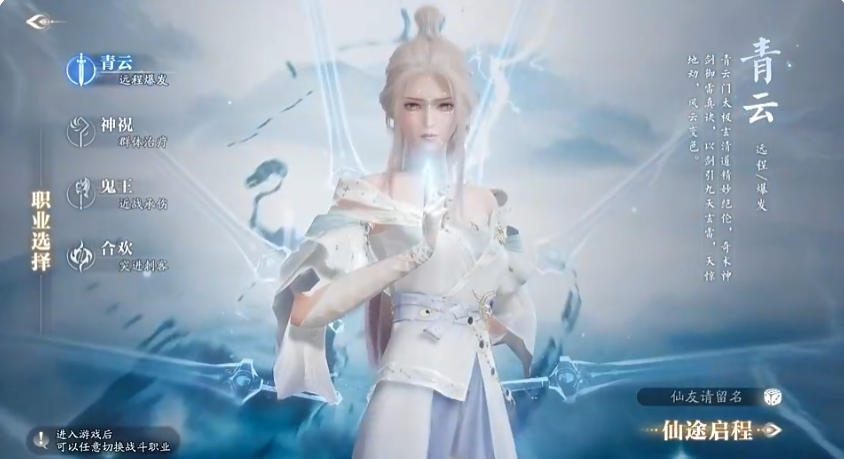
1. Qingyun
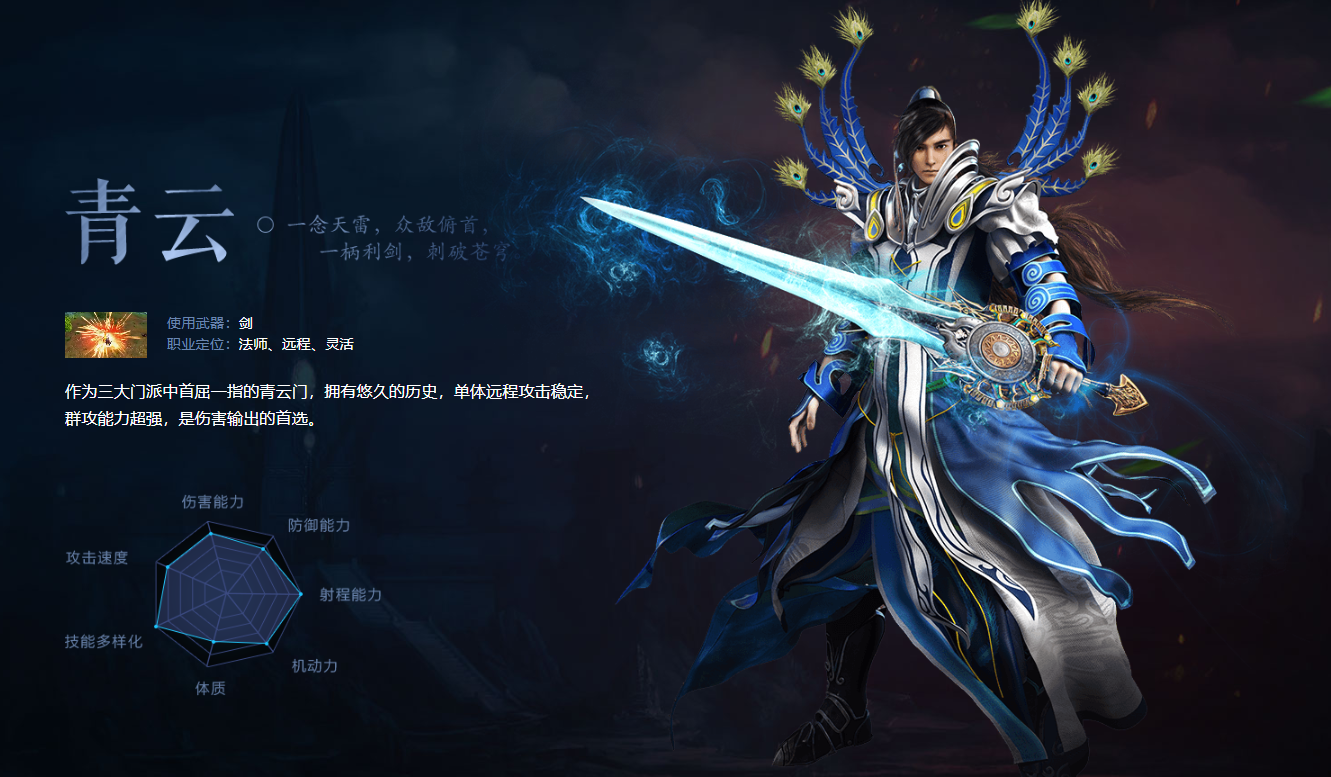
With its outstanding long-range AoE (Area of Effect) ability, it firmly holds the top spot in the T0 tier. As the most typical mage class in the game, Qingyun boasts the widest skill range and the highest burst damage among all classes. Its signature skill "Sword Dragon Emerges from the Sea" can freeze and control enemies over a large area, while "Heavenly Punishment Sword Qi" and "Thunder God's True Scripture" can instantly unleash massive damage. In PVE scenarios, Qingyun's monster clearing efficiency is unmatched, making it the core DPS (Damage Per Second) for teams tackling high-difficulty dungeons; in PVP, it relies on long-range harassment and control chains to suppress opponents, especially showing strategic value in large-scale battles. It's worth noting that there is a clear polarization within the Qingyun faction—high-end Qingyun players can dominate the battlefield, while those less skilled may frequently die due to their weak survivability.
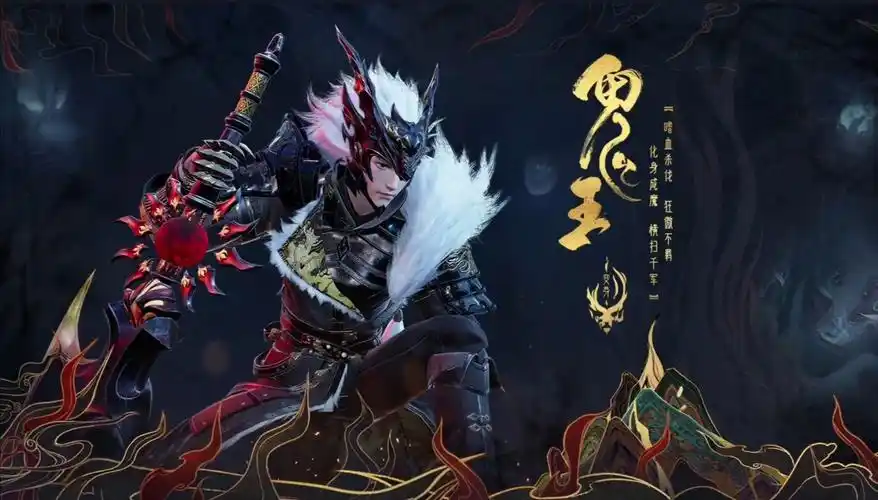
2. Ghost King

As an all-rounder profession combining offense and defense, it also ranks in the T0 tier. This class perfectly integrates the survival capabilities of a tank with the burst damage of a DPS. Its "Mingwang Transformation" skill can make it immune to all control effects, while "Fury Slash" and "Soul Chasing Strike" combine high damage with control effects. In PVE, the Ghost King is an indispensable main tank for the team, capable of steadily attracting boss aggro; in PVP, it disrupts enemy formations with its powerful charging abilities. Notably, the Ghost King is relatively friendly in terms of operational requirements and offers flexible development routes, suitable for both casual players who prefer a pure tank role and big spenders who want to develop a semi-tank, semi-DPS build. Data shows that the Ghost King has a 75% pick rate in high-level matches, making it one of the most stable choices for climbing the ladder in the current version.
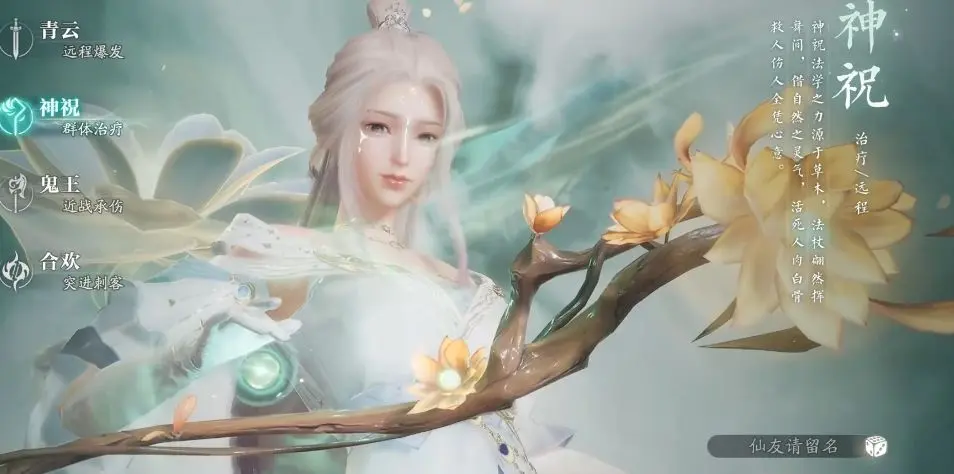
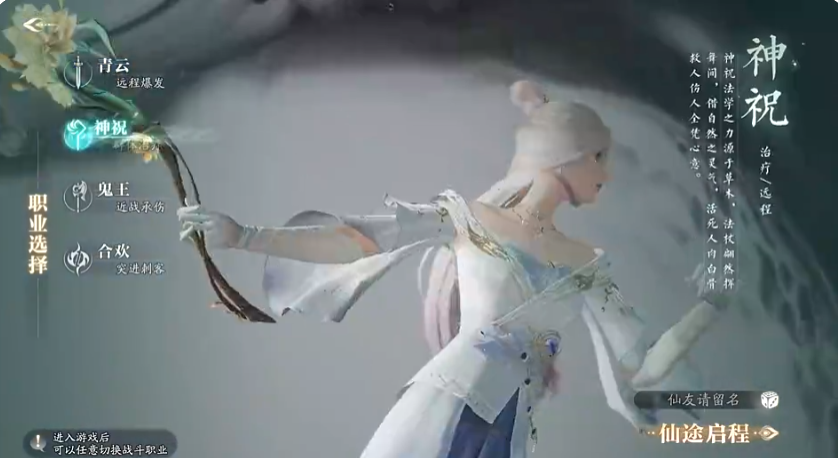
3. Tianyin
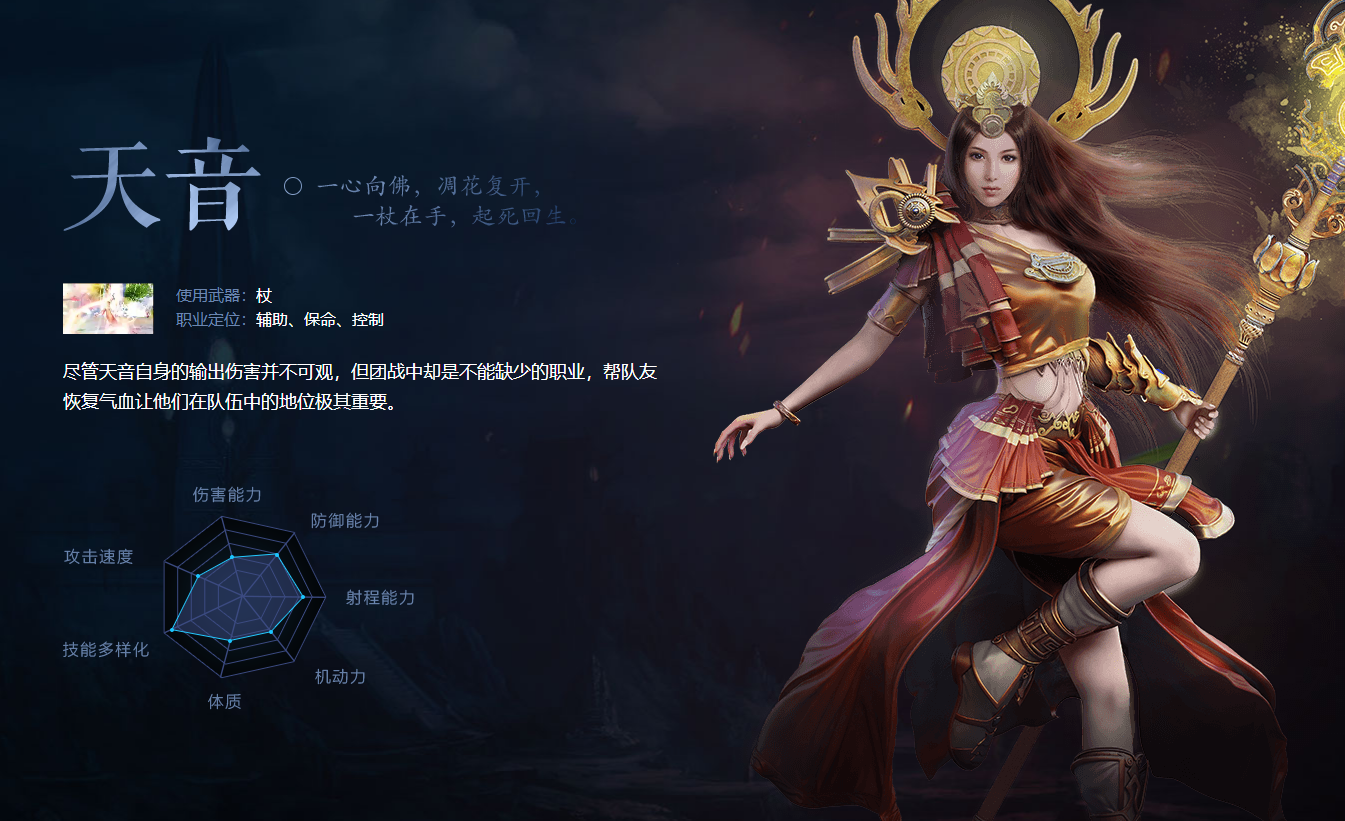
As the only dedicated healer in the game, it ranks in the T0 tier due to its irreplaceable team value. Although its solo combat capability is limited, Tianyin's group healing, shield casting, and resurrection skills make it a must-have for all high-difficulty content. The "Endless Life" skill provides continuous healing, while "Reversal of Life and Death" can instantly turn the tide of battle, making these abilities indispensable in team dungeons and arenas. Another advantage of Tianyin is its low cultivation threshold, even zero-spend players can steadily acquire resources through support roles, making it an ideal choice for casual players. Statistics show that the demand for Tianyin in team dungeons is as high as 90%, far exceeding other professions.
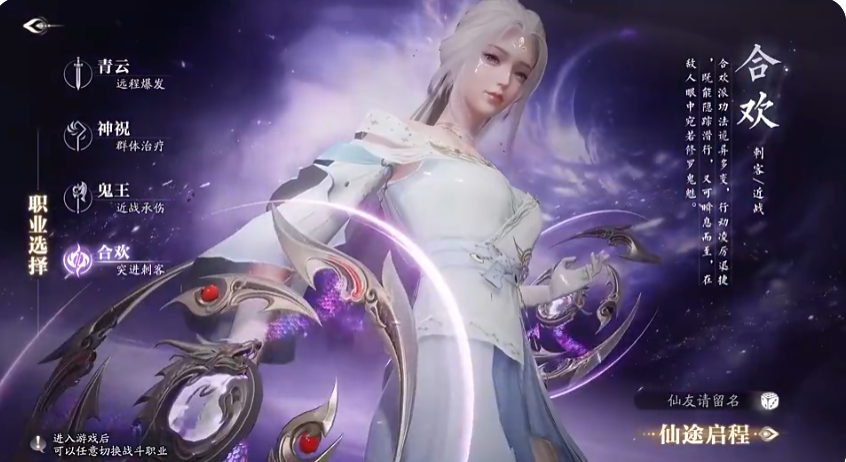
4. Huan
Although not in the T0 tier, its unique "Combo Point" mechanism is still worth noting. By accumulating combo points through skills like "Wind, Flower, Snow, Moon," and then using them to release the ultimate skill "Jiangnan II," it can deal astonishing single-target burst damage. The "Shadow Slash" branch focuses on one-hit kills, while the "Soul Breaker" branch emphasizes mobility and combos, both requiring precise skill chaining and positioning. Huan's stealth skill "Hidden Dragon" is the strongest first-strike move in the game, but it has a long cooldown after use, so timing is crucial.
5. Summary

The meta in PVP arenas is constantly changing. The strongest 3v3 combination in the current version is "Shen Zhu + Ghost King + Qingyun," balancing survival, control, and burst. In 5v5, the "Double Ghost King Charge" tactic is popular, combined with Qingyun's AoE control to exert pressure. In solo arenas, high-end Huan players occupy most of the top spots, but the entry barrier is very high. PVP-oriented players should closely follow the balance adjustments each season and adapt their builds to the changing environment. The profession system in Zhuxian 2 mobile game is both deep and broad, with no absolute best profession, only the most suitable choice. Qingyun's splendid spells, the Ghost King's brave charges, Shen Zhu's life-saving abilities, and Huan's deadly assassinations each bring a unique gaming experience.
This concludes the discussion on what profession is powerful in Zhuxian 2. The editor suggests that players should not blindly follow the strength rankings but make choices based on their own preferences and game goals, as the true meaning of the game lies in enjoying the journey of cultivation. With the continuous updates and iterations of the game, the profession balance will continue to adjust, but following the core principles of this guide—clarifying your position, understanding profession mechanisms, and planning your cultivation reasonably—you will always find your place in the world of Xianxia.
Guide to Class Combinations in For the King How to Combine Classes in the Mobile Version of For the King
Character pairing is one of the core contents of the game For the King. Reasonably selecting a lineup before an adventure can make players' journey smoother and provide a better gaming experience. So, how should you go about character pairing? Here is a specially prepared guide for character pairing in For the King, offering three methods that players can choose according to their preferences.
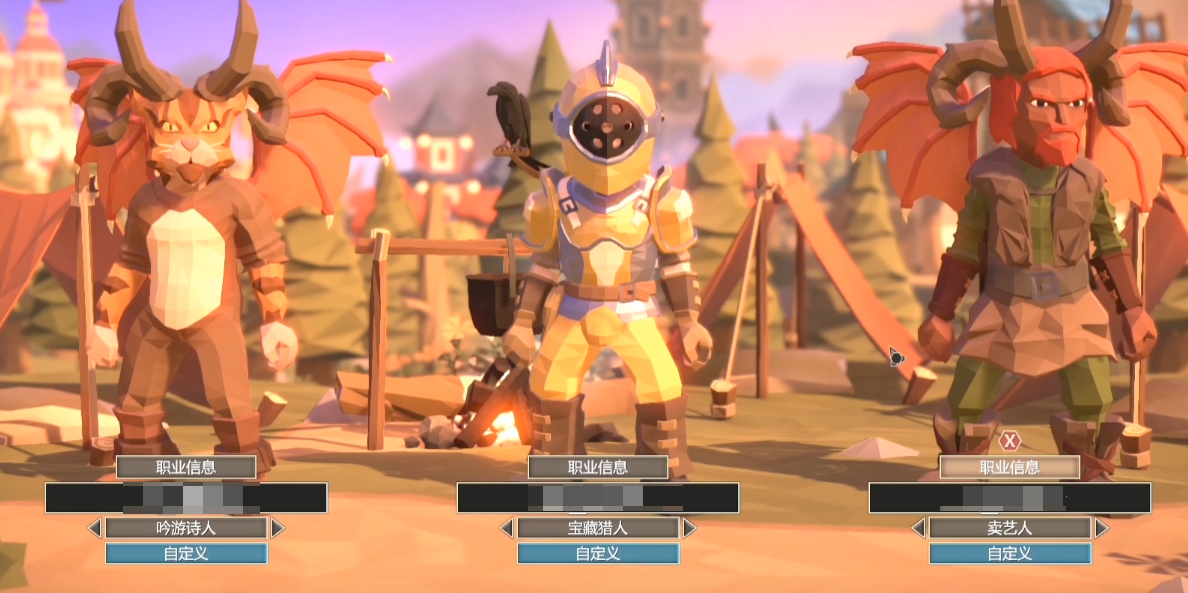
1. Bard + Treasure Hunter + Blacksmith
The Blacksmith takes the damage, the Bard provides support, and the Treasure Hunter offers high output; this is the basic logic behind this lineup. Additionally, this team starts with a good amount of gold, allowing them to acquire many useful items from the shop early on. The Treasure Hunter also has the ability to find treasures, so as long as the player manages well in the early stages, this lineup can easily develop. In the later stages, the Treasure Hunter's excellent damage capability, combined with the Bard's high buffs, can easily push through monsters, making it very easy to clear levels. Most importantly, this lineup is easy to handle in actual combat and doesn't feel overly complex to play.
2. Gladiator + Scholar + Trapper
This is a popular two-damage-one-support lineup. The strength-oriented Gladiator complements the magic-damage-focused Scholar well. Before they fully develop, the Trapper's excellent early-game abilities can buy them a lot of development time. Moreover, the Trapper possesses great trap-disarming and sailing skills, which, when converted to a support role later on, can provide significant buffs to the Gladiator and Scholar. This makes it a lineup with stable burst points throughout the early, mid, and late game. In terms of gameplay, the lineup can choose to focus on either the Gladiator or the Scholar based on the acquired items and equipment, while also accumulating more recovery items.
3. Hunter + Blacksmith + Scholar
This is a classic trio. The Blacksmith can shield and take damage, allowing the Hunter and Scholar to deal damage. Both of these damage dealers are efficient at providing high DPS once they are well-developed, with one leaning towards physical damage and the other towards magical damage, ensuring that the team has no major weaknesses in its offensive capabilities. Furthermore, the Hunter can later sacrifice some of their damage output to focus on perception, using the bow's stun shots to even achieve the feat of continuously stunning a single enemy. Since the Scholar lacks support abilities, they naturally focus on dealing damage, and players can cultivate this class as the main damage dealer in the team, bringing substantial returns.
The three team compositions provided above are all practical and have considerable strength. Players can try using them to complete For the King and enjoy the pleasure of winning through strategy. That concludes the guide for character pairing in For the King. I hope everyone enjoys it.
"For the King" Class Combination Guide and Class Recommendations for the Mobile Version of "For the King"
For the King mobile game is ported from the PC version, and while there are some differences in operation, the core gameplay remains the same. Therefore, when looking for For the King class pairing strategies, you can also refer to the PC version. Below, we will bring you the recommended classes for the mobile version of For the King. If you're interested, let's take a look together!
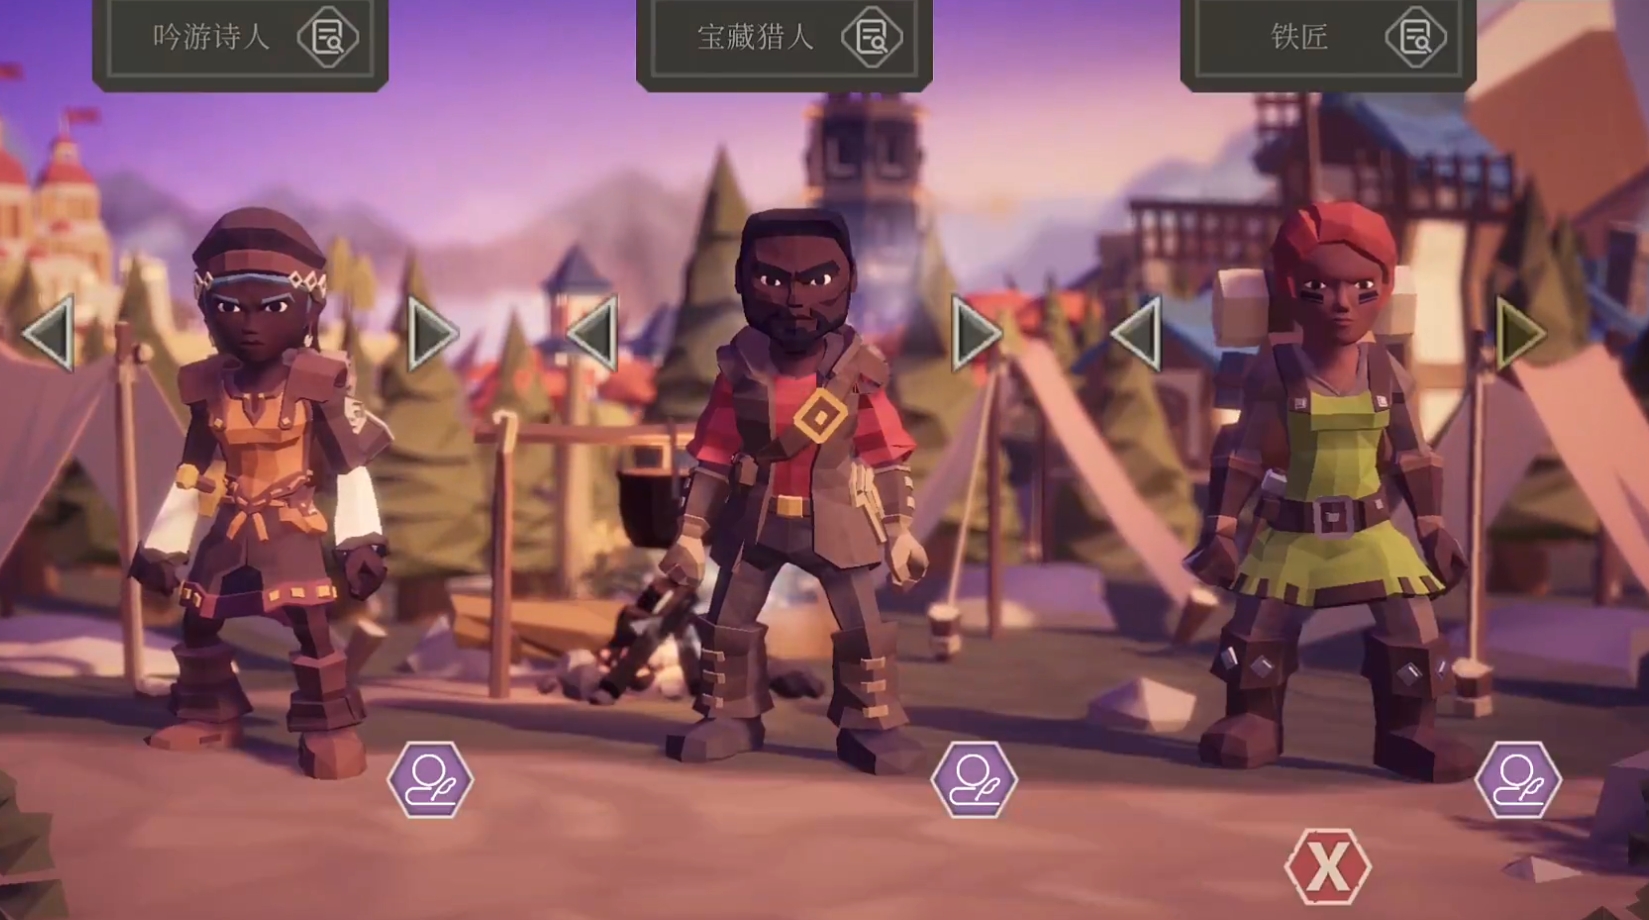
Minstrel:
The first recommended class, which can be obtained by unlocking 12 knowledge points, is an early support role with good growth potential. In team building, although it does not match up to the "top support" Bard, in the absence of a Bard, it is still a reliable "second-in-command" support. The primary attribute is "Talent," and it also has decent strength, generally leaning towards mobility and support. The Minstrel comes with the "Escape Mastery" skill, allowing quick disengagement from combat or escape from predicaments, avoiding team wipe.
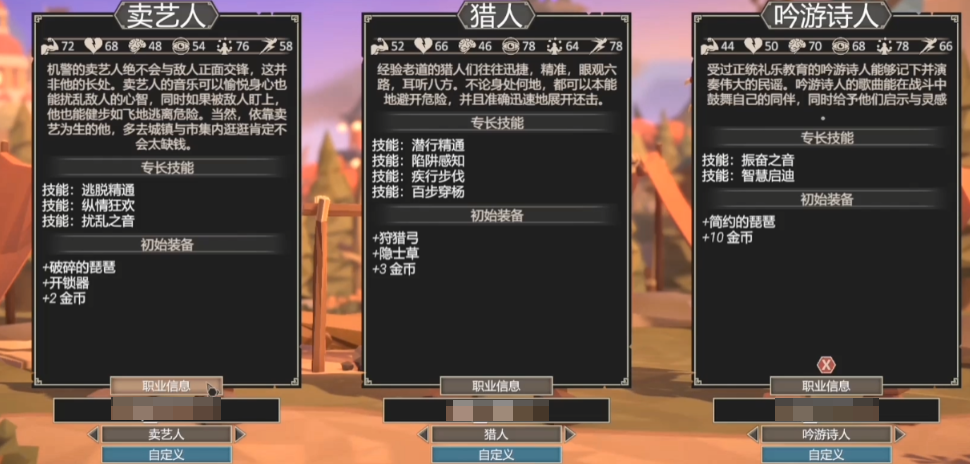
The "Festival Frenzy" skill provides a certain chance to earn gold when resting in cities, helping to alleviate initial economic pressure. The combat skill "Disruptive Melody" can interrupt the enemy's attack rhythm, reducing their effective attack opportunities, thus giving the team more round advantages. In terms of equipment, the initially equipped broken lute, though not a high-damage weapon, has a certain gold income support effect. The Minstrel is suitable as a stable support role for long-term battles, skilled at disrupting enemies and protecting the team, and is recommended to be paired with physical damage dealers or healers like the Herbalist, forming a balanced squad that excels in both offense and defense.

Woodcutter:
A strength-based warrior, unlocked with 18 knowledge points, one of the core physical damage dealers. The Woodcutter has the highest base strength value in the current game, even surpassing the Gladiator and Blacksmith, plus decent health, making it a semi-tank and semi-damage dealer. Although somewhat slow in speed, its core skills completely make up for this. The "Breach Mastery" skill plays a crucial role in exploration, providing a higher chance to break through blockades and open special passages or secret rooms.
The "Justice Arbitration" skill is a killer move; when using two-handed weapons and achieving a perfect hit, there's a chance to cause splash damage, meaning the Woodcutter can take out multiple units in a single attack, making it extremely efficient in clearing groups of enemies. Especially when equipped with items that increase the chance of perfect hits, the Woodcutter is particularly strong in crowd control. The Woodcutter is suitable to be paired with control or support companions, such as the Minstrel or Bard, who can use their skills to disrupt the enemy's rhythm, providing continuous output space for the Woodcutter.
Herbalist:
An intelligence-oriented role, unlockable with 15 knowledge points, this support class has extremely high intelligence and awareness attributes, suitable for important positions in the team for long-term healing or spell casting. The "Group Healing" skill is key to team sustainability, restoring a large amount of health to the entire team by consuming Divine Grass, and its healing amount is linked to the character level, offering strong growth potential. Notably, this skill significantly boosts the efficiency of herbal usage, essentially tripling the value of each herb. The "Herbal Mastery" skill continuously provides the team with herbal supplies, generating high-value items like Divine Grass or Golden Roots every turn. As a core medical support, the Herbalist is recommended to be paired with high-output but fragile casters or front-line strength-based characters, such as the Hunter, Scholar, or Woodcutter, ensuring team sustainability while providing longer survival and output time for damage dealers.
Other Classes:
Bard, currently recognized as the top support, with high talent, boosting morale, removing debuffs, and providing team buffs, a versatile all-rounder that can fit into almost any lineup.
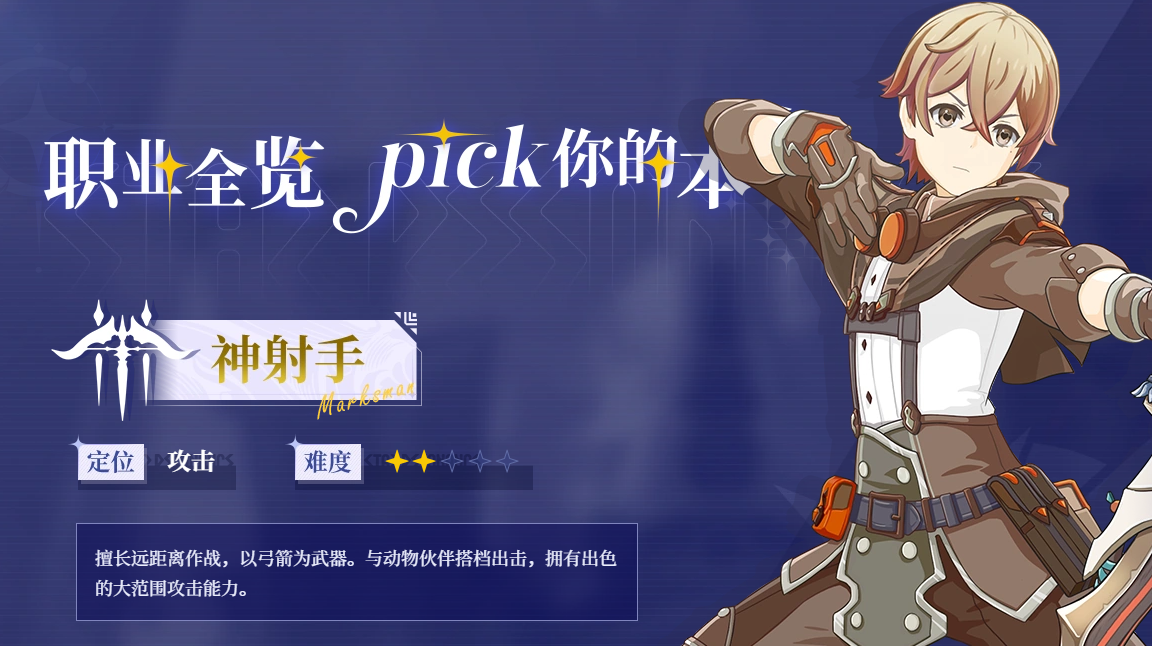
Hunter, a typical ranged agile damage dealer, with very high speed and awareness, often initiating attacks to suppress the enemy. Suitable for serving as a scout and first striker in exploration teams.
Black Hat, a control-oriented role, with high awareness and speed, excelling in using poisons, traps, and other skills to weaken enemies. The stealing and chaos skills are quite useful in PVE, especially when paired with high-burst characters.
Blacksmith, a front-line tank, with high health and strength, proficient in using shields and armor, the ideal choice for the team's "tank." Paired with Bards and Herbalists, steadily advancing through levels.

So, that's the introduction to the class pairing strategy for For the King, along with some recommended roles. In fact, there is no absolute strength or weakness among different classes in this game; it relies more on the cooperation and division of labor within the team. As more classes are unlocked and understanding deepens, players can also try new combinations.
Which class is the strongest in Jade Dynasty 2? Recommendations for choosing a class in the Jade Dynasty 2 mobile game
Which class is the strongest in Jade Dynasty 2? Class selection is the first choice faced by new players, and this decision is very important. Suitable class development can make the initial stages of the game smoother and also provide a better gaming experience. It gives an advantage in early combat as well. Given that new players often don't know how to choose, here are a few powerful classes recommended below, which should help everyone quickly become strong in this world.
I. Class Introduction
1. Ghost King
This class can be understood as a tank, with rage being the core mechanism. Normal attacks on groups accumulate rage, enhancing the "Mad Demon Slash" pull range. The strength of the Ghost King lies in its ability to switch between two forms, offering both defensive and offensive capabilities. The defensive form focuses on damage absorption, while the offensive form has excellent crowd control. In PvP, their stun and slow chains can quickly break through enemy formations. High defense does not mean mindless standing; managing aggro requires skill cycling. This class has limited mobility options and lacks agility.
2. Qingyun
Qingyun acts as a magic artillery, with their mechanism revolving around Sword Intent. When Sword Intent reaches 200, it triggers the Flying Sword True Decree, leading to a burst window. In dungeons, no one can match their area-of-effect (AoE) attacks and control abilities. They can also create a freezing chain, which is extremely powerful. In PvP, they have low health and are easily killed by Huanhuan. Managing Sword Intent and the timing of regular attacks and skills is crucial.
3. Divine Blessing
Divine Blessing serves as a strategic support, primarily fighting through the cycle of Divine Spirit. Three regular attacks can recharge energy, enhancing healing efficiency. The group resurrection skill is critical, capable of turning the tide at key moments. Their dual benefits of reducing damage and increasing damage subtly boost the team's overall output. Control skills can interrupt bosses' key spells. The operation threshold is relatively low, making it suitable for beginners, but some predictive ability is required.
4. Huanhuan
This is an extreme assassin class, with stealth and instant pursuit being their strengths. Stealth allows them to silently approach enemies, while teleportation enables quick repositioning for pursuit and takedown. When dealing with low-health targets, their damage bonuses are highly controlled. This class has a high skill ceiling and is difficult to master, with low tolerance for mistakes. A single error can lead to the collapse of the attack chain. They also heavily rely on equipment. However, in the hands of a skilled player, they can be a terrifying presence in battle.
II. Class Analysis
For new players, Ghost King or Divine Blessing would be more suitable choices, as they are quite strong. The Ghost King has high fault tolerance, and Divine Blessing can quickly improve proficiency. For those with some operational skills, Qingyun and Huanhuan are good choices. Qingyun has a high control ceiling, and Huanhuan offers significant benefits in use, providing a thrilling high-burst capability.
In the current version, the trend in dungeons is clear. Whether it's Divine Blessing's healing or the Ghost King's control, both are high-cost necessities. In PvP, the benefits of Huanhuan cutting through the backline increase with higher tiers, making them very prominent in mid-to-high levels.
From a long-term perspective, Qingyun currently performs very strongly and is a powerful class for development. Although Huanhuan has a very high difficulty, it has great potential. Adjusting your class choice based on different versions and developing strategies are very important. All four classes have irreplaceable roles in the team. The Ghost King serves as the team's barrier, absorbing damage and controlling the field; Qingyun excels in AoE and control; Divine Blessing provides significant support and healing, with noticeable team buffs; Huanhuan, as an assassin, has strong burst capabilities but relatively poor survival.
After this comprehensive analysis, what do you think is the strongest class in Jade Dynasty 2? Class selection should still be based on personal preferences and the current environment. Consider various factors to choose the most suitable class for your development. Use this analysis to find your own path.
Introduction to the Eighth Job Transfer in Muffin Go What are the eighth job transfers in Muffin Go?
In the game "Muffin, Let's Go", the eighth job change is about to debut, meaning that the professions we once knew will be welcoming a significant breakthrough! Today, the editor brings you an introduction to the eighth job change in "Muffin, Let's Go". This eighth job change is not just an enhancement; it also endows each profession with a brand new elemental attribute, making players' combat styles more varied and the gameplay even more challenging. So, which professions become stronger after the eighth job change? Next, let's get to know these professions that are about to evolve.
Firstly, the Swordsman is one of the most representative eighth job changes. After completing the job change, the Swordsman transforms into the "Outsider Judge", not only looking cool but also experiencing a huge change in gameplay. As a fire-attribute profession, the Outsider Judge possesses powerful flame skills, exchanging their own health for greater attack output. Imagine, at a critical moment, burning your own blood to unleash a raging inferno, overwhelming the enemy, this kind of ultra-burst feeling absolutely brings a strong sense of satisfaction. Moreover, the continuous damage effect of the flame skills is very powerful, capable of defeating enemies in a short time, definitely becoming a strong character in team battles.

The next job change for the Ranger, becoming the "Harmonizer of All Things", is even more eye-catching. The transformed Ranger is no longer a profession relying on skillful strikes but becomes an envoy of natural forces. They can control the rhythms of nature to inflict damage on enemies, and this damage has the effects of a natural attribute, making it hard for enemies to escape its grasp. This connection with nature gives the Ranger's gameplay a more rhythmic and strategic feel. At the same time, this job change grants the Ranger powerful control skills, preventing enemies from easily counterattacking, and in some cases, even interrupting the casting of enemy skills.

When it comes to the Shadow Assassin, everyone might already have some understanding of this profession. After the eighth job change, the Shadow Assassin becomes the "Blazing Inferno Dancer", still a fire-attribute, but this time, the flames differ from those of the Swordsman. As a Blazing Inferno Dancer, players no longer sacrifice their own health but instead boost their attack power by infusing flames into their weapons. Every swing of the weapon brings powerful flame damage, this direct strike leaves enemies unable to react, truly the art of playing with fire. Additionally, the damage output of this profession is more stable, especially in prolonged battles, where the continuous flame damage can constantly erode the enemy's life.
Next up is the Scholar's job change. The Scholar's eighth job change turns them into the "Weaver of Collapse", as the name suggests, this is a very special existence. As a Weaver of Collapse, the Scholar no longer relies solely on traditional magic damage but can use webbing imbued with corruption to attack enemies. Each attack inflicts poison damage, causing continuous harm to enemies, combining both sustained and burst damage, it's really a combination of various playstyles. The Scholar's method of attack becomes more strategic, with the accumulation of poison damage allowing enemies to be gradually worn down in situations where they cannot escape.

Finally, the Acolyte's job change, the "Abyssal Binder", brings dual power of flame and holy attributes. As an Abyssal Binder, players can release flames with holy effects, burning enemies while the holy attribute of the flames produces additional effects, providing more control and damage output. The operation method of this profession becomes even more strategic and variable, the combination of flame and holy attributes makes the battle process more exciting. Players can utilize the multiple effects of this profession to flexibly respond in battles, both dealing damage and providing strong control.
Above is the content of the eighth job change introductions in "Muffin, Let's Go". This eighth job change is not only an enhancement of profession strength but also a redefinition of profession gameplay. Each profession has acquired its unique elemental attribute, opening up entirely new playstyles, greatly enriching the game's combat experience. Get ready to welcome these powerful job changes and feel the charm of the new professions!
Recommendations for Choosing a Profession and Playstyle at the Beginning of Return Loop How to Choose at the Start of Return Loop
For beginners, the choice at the beginning of playing Loop Hero is very important, as the initial choice will directly affect everyone's later exploration efficiency and the direction of various storylines. So today, I will provide different aspects of starting strategies based on some core mechanisms and occupational characteristics of this game. This way, everyone can play from different perspectives, helping to choose a suitable start. So if you're interested, follow along with me to learn more!

In this game, three professions are provided, each bearing different functions within the time loop. First, let's share about the Insighter. The core advantage of this profession is its ability to perceive environmental anomalies, discovering key clues in time rifts in advance. Its attribute points can increase the range of perception and speed of puzzle solving. For players who enjoy exploring storylines or unlocking different endings, this profession could be a good choice. The second profession to share is the Psionicist, who serves as a team's control and support. Its core advantage is its strong long-range control capabilities, and its field control can reduce the team's casualty rate by 30%. Various attribute point allocations can shorten skill cooldowns.

The third profession is the Boundary Breaker. Its core advantage is having very high health points and penetration damage, capable of ignoring 20% of an enemy's defense. Additionally, its attribute points can enhance output and survival. At the beginning, everyone can choose from these three professions. For resource accumulation, you can recycle resources, first completing main quests to unlock the Fate Dice system, then focusing on various side quests cyclically to obtain rare materials. You can also employ the technique of resetting dungeons, which is recommended to challenge the third layer on the third loop, using the knowledge of boss attributes and weaknesses from the first two loops to maximize your damage output.

Regarding the mechanism of the Fate Dice and its connection to attributes, everyone can improve success rates by decoding various types of dice, triggering hidden rewards. During key selection time windows, there are golden periods that may trigger various chain reactions. When choosing important core positions, such as the Initial Spirit, whose core position is very high, priority and resource allocation for their skills need to be better chosen. For basic resource management, everyone needs to plan the distribution and use of action points reasonably, so that resources are not wasted.
Through the above strategies, everyone can quickly establish various advantages in their initial choices, allowing for efficient unlocking of multiple endings and hidden content. Beginners should pay attention to following the steps one by one, to accumulate more critical resources, helping the entire team to gain advantages in various confrontations.
Here are the eighth-tier professions in Muffin Go: A List of Muffin Go's Eighth-Tier Professions
Departure Muffin will soon launch the 8th job advancement, which refers to the 8th job change for professions. This means that all professions in the game will receive an epic level of enhancement. So, speaking of these professions that are about to be strengthened, to let everyone understand and recognize the 8th job advancement professions in Departure Muffin, the following section will introduce these professions. After reading this introduction, you will have a good understanding.

Talking about these 8th job advancement professions, the five professions in the game have all received elemental type advancements. Yes, this job change is related to elements. Among them, the first profession, Swordsman, becomes an Outworld Judge after the 8th job change. This is a fire-attribute profession with the effect of sacrificing oneself (consuming one's own HP) to inflict flame sin burn damage on enemies.

The second 8th job advancement is the Ranger. This profession gains the power of nature and becomes a Strings of All Things after the job change. This profession can release a Nature Rhythm Song to deal damage with a natural attribute to enemies. The third 8th job advancement profession is Shadow Strike, which becomes a Hellfire Dancer after the job change.
This is also a fire-attribute profession, but unlike the Swordsman, this profession does not need to burn its own HP. Instead, it needs to infuse flames into weapons and then attack enemies, causing direct flame damage. This damage is immediate and does not have a continuous damage type buff.
The fourth job advancement profession is Scholar, which becomes a Collapse Weaver after the job change. This profession has the power of nature and can use web attacks with decay effects when attacking, inflicting poison damage on enemies. The last job advancement profession is Acolyte, which becomes an Abyss Binder after the job change. This profession has flame-attribute damage and can release holy-effect flames to attack.
Above is the complete introduction to the 8th job advancement professions in Departure Muffin. After reading the above introduction, I believe everyone now has an understanding of these 8th job advancement professions. With this understanding, you can now look forward to the release of these 8th job advancements and get ready to advance your professions.
Star Trace Resonance Zero氪职业推荐 Star Trace Resonance Zero氪职业选择推荐 Note: "Zero氪" is a direct translation but it might not convey the intended meaning in English. If "零氪" refers to "free-to-play" or "non-paying" in the context of gaming, then the translation could be: Star Trace Resonance Free-to-Play Career Recommendations Star Trace Resonance Free-to-Play Career Selection Recommendations
Today, I will bring you the content of zero-spending profession recommendations for Star Trace Resonance, the choice of profession significantly affects the gaming experience and development process for zero-spending players. Due to resource constraints, zero-spending players need to choose professions that have low dependence on equipment, moderate operational difficulty, and stable demand in the team. Only then can they smoothly advance in the game with limited resources, accumulate various resources needed for growth, and a reasonable choice of profession can reduce the initial learning curve. Let's take a look together.
As a long-range physical damage dealer, the Marksman's core advantage lies in its flexible attack mode and lower operational threshold. This profession does not require a lengthy casting process; players can adjust their attack targets and positions through instant operations, making it more advantageous when dealing with waves of enemies or moving targets. The mainstream hawk-taming playstyle triggers the hawk's coordinated attacks through basic attacks or skill critical hits, forming a stable output cycle. This mechanism allows the Marksman to deal considerable damage even without top-tier equipment, by relying on skill synergies. Since the output capability is not highly dependent on rare equipment, the Marksman can obtain basic gear through regular quests and dungeons in the early stages of the game, quickly building up combat power and helping zero-spending players efficiently complete resource accumulation tasks.
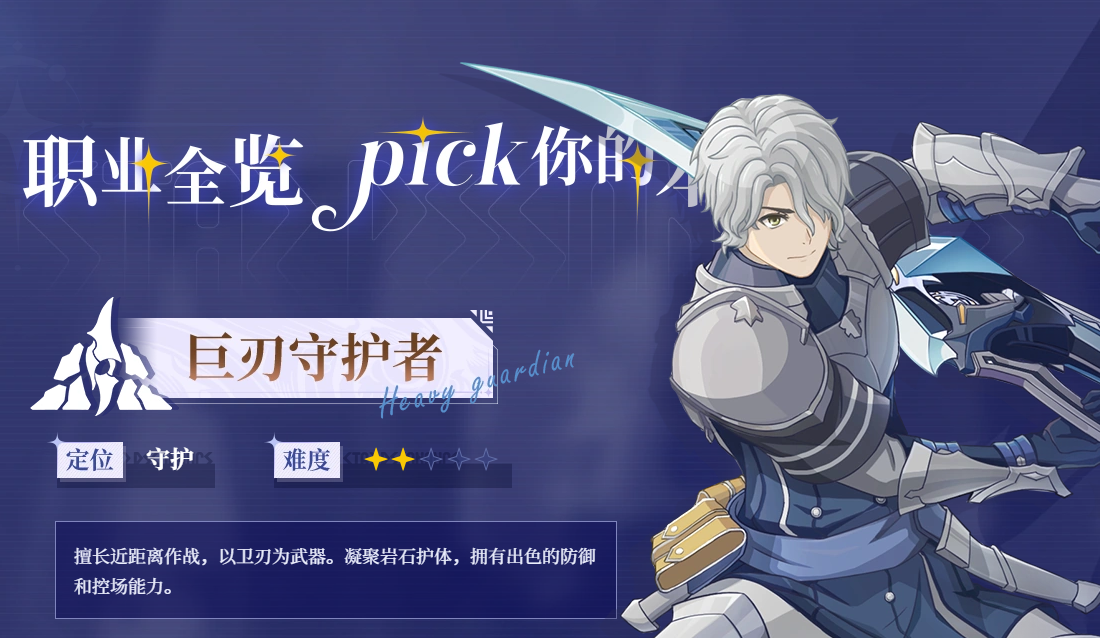
The Greatsword Guardian is primarily a tank, responsible for absorbing damage and controlling in the team. Its gameplay emphasizes survival and teamwork. The Rock Shield playstyle generates shields to block damage, and during the shield's duration, it also boosts the Guardian's own damage, achieving a balance between tankiness and damage. The skill mechanics of this profession do not strictly require high-end equipment attributes; even with common defensive gear, one can maintain survivability through the inherent damage reduction effects of the skills. Operations mainly involve taunting enemies and releasing shield skills, which are simple and easy to learn. Zero-spending players choosing the Greatsword Guardian can secure an important position in various team dungeons due to their stable tankiness, gradually improving their equipment and skills through team rewards, and continue to play a role in the team without high investment.
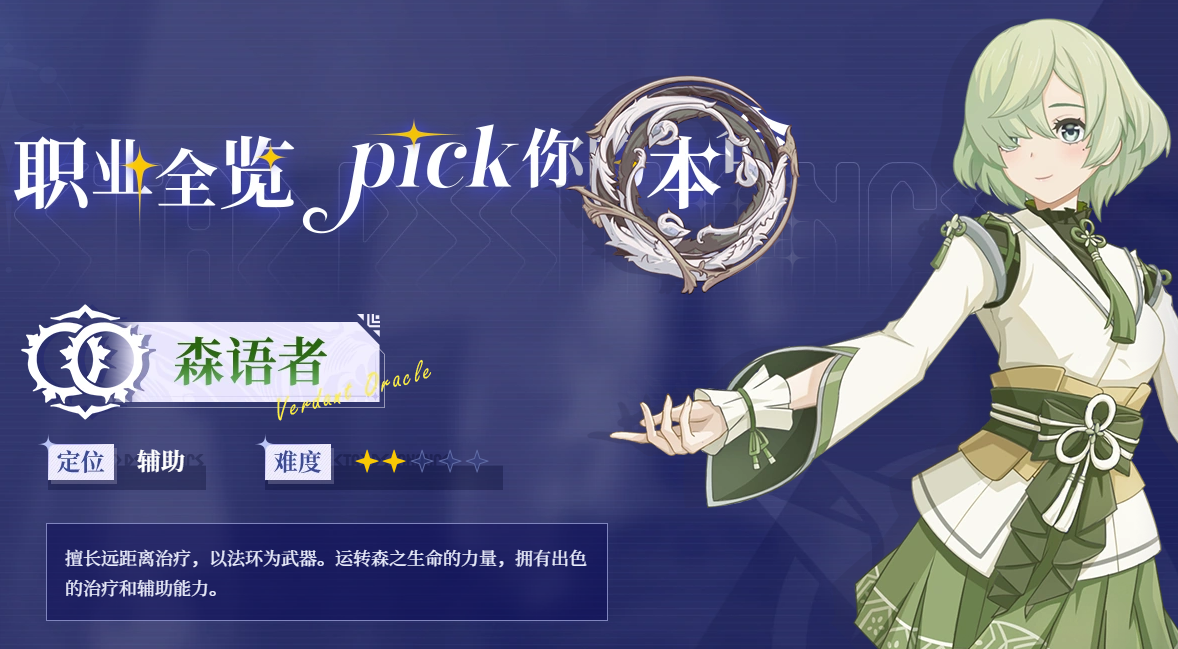
The Woodspeaker serves as the core support profession in the team, focusing on healing and buffing. It is a stably demanded profession in all kinds of team activities. The Healing playstyle centers around group healing skills, combined with continuous health regeneration buffs and resurrection skills, significantly increasing the team's fault tolerance and sustainability. As a support-oriented profession, the focus of developing a Woodspeaker is on enhancing skill levels rather than equipment. Basic cultivation needs can be met with regular resources. Zero-spending players choosing the Woodspeaker can easily join teams due to their scarce healing ability, obtaining resources through teamwork in dungeons and activities. Even with average equipment, they can become indispensable to the team with key healing and resurrection skills, achieving a high level of participation with low investment.
The content of the zero-spending profession recommendations for Star Trace Resonance has been introduced, these professions each have irreplaceable roles in the team, helping zero-spending players accumulate resources through team collaboration, achieve stable growth, and allowing zero-spending players to enjoy continuous gaming fun in the world of Star Trace Resonance.
JX2 Career Selection Guide JX2 Mobile Career Recommendations
There are many professions in Zhuxian 2, and when it comes to these professions, many people do not know how to choose them. The main reason for this is the lack of understanding of these professions. To help everyone understand the professions in the game and make a choice, today we will bring you a guide on choosing professions in Zhuxian 2. In this guide, we will introduce the characteristics of each profession. After reading the guide, you will be able to pick the one you want to play.
The first profession we're going to look at is called Ghost King. This is a melee profession in the game, positioned as a tank warrior. From its positioning, this profession is one that can both take and deal damage, which is indeed the case. This profession can withstand attacks and also output damage. In actual combat, its basic attack has splash damage, allowing it to hit multiple units;
It also has a rage mechanism, through which it can transform into a Míngwáng state, giving it effects such as life steal from attacks and immunity to control. This effect makes it both capable of taking damage and dealing damage. Additionally, it has multiple group control and damage skills, as well as skills that convert attacks into shields. These skills increase its survivability and fault tolerance, providing it with strong front-line combat capabilities. This is the first profession. After reading about it, let's move on to the second one.

The second profession is called Qingyun, which is a ranged DPS type profession, very similar to a mage in its role. It has quite high DPS but is relatively fragile. In combat, it mainly relies on Sword Intent to release sword array attacks. It has various sword arrays, all of which deal significant damage, capable of inflicting terrifying damage within a range. Additionally, these arrays have different attributes, some with frost damage and others with lightning damage, making its damage capabilities quite comprehensive and hard to counter;
Regarding its fragility, there is a way to compensate for this weakness, which is related to its levitation ability. This is a skill of the profession that allows for a period of flight. If used well, it can avoid a lot of damage. This is the second profession, Qingyun.
After understanding this profession, let's look at the third one, Huan. This profession is positioned as an assassin. As a profession under this role, it has very high mobility and burst damage, capable of dealing high damage instantly. However, this damage is only effective against single targets, not groups, so this profession performs much better in PvP than in PvE, making it a PvP-oriented profession;
In PvP, it can use stealth and quick displacement skills to rapidly approach the opponent, then unleash damage, filling up the damage in an instant. If the opponent fails to break free and takes the full damage, they will almost certainly lose. Therefore, this profession is very strong in PvP. This is the third profession. After understanding this, let's move on to the last profession, Shen Zhu.

This profession is positioned as a support healer. It is the only support profession in the current stage of the game. As a support profession, its status in the game is very high because any dungeon run requires a support, and without one, the dungeon cannot be completed. Therefore, this is the most popular profession in the game. However, this is due to its role. If we look at the inherent strength of the profession, it is not very high. After all, as a support, its strength is not comparable to that of a DPS profession. So, in terms of strength, it is quite average. However, what really matters for this profession is its functionality, or its role.
From this perspective, it is an impeccable profession. When running dungeons later, it can even enjoy special treatment, such as having priority for equipment and items. Therefore, if you are looking for a laid-back profession and don't want one with high intensity, this profession is highly recommended. These are all the professions in the game.

The above is a detailed analysis of the Zhuxian 2 profession selection guide. After reading the introduction above, I believe everyone has gained a certain understanding of the four professions in the game. Now, you can choose the one you want to play based on what you've learned.
Recommend


Strategy

A Guide to Zhetian Fanchen Yiyue Sharing Tips for New Players on How to Play Zhetian Fanchen Yiyue
Introduction to the Public Beta Time of Zhetian Fanchen Yeyi When is the public beta for Zhetian Fanchen Yeyi?
How is Zi Yue from Zhetian Fanchen? Introduction to Zi Yue from Zhetian Fanchen
What are the Luhida Origin redemption codes? Sharing of Luhida Origin mobile game gift codes
Lu Xida Origin Team Recommendations Lu Xida Origin Team Guide
Lu Xida Origin Strategy Sharing: Beginner's Guide to Lu Xida Origin
