
Legendary Treasure
Game Introduction


Hot Strategy
How to Play Forgotten Sea Treasure Shipping: A Detailed Guide
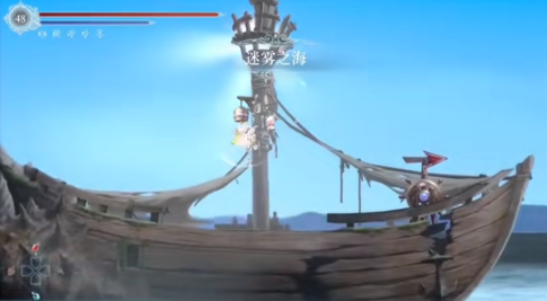
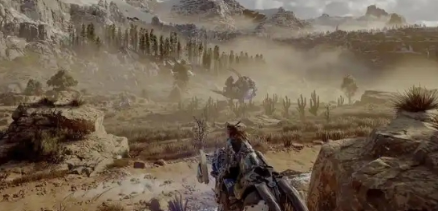
Forgotten Sea is an open-world mobile game mainly focused on maritime adventures, created by a studio under NetEase. The game incorporates a variety of elements, such as exploration and turn-based combat. Here, you also need to sail various sailing ships to complete corresponding sea battle missions. Treasure shipping in Forgotten Sea is a very important gameplay, where you need to gradually explore and interact with NPC characters to complete the corresponding challenges. Next, I will introduce the specific gameplay to everyone.

Firstly, if you want to unlock the treasure shipping gameplay in the game, you need to complete the corresponding island objectives, follow the main storyline and exploration goals, and complete the unlocking tasks. As long as you successfully unlock the Memory Tower, you can start this gameplay. In the main city area, there are many mailing services that players can freely challenge. The game covers a particularly rich variety of islands, each hiding a large amount of treasure or historical relics. If you want to successfully collect a large amount of treasure and ship it, you need to use your strong observational skills and good logical thinking ability to carefully explore.
Secondly, during the process of completing the shipping mission, the main task is to safely deliver various treasures or rare materials to the warehouse. Players can obtain rare treasures in various dungeon missions and main story missions, but they may encounter many enemies during transportation, so it's essential to ensure the safety of these materials without any loss. In this process, comprehensive planning needs to be done in advance, and all possible situations should be considered. After correctly selecting weapons from the armory, one can improve their security performance.

The game also features a highly realistic weather change system, such as thunderstorms and headwinds. Under these harsh weather conditions, various random events may occur, like ghost ship attacks. When players encounter many random events during the treasure shipping process, they must switch to manual mode to cope easily and use their superior advantages to engage in fierce battles with these enemies.

Above are the specific introductions to the content of treasure shipping in Forgotten Sea. When many new players trigger this gameplay but do not know how to properly respond, you need to follow the above steps to complete the challenge. This game also supports a multiplayer cooperative mode, where you can ensure the transport of treasures through proper division of labor and cooperation.
What to Choose for the Bandit Treasure in Yijian Fengyun Jue: A Guide to the Three Treasure Choices in the Mobile Version of Yijian Fengyun Jue
The bandit treasure is part of the White Jin mission in "Yijian Fengyun Jue". After acting together with White Jin, you will fight against the bandits again and can choose one item to take away at the end. So, what should you choose from the bandit treasure in "Yijian Fengyun Jue"? The game offers players three different choices, each providing something different. This time, we will analyze which choice has the highest cost-effectiveness for you.
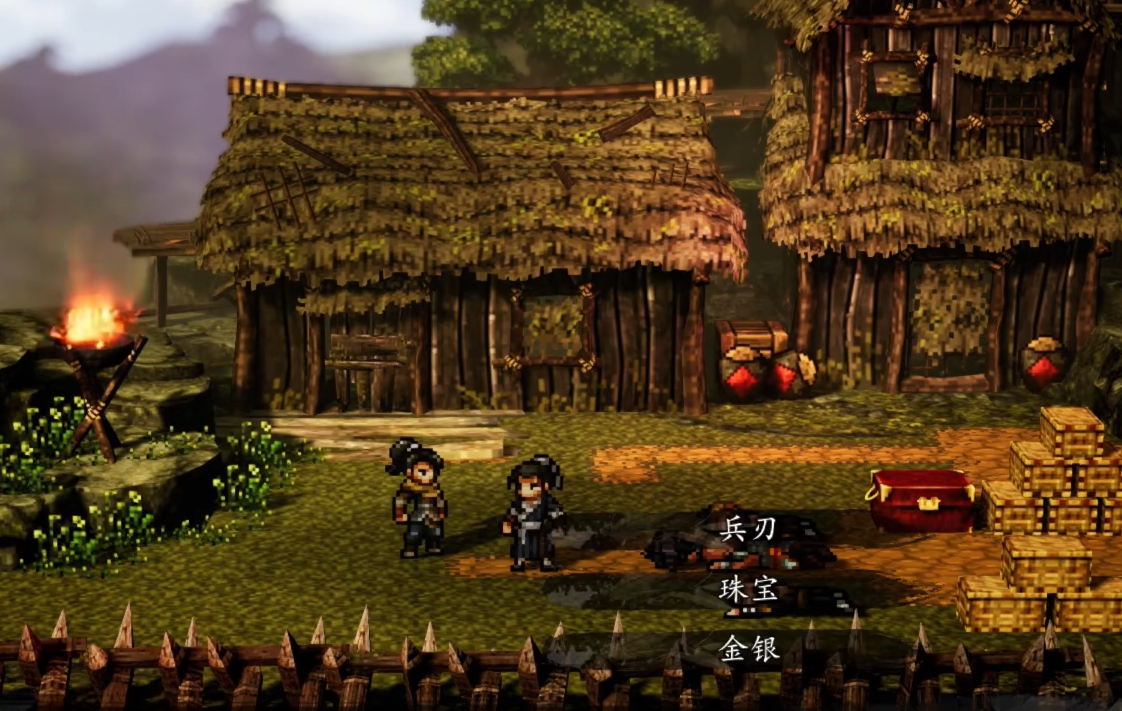
After rescuing the child from the bandits along the main storyline, you will meet White Jin and return to the bandits' lair with him. After a series of battles, you successfully defeat all the bandits. At this point, White Jin gets his long-desired wine, and the player will have to choose one item from among weapons, jewelry, or gold and silver as a spoil of war to take away.

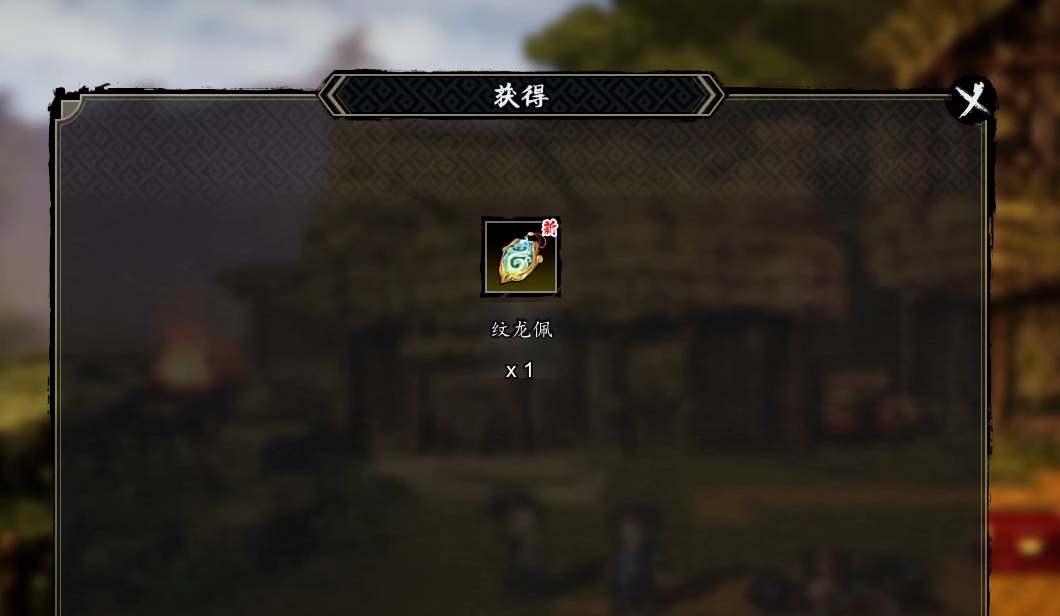
Among these three options, choosing weapons will get you a seventh-grade weapon, Iron Thistle, while choosing jewelry will give you a seventh-grade Dragon Pattern Pendant. Both items are of relatively low grade, serving as transitional equipment. Moreover, the player will later unlock the quest to apprentice under Wudang, where they can obtain more useful equipment. Therefore, these two items are not particularly useful and do not represent the best choice.
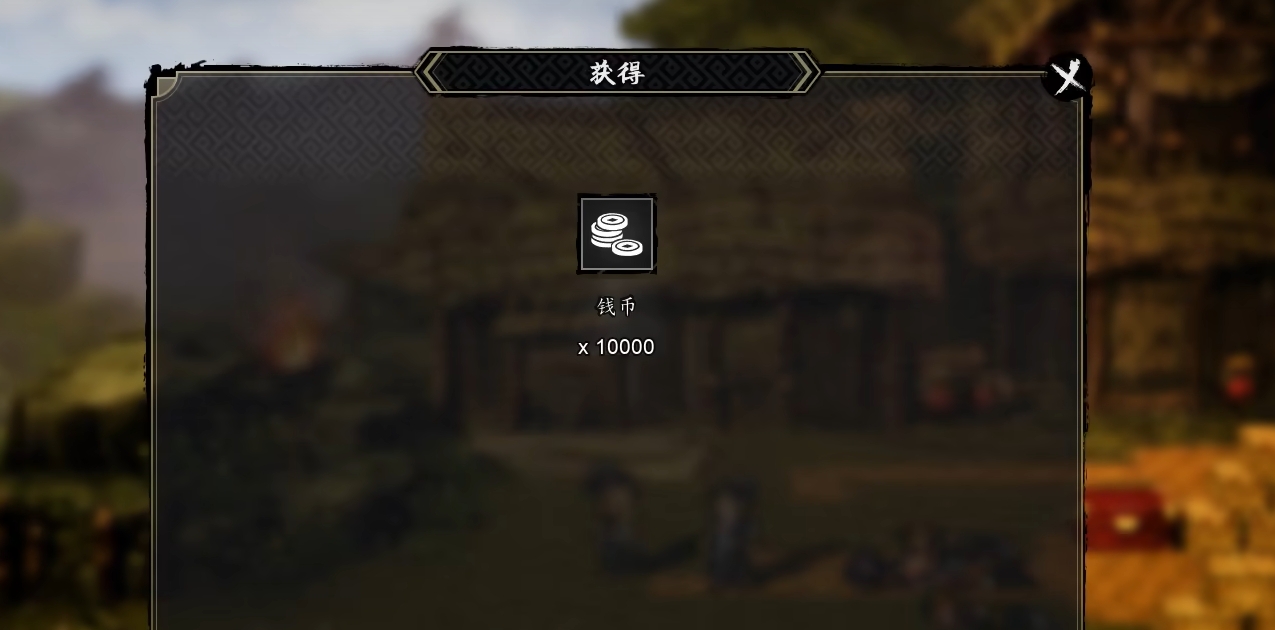
If you choose gold and silver, you will get 10,000 coins, which can be used to make equipment or buy the props you need. Even if there's nothing you need to buy right now, you can save it for future use. From a cost-effectiveness perspective, choosing gold and silver is the most suitable option.
This is the guide on what to choose from the bandit treasure in "Yijian Fengyun Jue". Overall, the value of the items offered by the treasure here is quite similar, but in terms of versatility, choosing gold and silver is better, as there will be better weapons and equipment available later on.
Where is the Dawn of the Wilderness treasure location? A look at the Dawn of the Wilderness treasure location positions
In the game, players can choose to explore freely. Each different area will have some important items. These items can help players obtain more rewards, including rare resources and special rewards. Where is the location of the Dawn of the Wasteland treasure? This is what we are going to share today. Players can acquire it by following the methods below.

In this place, players can see 11 treasure maps, some of which can be obtained through fishing, such as the Secret Forest Treasure. Players can get these treasures in the process of completing main quests. There are also two relatively hidden locations for drift bottle treasures, usually near stranded logs. Players can search along the coast.

If a player completes 7 daily treasure hunt tasks, they can additionally receive 10 bonus rewards and have an extra chance to get a treasure map. After obtaining the treasure map, one can choose to go treasure hunting. There are two core treasure spots here: the Secret Forest Ruins and the Snowfield Hunter. Players can come here and choose to explore them first.

During exploration, it's recommended that players carry a metal detector, which can directly detect some hidden chests around. Additionally, key points can be seen directly on the terrain map, making the search process relatively easier. Players need to carefully observe their surroundings.

To get enough rare rewards, players should first know where the Dawn of the Wasteland treasure is located. These treasure maps can help players obtain additional rare materials or equipment, effectively enhancing their strength in a short time, while also getting more treasure maps.
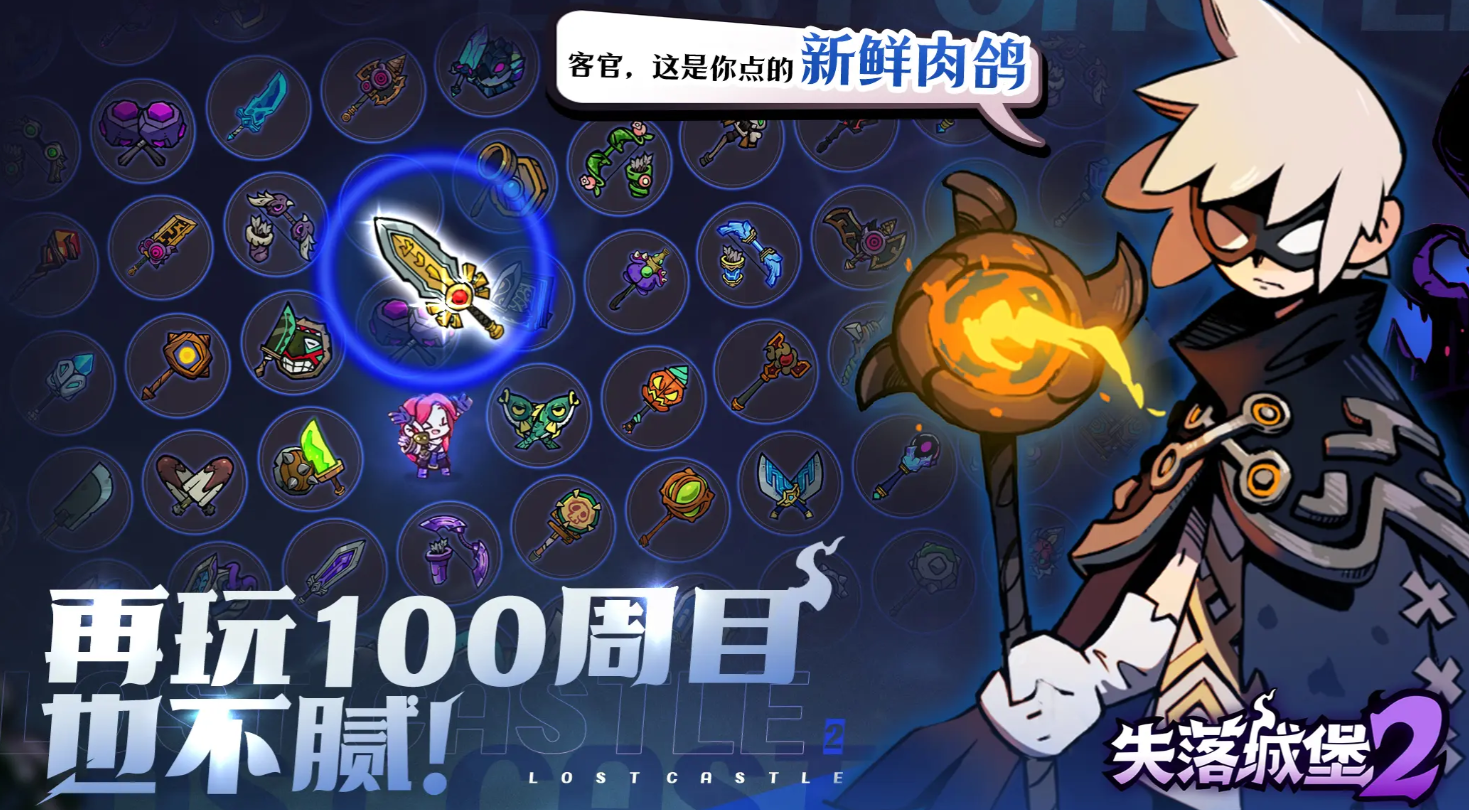
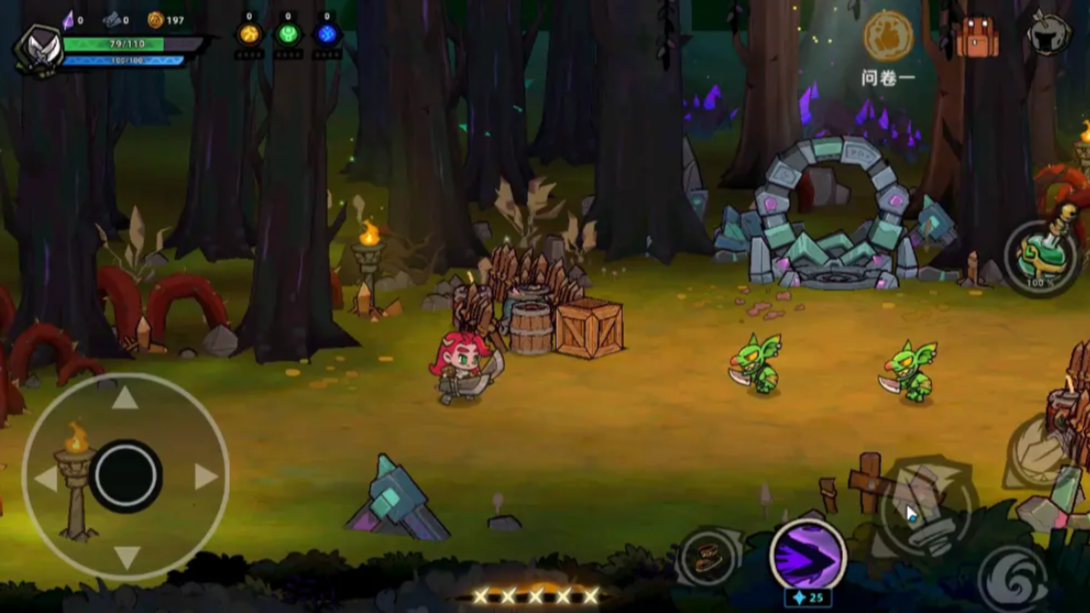
Lost Castle 2 Treasure Overview Guide and Lost Castle 2 Mobile Game Treasure Collection Sharing
This guide brings you an overview of the treasures in Lost Castle 2. Each treasure has its unique effect, which will determine the overall attack style. However, many newcomers are completely unaware of these effects, making it easy to choose a treasure that is not suitable for them, thus affecting the overall output. To avoid this situation, the following treasure guide will help you get to know and understand them.
1. Goblin Horn
It increases attack power by 2% with each hit, up to a maximum of 12%. All bonuses are lost upon taking damage.
2. Lucky Coin
Every 5 seconds, it boosts attack damage by 50%, and the rune effect increases the critical hit chance of that attack by 50%.
3. Devouring Fang
Upon killing an enemy, there's a 50% chance to restore 1% health and 10% mana. The rune effect is that after triggering any recovery effect, your attack power and critical hit rate increase by 2%, lasting for 15 seconds, and can be stacked up to 10 times.
4. Lone Momo Pig Contract
It summons a powerful lone Momo pig to assist in battle. The Momo pig is a summoned creature, and its health and attack power will increase according to the owner's runes. The Momo pig will self-destruct after being killed twice consecutively by enemies.
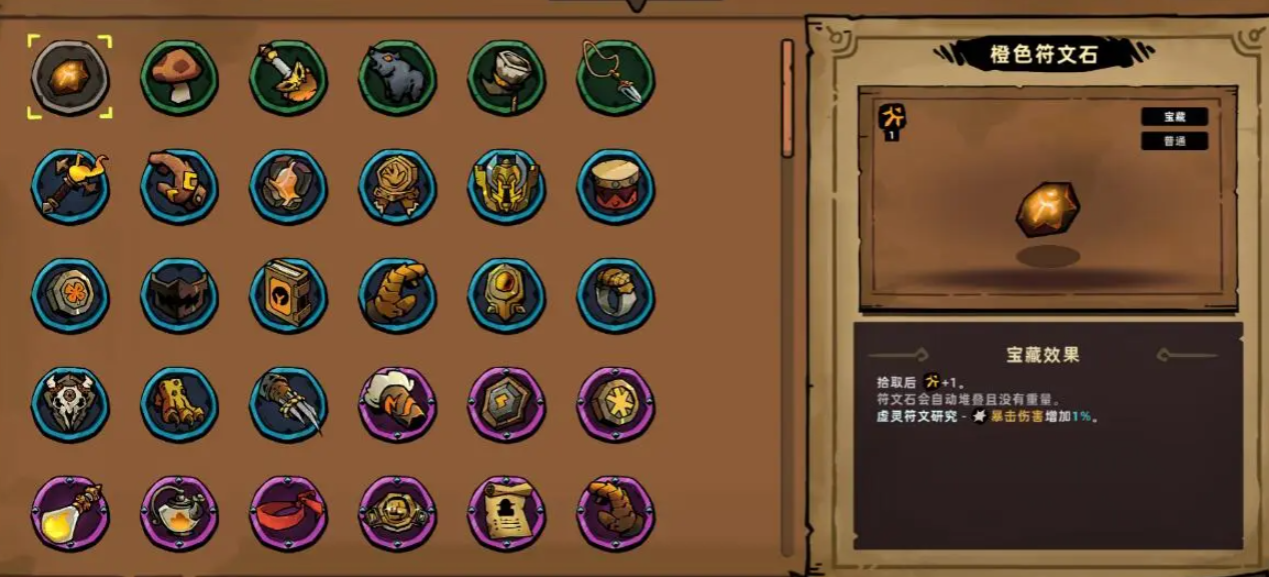
5. Orange Rune Stone
Picking it up adds 1 to your runes, and the rune stones automatically stack without weight. The rune effect is a 1% increase in critical hit damage.
6. Fire Dragon Scale Hand
The Fire Dragon Scale Hand launches 3 rockets after each weapon skill use, with a 2-second cooldown. The rune effect is igniting an enemy grants a flame aura for 5 seconds.
7. Fishman Shaman Totem
In a new area, and when using a weapon skill for the first time, it summons a blue totem pole. This totem pole helps all nearby teammates recover mana, and when lifted, it quickly recovers its own mana. There can only be one totem pole at a time.
8. Crystal Dragon Claw
The Crystal Dragon Claw is a legendary rarity treasure, unlocked by defeating the boss of Crystal Mountain. Its ability is to release an electric shock on a random nearby enemy each time you dodge, with a 2-second cooldown. The rune effect is that when attacking an electrified enemy, each electric pulse increases the damage they take by 4%, stacking up to 20% and lasting for 7 seconds.
9. Charging Glove
The Charging Glove deals an additional 5% to 35% damage with each attack, with the amount of extra damage related to the interval between the last two attacks.
10. Demon-Slaying Wakizashi
When dodging, it generates a ghost blade to attack surrounding enemies, dealing multiple hits, and this damage is considered as a dodge attack.
11. Kinetic Converter
It gains a small amount of weapon energy every 8 meters moved, and the type of energy depends on the weapon you are holding. Filling the rune allows you to gain more weapon energy at once.
12. Glacier Emblem
The Glacier Emblem changes the rune shock attribute to ice. When filled, it causes a rune crit after each attack that freezes an enemy with ice, with a 1-second cooldown.
13. Fragile Amulet
While in a new area and if no damage has been taken, it increases attack power by 15%. The rune effect is an additional 15% critical hit rate.
14. Creepy Glasses
This is a legendary rarity treasure, unlocked by defeating the leader of Black Castle. It increases the critical hit rate of all weapons by 30%, and the rune effect converts any critical hit rate over 100% into critical hit damage.

15. Desperate Headband
The Desperate Headband increases the critical hit rate by 50% when attacking enemies with a higher percentage of health than yourself. The rune effect is a chance to trigger a slash with each critical hit.
16. Eroded Wristguard
Each time an enemy is killed nearby, it permanently increases the rune slash by 0.5%, up to a maximum of 50%. The rune effect is a 20% chance to trigger a kill effect with each slash.
17. Soul-Draining Wedge
It restores 1% of the damage dealt as health with each normal attack and special action, not exceeding 35% of the maximum health. The rune effect is a 15% increase in attack power and 2 points of defense when your health is not more than 35%.
This guide to the treasures of Lost Castle 2 ends here. The above mainly introduces the different effects of various treasures. After understanding them, you can reasonably match them based on the enemies or resources in hand, leveraging the advantages of the treasures to make the battle smoother.
Lost Castle 2 Treasure Guide: What Treasures Are There in Lost Castle 2?
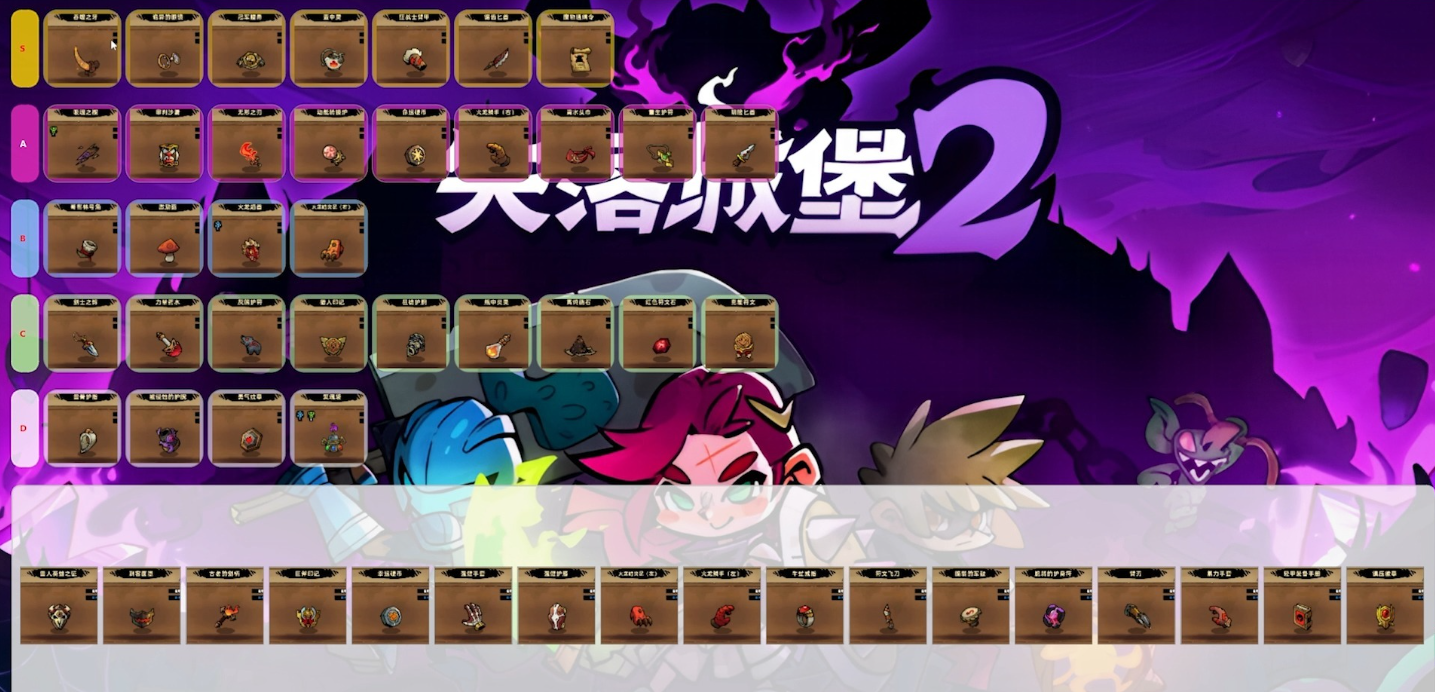
In today's content, the editor brings you a comprehensive guide to Lost Castle 2. In this game, if players want to increase their output, then obtaining some useful treasures becomes very necessary. If players want to know which treasures currently exist in the game and what specific functions they have, perhaps after reading today's article, you will be able to find the answers you are looking for.
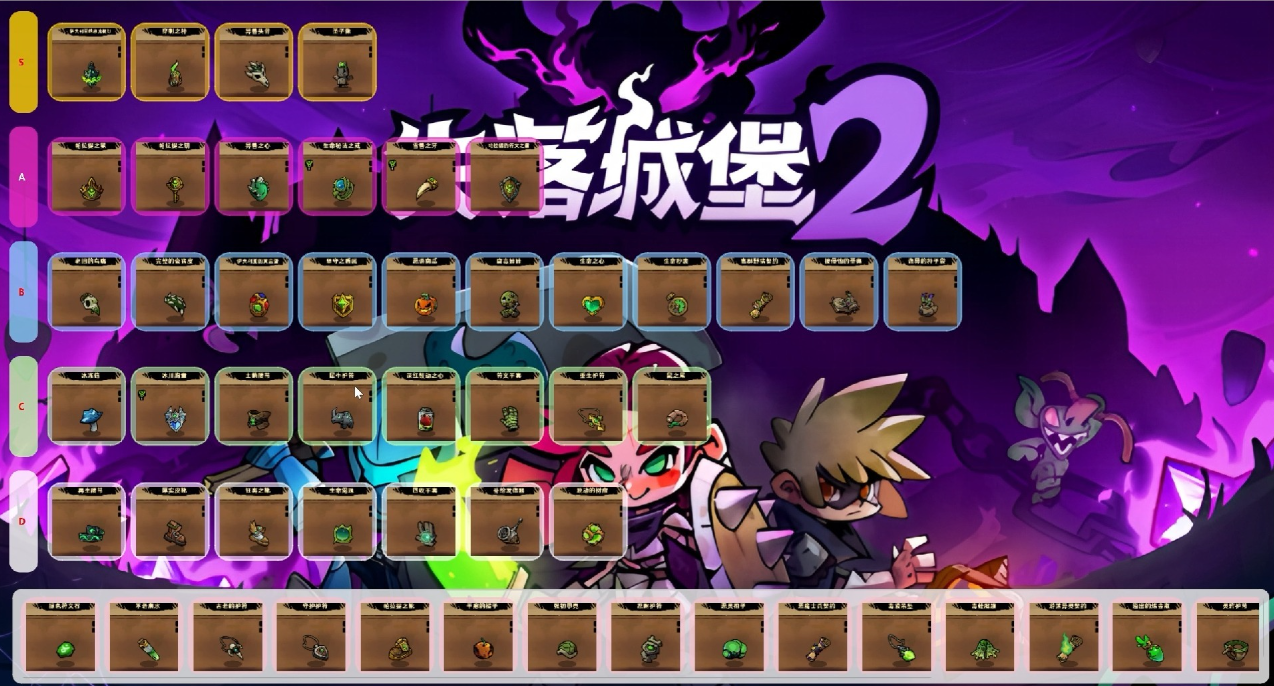
From the image above, you can see that there are quite a few types of treasures currently existing in the game. These treasures are divided into 5 levels, from highest to lowest: S, A, B, C, D. Generally speaking, if players are in the early stages of the game, they can mostly only get B-level treasures, and need to advance to higher-level stages to have a chance at getting S or A-level ones. To make the gaming journey easier for players, the developers have also set the attributes of B-level treasures to be quite good, so players do not necessarily need to pursue the highest level; it is enough if they are adequate.

The most popular treasure combination in the game currently is Crystal Dragon Claw, Lightning Wristguard, and Snow Beast Fang. There exists a complementary relationship among these three treasures. When fully equipped, they can unleash the greatest power. First, the Snow Beast Fang, when players consume mana during combat, not only does it immediately restore 25% of your mana, but it also converts part of the damage you receive directly into health, greatly enhancing players' endurance in battles.
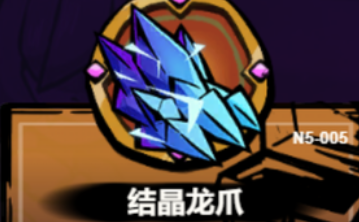
The Crystal Dragon Claw leans more towards providing auxiliary effects. When players wear the Crystal Dragon Claw, it can randomly dodge an attack from a nearby enemy. Although this effect has a cooldown, it is only a short two seconds, making its activation frequency quite high in combat. If players choose a relatively fragile character, the existence of the Crystal Dragon Claw can help you avoid damage to the maximum extent.
Many players are not very familiar with the treasure system in Lost Castle 2, so the editor has provided a simple introduction in today's article. The presence of treasures allows players to defeat bosses more easily within the game. I hope today's article can be helpful to all the players.
Lost Castle 2 Treasure Overview Guide Lost Castle 2 Treasure Compendium
In the game Lost Castle 2, if you want to deal higher damage, choosing the right treasures to carry is very important. In today's content, I have prepared a guide on the Lost Castle 2 treasure list for players and also recommend some useful treasures. If you pick up a treasure in the game but are unsure whether it suits you, you can compare it with the content in this article.
The treasures in the game are divided into 5 grades, with the lowest being the D-grade white treasure and the highest being the S-grade orange treasure. In the early stages of the game, what players pick up more often are D, C, and B grade treasures. Although their effects are not too great, since the monsters' health points are also relatively low at this stage, they are generally sufficient. Due to the uncertainty of drops in the game, I suggest that everyone make do with whatever they find in the early stages and try to choose higher-grade items.
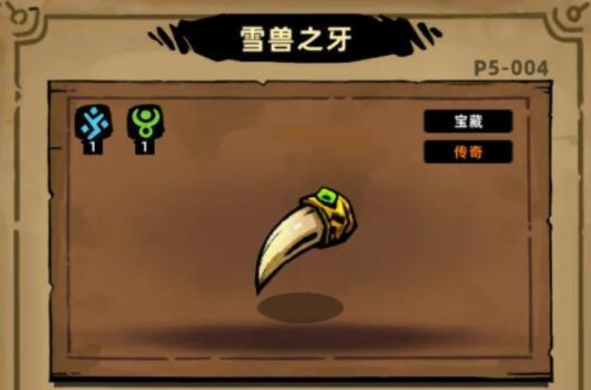
Once you progress to later levels, you can start picking up orange treasures. The first one I recommend is the Snow Beast's Fang. Currently, the "bumper car" strategy is quite popular in the game, and if you want to perfectly achieve this setup, you need a one-handed sword and the Snow Beast's Fang. Its effect is to convert a certain amount of damage taken into health, which can trigger the mechanism of the one-handed sword, giving players an invincible state. Therefore, when combining these two treasures, you can basically maintain an invincible state throughout the battle.
Of course, many players also like the curse set, so I recommend carrying Magic Crystal and Parchment. The existence of the Magic Crystal increases the player's maximum mana, making it one of the core treasures for this playstyle.
In Lost Castle 2, the treasure system greatly enhances the game's playability. If you're not very familiar with this aspect of the game, I believe today's content has helped you better understand this system. I hope it will be helpful to you.
Where is the Dawn of the Wilderness Treasure? A Guide to the Locations of the Dawn of the Wilderness Treasure
In the Dawn of the Wilderness, there is a treasure that is part of the exploration gameplay in the game. As part of the exploration gameplay, the treasure comes with a large number of rewards, and players need to collect the treasure to obtain these rewards. When it comes to collecting treasures in the Dawn of the Wilderness, to help everyone find these treasures, the following will provide a treasure collection guide. After reading this guide, you will be able to find the treasures.
Regarding the treasures, there are a total of 11 treasures in the game. Among these 11, 7 are treasure hunt quests. Players need to accept the quests, and through the quests, they can obtain treasure maps. The treasure maps will directly indicate the location of the treasures. By going to the designated locations, you can find the treasures. These 7 treasures are relatively easy to find.
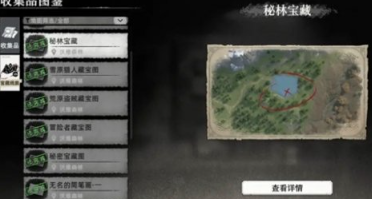
As for the remaining 4, these 4 treasures are harder to find in the game. To find these four treasures, you need to go fishing and obtain the blueprints by catching bottles. Then, use the blueprints to find the treasures. The first blueprint is the Secret Forest Blueprint, located roughly in the center of the Secret Forest's pond.
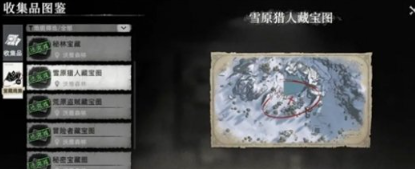
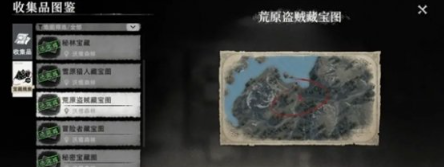
The second blueprint is the Snowfield Blueprint, located roughly at the foot of the mountains in the Snowfield. The third blueprint is the Wilderness Blueprint, located near the lake in the Wilderness, at a sunken point in the lake. The last blueprint is the Hidden Shore Blueprint, located at a sunken position on the lakeshore.
Here, you can find the last treasure. After finding it, combine it with the previous treasure hunt quests to find all the treasures. Once you have found them all, you can get all the rewards. After obtaining them, you can wait for new treasures to appear. With the introduction of new maps, new treasures will also be introduced, and you can collect them at that time.
The above is all the content about where the treasures are in the Dawn of the Wilderness. After reading the introduction above, I believe everyone has a clear idea of where these treasures are distributed. Once you know where they are, you can go to the designated locations to find these treasures.
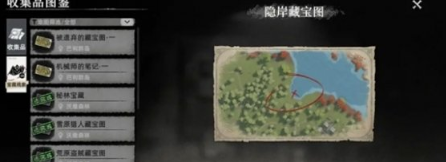
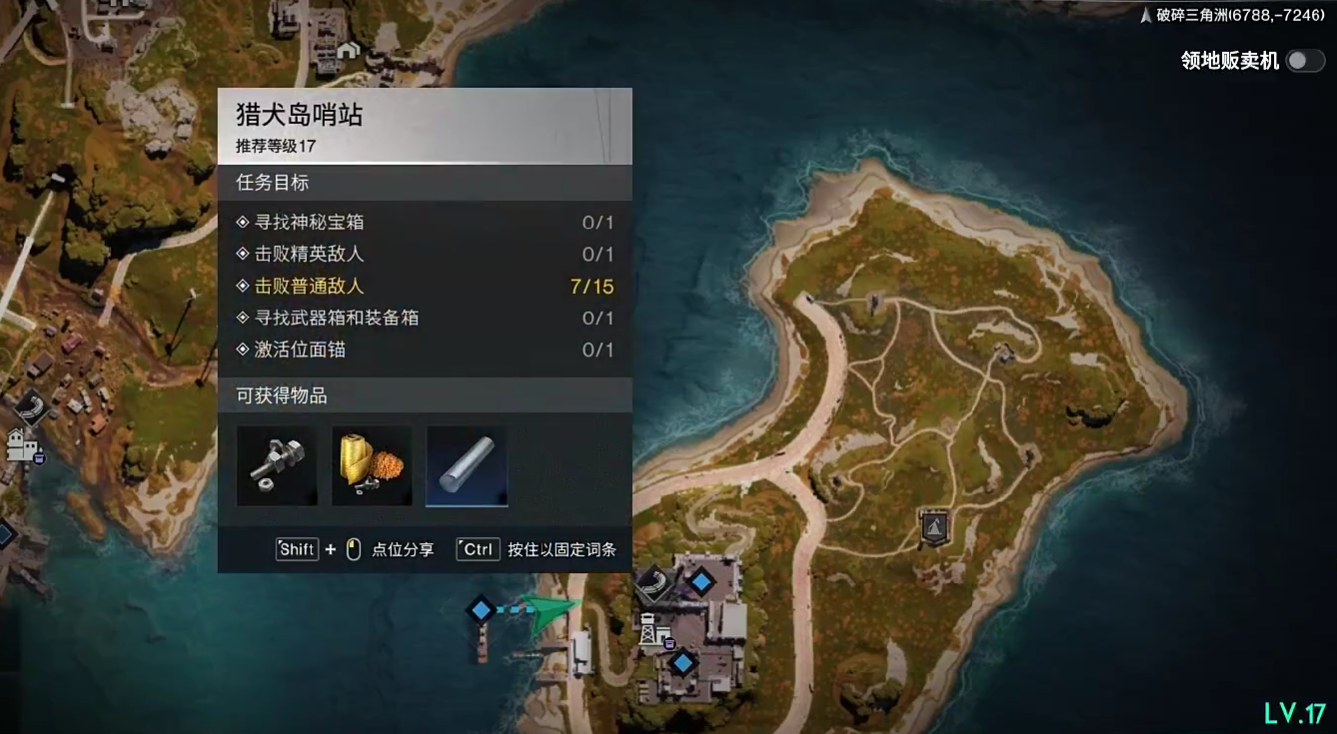
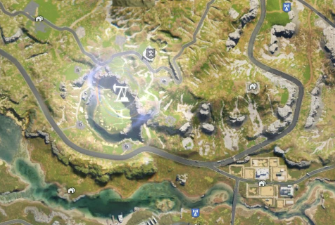
Where are the mysterious treasures on Hound Island in the Seven Day World? Introduction to the treasure locations on Hound Island in the Seven Day World
Seven Days World Hound Island is a research base within the game, where players can obtain mysterious treasures by exploring Hound Island. These mysterious treasures can also provide players with a large amount of weapons and equipment. In this article, I will specifically introduce how to explore Hound Island in Seven Days World. I hope this content can help all adventurers who are interested.
Hound Island belongs to DLC map block six in the game. Players need to open the activity panel and then click on Hound Island exploration to start the adventure on Hound Island.
The mysterious treasures of Hound Island are mainly distributed in chests near the Hound Island watchtower. After arriving at Hound Island, players need to open the map and switch to the coordinates of the Hound Island watchtower in the lower right corner. Upon arrival, head east to reach the entrance of the watchtower. Inside the watchtower, players need to defeat an elite enemy.
The elite enemy on Hound Island is usually a Rosetta Riot Control Officer. After defeating it, players can obtain all access cards, allowing them to enter the factory area of the island to find weapon and equipment chests, as well as mysterious chests.
These chests contain blueprint fragments for weapons. It's worth noting that in other areas of Hound Island, players can also search for weapon chests by reaching the vicinity of the helicopter and the eastern part of the island.
Before challenging the Hound Island map, it is recommended that players first raise their game level to 17 or above and meet the combat power requirements of the Hound Island outpost; otherwise, they will not be able to complete the challenge.
Of course, in addition to the mysterious chests, after successfully challenging the Hound Island outpost, players can also obtain equipment upgrade materials and crafting materials in the game, as well as increase the exploration progress of the game map.
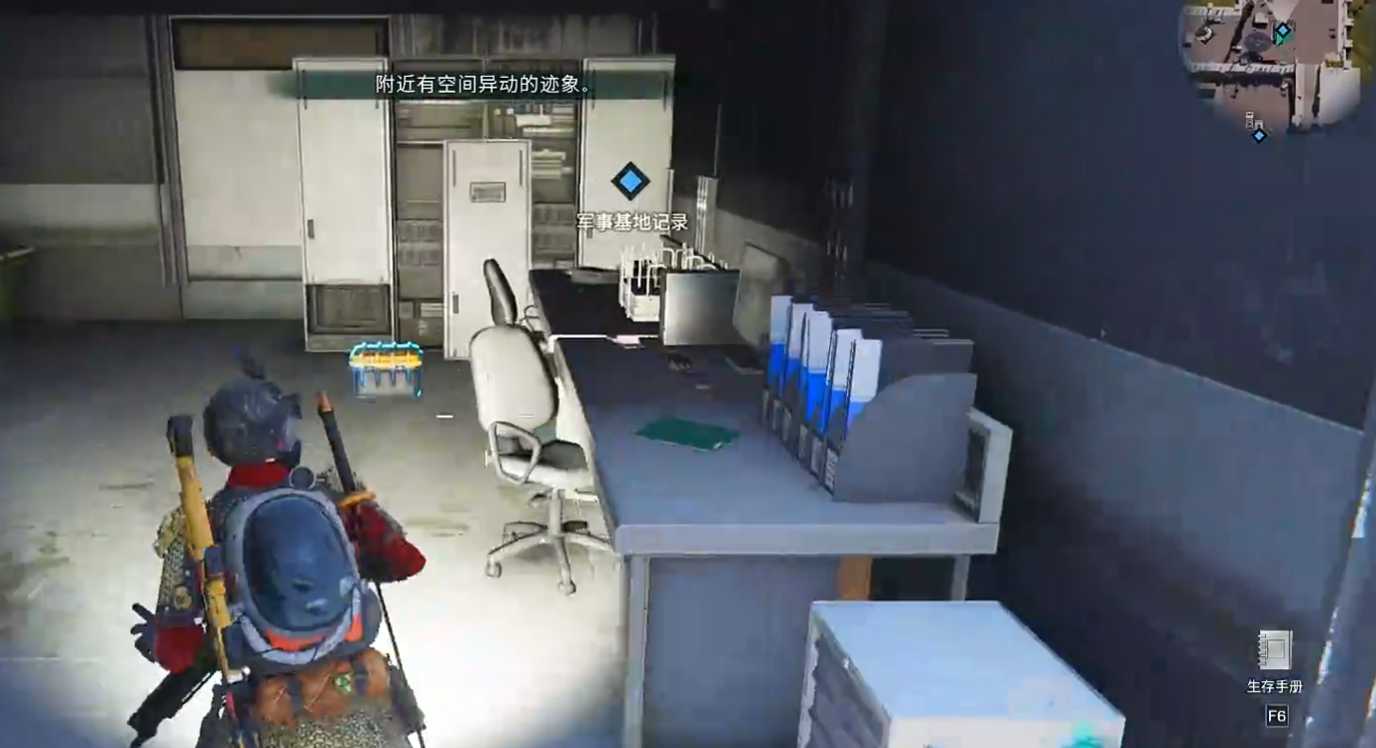
The content above is a specific introduction to the location of the mysterious chests on Hound Island in Seven Days World. If players want to obtain the mysterious chests on Hound Island, they must first clear all the monsters in the scene. Naturally, after entering the Hound Island outpost, clearing the monsters is the first thing players need to do. I hope that after reading this content, everyone can go into the game and experience it~
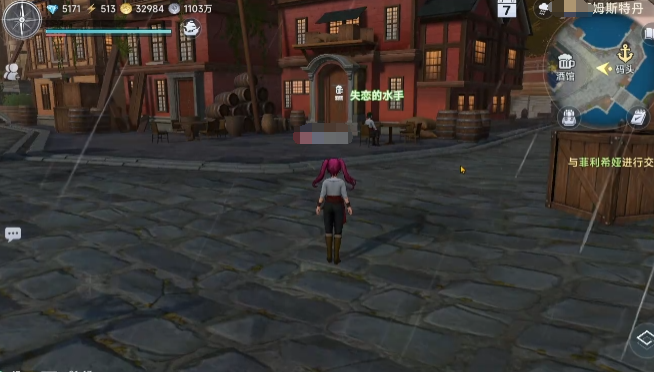
Where is the treasure mentioned by the drunk in the Age of Great Voyages? Tips and tricks for the drunk's treasure in the Age of Great Voyages.
Today, I will be introducing the content of the "Treasure from the Drunkard's Mouth" in the Age of Great Voyages. The gameplay of the treasure from the drunkard's mouth is like a precious hidden treasure concealed behind waves and mist, attracting countless players to delve deep into its exploration. This gameplay is not isolated but is closely intertwined with the game's rich adventure system, presenting a unique gaming experience through distinctive clue acquisition methods and challenging exploration processes. Let's take a closer look together.
The first step for players is to go to a specific port's tavern. The tavern, as a hub of information in the game, often conceals key clues, and the drunkards are important providers of these clues. Players need to head to the tavern in Oporto, where they will converse with the drunkard. At this point, the drunkard will mention that the player should go to the scholar in Lisbon to investigate something about Jimenez, because that is his family's ancient surname. This clue is like the first key to opening the door to the treasure, guiding the direction of the player's subsequent exploration. After obtaining the clue provided by the drunkard, the player must proceed to the designated location based on the clue for further exploration.

Players need to go to the library in Lisbon. In the game, the library is a treasure trove of knowledge and information, where many key pieces of information about history, culture, and treasures can be found. In the library, players should read the treasure appraisal books. By carefully reading them, players learn about the Kingdom of Navarre. In the early 10th century, the Kingdom of Navarre was established in northern Iberia, reaching its peak during the reign of Sancho III of the Jimenez family, before being replaced by the Kingdom of Aragon. Soon after, the royal family became extinct and became part of the French royal lineage, and the church in Oporto has treasures left by the Jimenez family. This information further enriches the player's understanding of the treasure's background and provides a clearer goal for the next steps. The player needs to go to the Oporto church to find the treasure.
Based on the information obtained from the library, players need to return to Oporto, with the destination being the Oporto church. They need to search at a specific location within the church. In the task of the ancient king, players need to search the wall to the left of the bookshelf in the Oporto church. This search process is not done randomly but is based on precise positioning made from the previously acquired clues. When searching, players need to carefully observe the game scene and pay attention to any hints or signs related to the mission. Through the search, players may find the relevant treasure. In this mission, players have the opportunity to obtain items such as the Warrior's Crown and the Letter of Introduction. These treasures not only have value within the game, which can be used to complete missions and enhance character strength, but also bring a sense of accomplishment from successful exploration to the players.
I have now introduced the content of the "Treasure from the Drunkard's Mouth" in the Age of Great Voyages. Throughout the entire process of exploring the treasure from the drunkard's mouth, it is crucial to pay attention to the clues provided by different characters. The seemingly casual words of the drunkard may actually hide significant clues, and players need to extract the key information from them.
Seven Day World Wave Light Town Bay Treasure Acquisition Guide How to Obtain the Treasure in Wave Light Town of the Seven Day World
Let's chat about the treasure hunting guide for the Bay of Glittering Town in the Seven Days World. During the experience of this game, many players have heard rumors that there is a mysterious treasure hidden in Glittering Town. However, the location of this treasure is quite secluded, and finding it is not an easy task. Today, I've compiled a guide to exploring the mysterious treasure of Glittering Town for all players, hoping to help everyone successfully uncover the mystery of this treasure and add it to their collection.
First, players need to determine the exact location of the Rusty River area, and then locate where Glittering Town is within this area. Glittering Town is situated at the far right, by the sea, in the Rusty River area, with the most convenient entry point being from the left entrance. After entering the town, players just need to follow the main road steadily, and they will come across an equipment box; pick up this box. As you continue deeper into your exploration, the paths within the town may be a bit winding, and near the water, there is also a waiting-to-be-discovered treasure chest.

Next, adjust your direction and head north. Pay attention to a prominent large factory ahead; the mysterious treasure chest is quietly placed at the top of the factory. To get there, you need to climb up the winding stairs step by step, without much hesitation, just keep moving forward whenever you encounter a section of stairs. Along the way, you will occasionally meet several waves of ordinary monsters patrolling, as well as scattered supply boxes, which are all worth stopping to explore and can be picked up along the way.

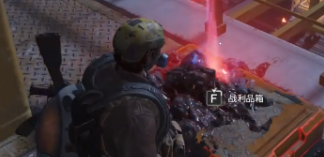
After successfully reaching the top floor area of the factory, continue exploring along the designated route, and soon you will find a container. On one side of the container, there is a treasure chest emitting a mysterious aura, which players can go ahead and open. After opening the treasure chest, turn your gaze to the edge of the chest and pick up the green storage box. Then, take a flying potion, use the lightness brought by the potion to reach the top of the tower, and you will see the mysterious treasure chest glowing red at a glance.
The above is the complete guide for obtaining the Bay of Glittering Town treasure in the Seven Days World, hoping to provide practical assistance to all adventurers. The design of the treasure hunt path is quite ingenious, and it is recommended that everyone maintain a calm mindset during the exploration, savoring the fun of solving puzzles along the way. By reasonably collecting these scattered supplies, you can not only enrich your backpack but also lay a more solid foundation for future adventures.
Recommend


Strategy

A Guide to Zhetian Fanchen Yiyue Sharing Tips for New Players on How to Play Zhetian Fanchen Yiyue
Introduction to the Public Beta Time of Zhetian Fanchen Yeyi When is the public beta for Zhetian Fanchen Yeyi?
How is Zi Yue from Zhetian Fanchen? Introduction to Zi Yue from Zhetian Fanchen
What are the Luhida Origin redemption codes? Sharing of Luhida Origin mobile game gift codes
Lu Xida Origin Team Recommendations Lu Xida Origin Team Guide
Lu Xida Origin Strategy Sharing: Beginner's Guide to Lu Xida Origin
