Guess the Picture
Game Introduction


Hot Strategy
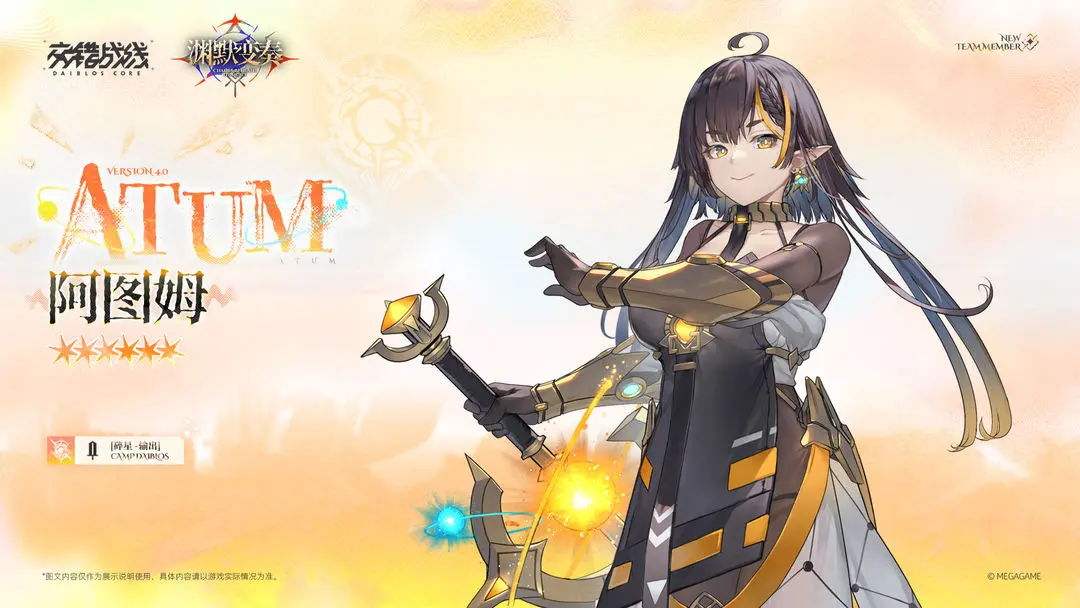
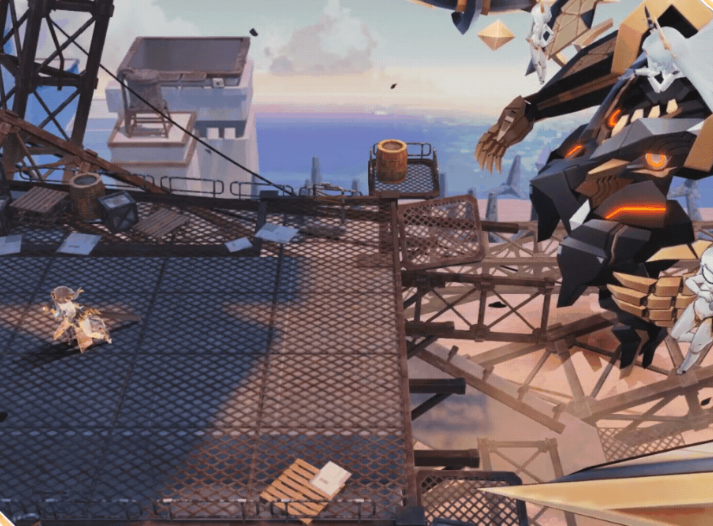
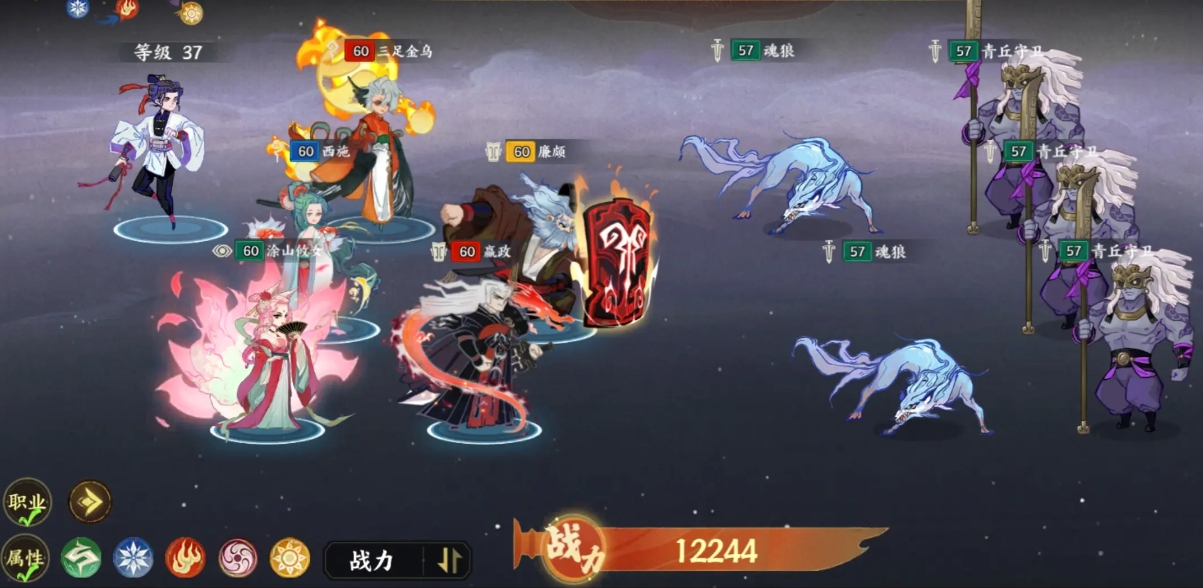
How is Crossline Atum? An Overview of Crossline Atum's Strength
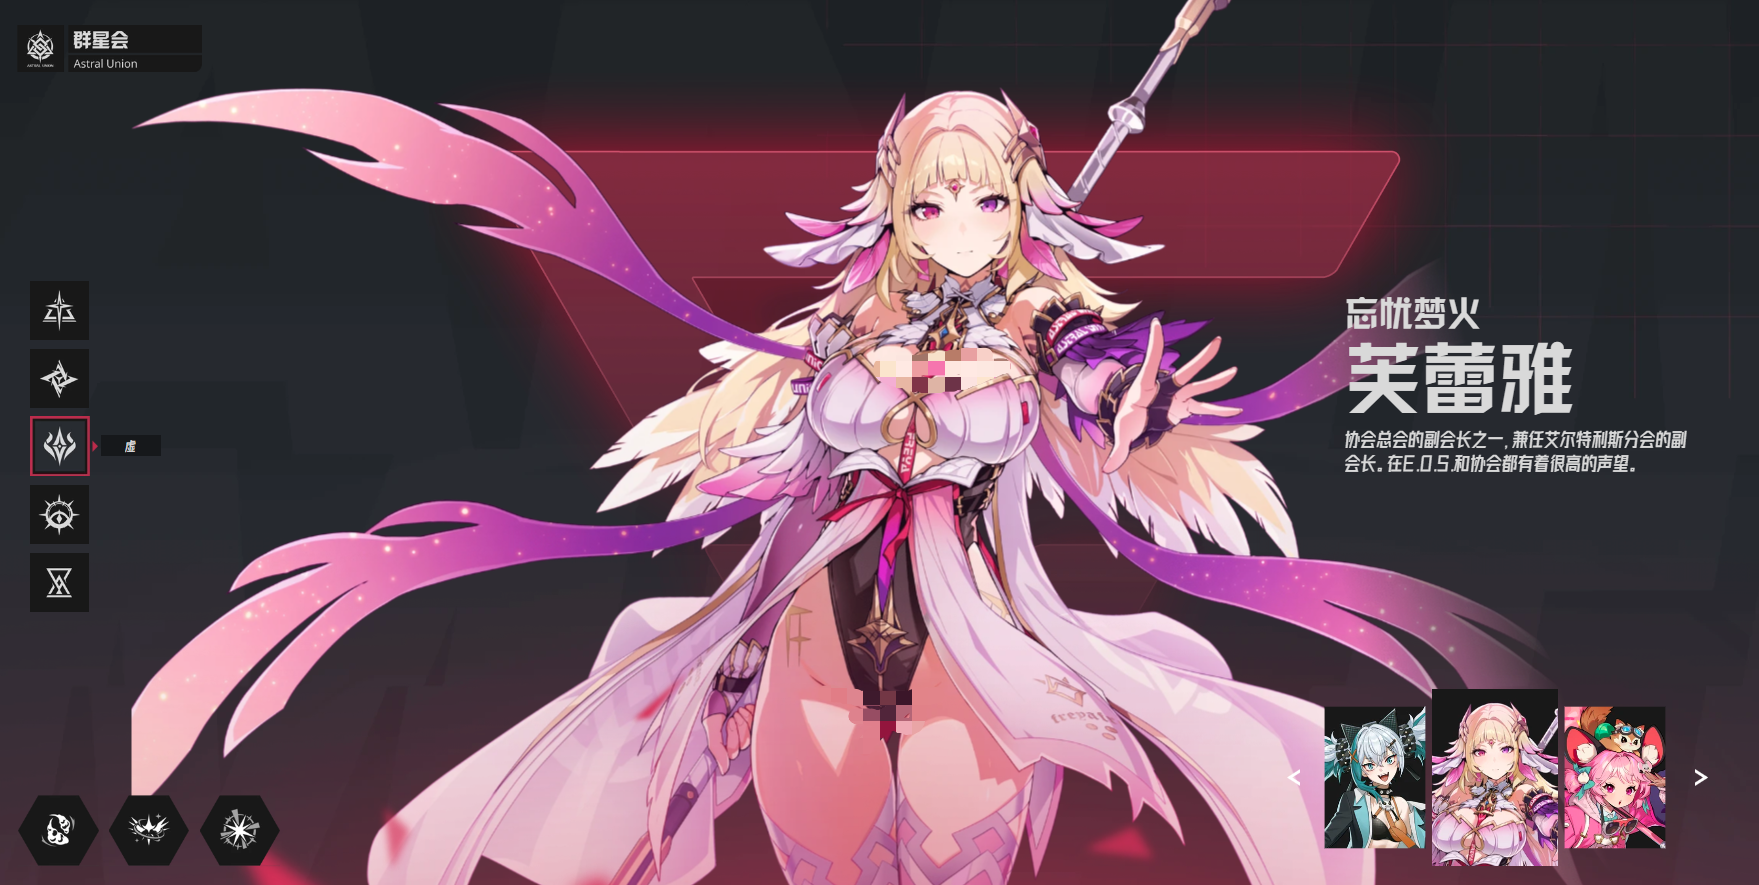
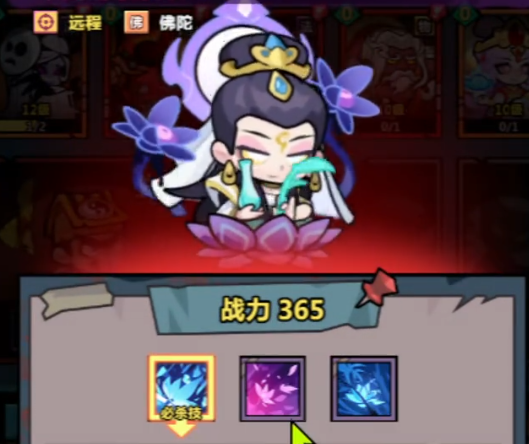
How is Atum in the Intersecting Frontlines? As a brand new six-star damage dealer, Atum has a sweet appearance, and her overall character design is quite appealing. She has gained true self-awareness and looks like a charming and cute girl. Players are more concerned about her strength, wondering how powerful her damage output is. Next, we will detail her skill set, which will make it clear at a glance.
Skill 1 "Stellar Blade Strike" deals energy damage to the enemy target, with each attack having a chance to inflict Laceration on the target. Skill 2 "Moon Shadow Horizontal Slash" deals energy damage to the enemy row targets, with each attack having a chance to increase the duration of Laceration and Advanced Laceration that the enemies have.
Skill 3 "Celestial Circulation" deals energy damage to the enemy units, with each attack having a chance to inflict Laceration. If the enemy already has the Laceration effect, there's a chance to apply an even higher level of Laceration. She also possesses two fairly good talent effects. One of them, "Setting Sun Melting Gold," at the start of her turn, has a chance to gain these random effects: increased attack, causing the target's action to be delayed; increased number of actions; the obtained effects are random.
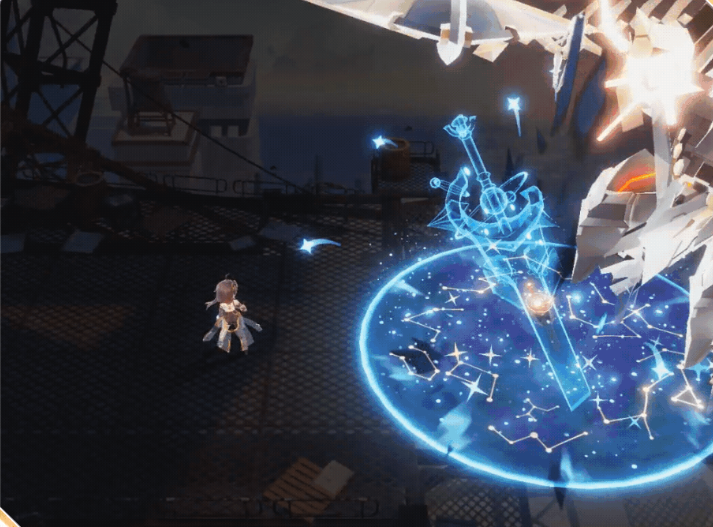
Talent 2 "Moon Wheel Imprint Radiance" increases the damage dealt by Skill 2, and after using Skill 2, there's a certain chance to use this move again; if this skill defeats the target, then her own action sequence can be advanced.
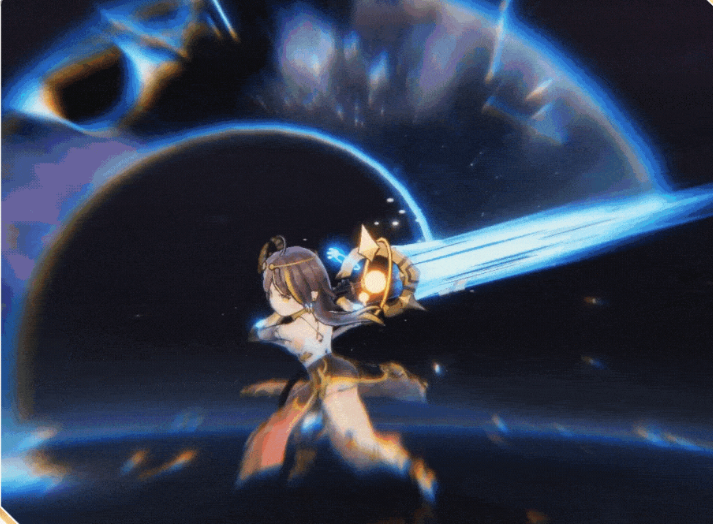
Finally, the trait "Dusk Descending," after attacking, she gains several layers of "Afterglow." Based on the number of Afterglow layers, she will subsequently gain different combat effects: after dealing damage, there's a chance to increase the duration of Laceration and Advanced Laceration that the target has; when using Skill 3, critical hit rate is additionally increased; using Core Burst detonates the Laceration and Advanced Laceration that the enemy has, and grants immunity to Overheating.
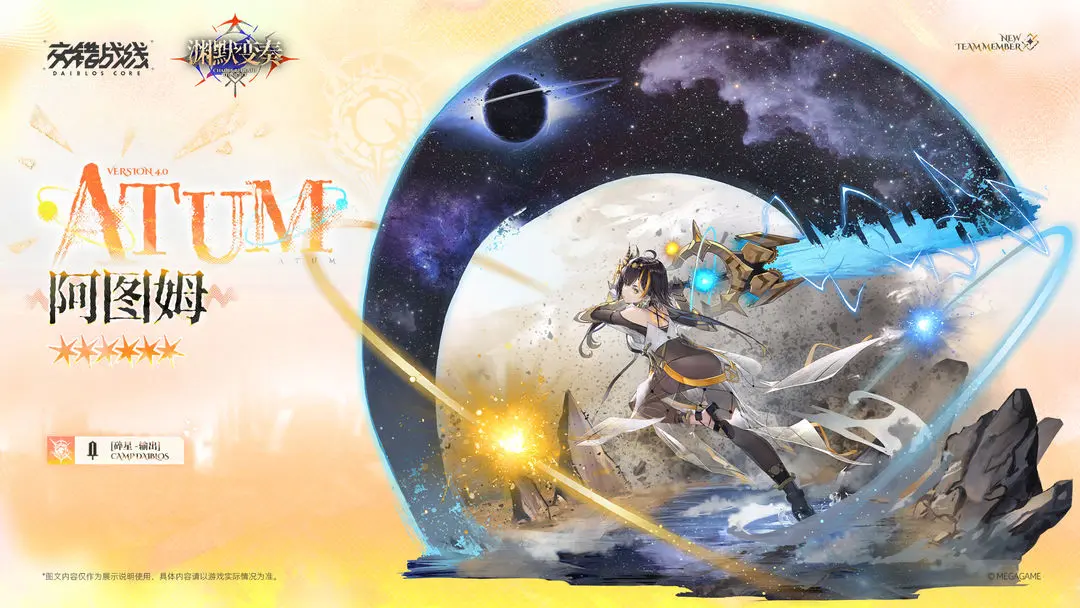
The skill mechanics of Atum in the Intersecting Frontlines are as described above. Now, do friends have a certain understanding of the strength of this new character? This character mainly adds effects probabilistically, and through traits, these effects can be triggered, further enhancing her damage output capabilities. Overall, she is quite impressive.
What are the recommended team compositions for clearing stages in Iser? Recommendations for team compositions to progress through levels in Iser.
What are the Yise pioneer team compositions? In the cyberpunk-themed strategy mobile game "Yise," the rational pairing of the pioneer team directly determines the efficiency of main storyline progression and the speed of resource accumulation. Optimizing the team allows newcomers to complete Chapter 7 72 hours faster than average, with 45% more resource acquisition. In this article, we will deeply analyze the core mechanisms and practical strategies of the three mainstream pioneer systems based on the current version environment.
1. Newcomer Pioneer Team Composition
The low-cost, high-reward golden combination of Gray + Lian + Kachi + Doris forms the optimal solution for the pioneer period. All four characters are either gifted by the system or guaranteed in the first draw. Lian, an SSR unit given at the start, has excellent group damage capabilities. His skill "Molten Impact" deals 215% attack damage to three targets, and his passive "Fervor Boil" restores 15% health after killing a target, significantly improving sustainability. Gray's ultimate "Group Armor Break" reduces the enemy's defense by 35% for two turns, greatly increasing the team's output efficiency. His small skill provides critical hit rate bonuses, forming a perfect synergy with Lian. Kachi, despite being an R-rarity, is functionally comprehensive. The skill "Rapid Command" boosts the entire team's action bar by 20%, and its passive has a chance to add an extra pull effect after a friendly basic attack, ensuring smooth skill cycling. Doris' basic attack heals the ally with the lowest HP, and her ultimate "Holy Healing Light" restores 180% of her attack value as HP to all allies and converts it into a shield. It also provides an attack buff. This lineup averages 19 minutes to clear Chapters 1-7, a 40% efficiency increase compared to mixed teams. In actual tests, the monster clearing speed in the mechanical factory level leads by 70%, and in the five-person dungeon, Gray's armor break coverage exceeds 85%. Priority for development is Lian > Gray > Doris > Kachi, with core skills needing to be upgraded to level 5 to trigger a qualitative change.
2. Advanced Map Clearing Team Composition
The absolute king of continuous area-of-effect burn, Nova + Leila + Flame Demon + Valerian, forms a complete burn chain. Leila's ultimate "Lava Eruption" ignites six targets, and Nova's passive "Ember Spread" spreads the burn effect every 2 seconds. After stacking 3 layers, Nova's ultimate damage increases by 120%. In multi-target stages of Chapter 10, the DPS reaches 9,800, clearing the field 60% faster than conventional teams. However, when fighting single bosses, it takes 35% longer. Before Chapter 9, add the Flame Demon, whose passive "Incinerate" increases burn damage by 55%. Valerian provides shields and purification, compensating for survival weaknesses. Frost Control Flow: A strategic weapon for over-level challenges, Elsa + Steel Shield + Cross + Sea Witch build a control chain. After awakening, Elsa's "Ice Arrow Rain" has a 60% freeze probability, and Steel Shield's "Absolute Guard" creates an 8-second safe environment. Cross adds slow and vulnerability effects. The success rate of challenging 2,000 combat power is 28% higher than the burn flow. In the Chapter 8 Relic Guardian battle, precise freezing can interrupt the boss's laser charge. After Chapter 10, replace Sea Witch, whose ultimate "Tidal Shield" provides group immunity to control, solving the issue of late-game boss resistance. Poison Burst Flow: The ultimate nemesis for single bosses, Shanya + Fangges + Opal + Valerian specialize in high-difficulty boss battles. Shanya's skill deals 2.5% of the target's maximum HP as poison damage per layer, and Fangges and Opal quickly stack poison. When fighting bosses with tens of millions of HP, poison damage accounts for 63%. The efficiency of killing the guild war boss "Void Ash Cocoon" leads other lineups by 41%. Valerian ensures the team's survival, and when the poison stacks to 8 layers, it triggers Shanya's ultimate "Toxic Nova" to explode the damage.
3. Ultimate Team Construction
The T0 versatile team composition of Lily + Freya + Cross + Misaia. Lily accelerates the whole team by 25%, and her second skill provides critical damage bonuses and reactivation effects, while her ultimate reduces the main DPS's skill cooldown by 2 turns. Freya's buffs for attack and defense, along with her ultimate that includes group purification, form a perpetual skill loop with Lily. Misaia has the highest base attack panel among all characters, and her passive "Final Judgment" increases damage to targets below 50% HP by 65%. The win rate in the arena is 78%, and the clearing efficiency in Chapter 13 remains top. Ensure Lily starts first, followed by Freya to link the buffs. The core light and dark strategy is Misaia + Miao. Miao's skill "Data Reconstruction" revives fallen teammates and restores 100% HP, breaking the balance of the battle. It is recommended to save 300 draws to obtain them, avoiding the dispersion of resources. Miao can replace Valerian as the ultimate healer.
4. Resource Allocation and Pitfall Guide
Diamond priority: Daily purchase of 3 stamina (costing 100 diamonds) > targeted recruitment of core characters > random draws from the pool. Core skills of the main DPS must be upgraded to level 5, while auxiliary skills should be maintained at level 3. Equipment enhancement rule: Weapon > Shoes > Armor. The benefit of attack attributes is 2.3 times that of defense attributes. Avoid evenly developing multiple teams; focusing on a single system makes player progress 25% faster. Tank characters only need to ensure they "survive non-lethal attacks."
This concludes the full content on what Yise pioneer team compositions are. The single-target damage dealer Kororo's strength in long dungeons increases by 32%. Achieving a full five-star main team with core skills at level 5 within seven days can place you in the top 30% server-wide. Manual mode has a 33% higher three-star completion rate than auto-battle. Save energy bars before boss fights, and use the opening burst to reduce the boss's HP below 70%; reserve AOE skills for new waves of enemies in multi-wave stages.
Yokai Golden Finger pairing techniques and recommended lineup for map clearing
Today, the editor brings you content about the pairing techniques for Monster Gold Fingers, The reasonable pairing of Gold Fingers with the lineup is the core element to enhance map-clearing efficiency and combat performance. The special effects of different Gold Fingers and the characteristics of the monster lineup form a synergy, which can not only strengthen output and survival capabilities but also optimize resource acquisition efficiency. From attribute enhancement to skill strengthening, from lineup synergy to scene adaptation, every detail adjustment may bring significant combat improvement. Let's take a look together with the editor.
The pairing of Gold Fingers needs to revolve around the lineup positioning and combat requirements. Attribute enhancement type Gold Fingers work by reinforcing the attributes of monsters and their counter relationships. In the game, there exists a natural counter cycle among attributes like fire and lightning. When pairing, it is necessary to prioritize enhancing the core attributes of the main monsters, while also supplementing defensive enhancements for common counter attributes. This pairing logic allows the lineup to maintain balanced combat power in a variety of attribute environments, reducing combat disadvantages caused by attribute counters. Skill effect enhancement type Gold Fingers focus on amplifying the core value of monster skills. Control-type skills can be extended in duration, expanded in range, or increased in trigger probability through Gold Fingers. The synergy between these types of Gold Fingers and skill characteristics can significantly enhance the tactical value of skills, adapting to different combat rhythm needs.
This lineup uses continuous burning damage as its core offensive means, with members forming a damage stacking and enhancement loop through skill effects. Ksitigarbha serves as the source of burning, and his group burning skill can quickly put the enemy group into a state of sustained damage. The number of burning layers accumulates over time, laying the groundwork for subsequent bursts. The defense reduction skill of Nine-Tailed Fox can lower the enemy's magic defense, increasing both burning damage and other skill damages. The crowd control effect can gather scattered enemies, allowing Ksitigarbha's group burning to cover more targets. In dungeons with dense small monsters, it can quickly clear the battlefield, and in boss battles, it can complete challenges through a combination of continuous burning and single-target bursts.
The bleeding reaper lineup focuses on the stacking and bursting of bleeding status, achieving group reaping through the synergy of control and damage. Five-Star Pangu is the core damage dealer of the lineup, and his skill can trigger a wide-range bleeding explosion effect. The higher the number of bleeding layers, the more significant the explosion damage. When facing a group of small monsters, it can clear a large area with one explosion. Donghuang Taiyi's slowing-to-freezing skill can restrict the enemy's movement, giving Pangu time to stack bleeding layers. Once the freezing effect is triggered, it can briefly interrupt the enemy's skill release, reducing the damage taken by the team. This lineup has a clear advantage when facing fast-moving, numerous enemies, using control to limit enemy positioning and efficiently clearing the battlefield with the wide-range damage from bleeding explosions.
The content about the pairing techniques for Monster Gold Fingers has been introduced, The core of pairing Gold Fingers with the lineup lies in scene adaptation. Players need to choose corresponding Gold Finger effects based on the core output method of the lineup, amplifying the inherent advantages of the lineup through attribute enhancement, skill amplification, or resource bonuses.
How to Use the Meridian Chart in Jianghu 2: The Next Stop, Introduction to Using the Meridian Chart in the Jianghu 2 Mobile Game
Today, I'm bringing you the content on how to use the meridian chart in Jianghu 2. In the martial arts growth system of Jianghu 2, the meridian system is one of the core ways to enhance a character's strength. The proper use of the meridian chart directly affects the character's attribute bonuses and the effectiveness of martial arts. From activating the basic meridians to the advanced application of the Ren and Du meridians, every step is closely related to the character's growth path. Players need to gradually explore and master the complete usage of the meridian chart. Let's take a look together.
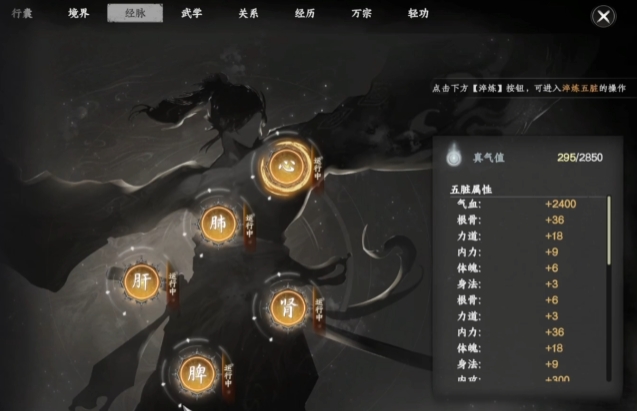
The activation of meridians follows a progressive rule. There are 8 meridians in the game, with the first 6 being branch meridians. The Ren and Du meridians, as high-level meridians, can only be unlocked after all branch meridians are activated. The conditions for activating branch meridians vary. Some are linked to the progress of main quests and automatically unlock upon completing specific plot points. Others require meeting certain numerical conditions. After accumulating enough Mo School points, players can go to the top of Longshe Fort and interact with the mechanical puppet to advance the process of opening the corresponding meridian. These prerequisites guide players to develop evenly while exploring the world, accumulating conditions for meridian activation through completing tasks and improving knowledge.
Once all branch meridians are activated, the meridian system interface will unlock a new interactive entry. Clicking on the Tai Chi icon in the middle of the interface will bring you to the exclusive interface for the Ren and Du meridians, initiating a higher level of attribute enhancement. Each node in the meridian has an attribute refinement function. Players can adjust the node attributes by consuming techniques or scrolls. Different mental methods affect the tendency of attribute terms during refining; some mental methods are more likely to refine yang attribute terms, while others tend to provide soft attribute bonuses.
The core function of the Ren and Du meridian interface lies in the configuration of mental methods. There are 4 slots for mental methods in the middle of the interface. Players can place different mental methods according to their needs. The configuration of mental methods directly affects the strength of attribute bonuses. It is generally recommended to place the mental method with better numerical performance in the main slot, and choose high-value mental methods for auxiliary slots to maximize the bonus effect. The complementary attributes between mental methods also need to be considered. Pairing a main mental method that boosts attack with an auxiliary one that enhances defense can form a balanced attribute combination. This configuration method deeply links the meridian system with the mental method system, allowing players to adjust the mental method combinations to fit different combat scenarios.
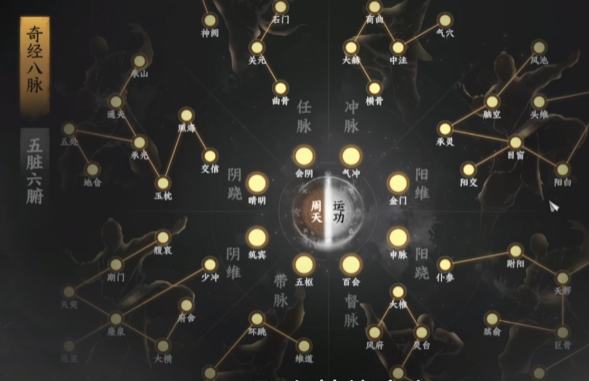
The unlocking of attributes through the Zhou Tian cycle is not completed in one go but expands dynamically as the character grows. Every time the true qi limit is increased or a new meridian node is unlocked, running the Zhou Tian cycle again may reveal new attribute terms. This design encourages players to regularly review the meridian system and adjust connection strategies in line with the increase in character strength. Whether it's the accumulation of basic attributes in the early stages or the unlocking of special effects later on, the Zhou Tian cycle function provides continuous growth space for the meridian system, making the use of the meridian chart run through the entire process of character development.
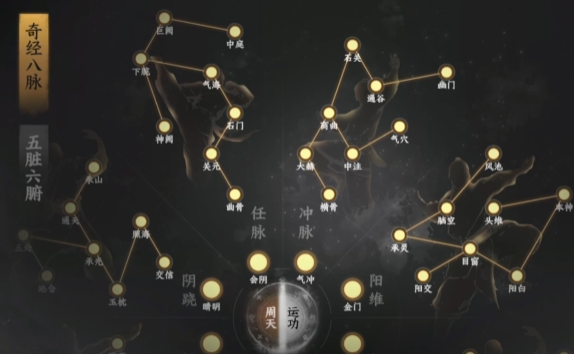
The content on how to use the meridian chart in Jianghu 2 has been introduced. The use of the meridian chart combines exploration, nurturing, and strategy. From the activation of basic meridians to the advanced operation of the Zhou Tian cycle, each stage requires players to operate based on their own development plans. Proper use of the meridian chart can improve the character's basic attributes.
Yokai Golden Finger Pairing Guide Yokai Golden Finger Map Clearing Team Recommendations
In the idle card game "Monster Gold Finger," there are many characters, and there are also many complex systems that can enhance the combat power of the characters. To clear stages, you need a strong lineup, so finding the right combination in "Monster Gold Finger" is very important. Here, we will introduce some recommended lineups for clearing stages in "Monster Gold Finger," sharing the currently very strong Bleed Team, and looking at the core members and some cultivation pairing options.
Core of the Bleed Team:
The core is represented by physical continuous damage output characters like Pangu. As a physical ranged attacker, Pangu has a very high attack frequency and bleeding efficiency. His skill mechanism determines that he can continuously inflict the "bleeding" status on enemies during battles. After his ultimate skill is activated, it lasts for 6 seconds, each hit causing damage while also inflicting 3 seconds of bleeding, which can be stacked to form extremely high sustained output. His basic attacks can also hit two units simultaneously and cause bleeding, making him effective against both single and multiple enemies.
Pangu's passive skill mechanism determines that he becomes stronger as the battle progresses. As the gate or his own HP decreases, his damage increases, reaching up to a 30% damage boost. This, combined with the rhythm of increased enemy aggression during the battle, allows for a powerful counterattack. A fully-starred Pangu gains the enhancement of "Ultimate Target +1," greatly enhancing his ability to clear the field. When paired with a fully-starred weapon, it can also trigger an area explosion at the end of the ultimate, significantly increasing the team's control and output capabilities.
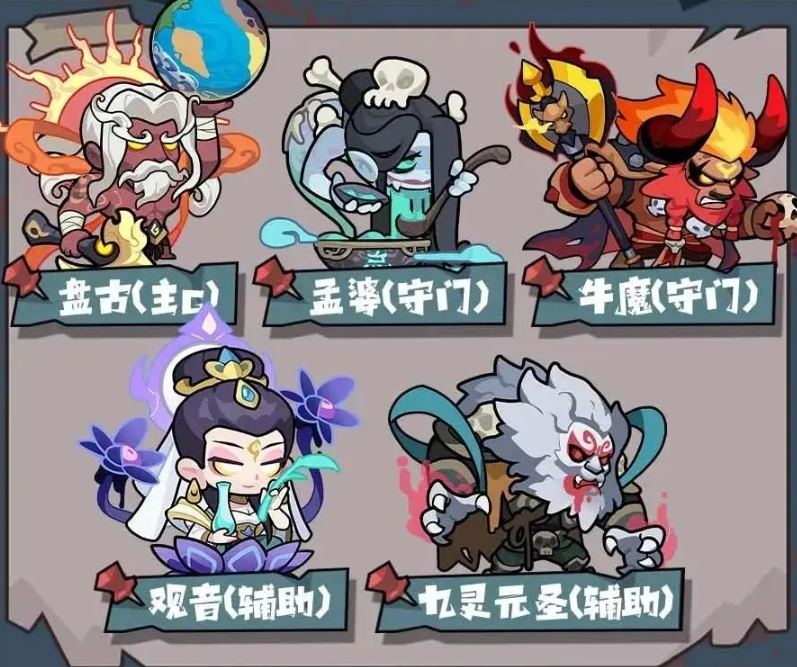
Recommended Lineup: Pangu (Main DPS) + Meng Po (Gatekeeper) + Bull Demon King (Gatekeeper) + Guanyin (Support) + Nine-Ling Yuan Sheng (Support).
Meng Po's main role is to continuously heal the gate, supporting the triggering rhythm of Pangu's passive. The Bull Demon King, as a gatekeeper unit, has decent knockback and resistance, preventing enemies from breaking through the front lines. Nine-Ling Yuan Sheng's skills combine control and armor penetration; his ultimate can stun enemies, and his passive can reduce their physical defense, creating output space for Pangu. Guanyin provides rage recovery and overall support and buffs for the team, with her critical hit-related skills being highly beneficial in high-frequency attacks. The entire lineup combines output, control, and sustainability, making it suitable for most dungeons, maintaining a steady and progressive style.
Recommended Artifacts:
The best choice for Pangu is an artifact with a "probability of additional ultimate release," which significantly boosts his burst output. The second-best choices are artifacts that increase "skill or basic attack damage" and those that "double the target count," which are highly beneficial when facing groups of enemies. For relics, prioritize those that stack lifesteal and increase sustained damage, such as the "Blood Mist Meat Grinder," "Vampire Broom," "Rusty Knife," and "Gluttony Vacuum Cleaner." These all effectively increase the coverage of the bleeding status and survival, especially in prolonged battles.
Choice of Skins:
Items like beds, gates, the main character, and other characters can have skins. It is recommended to use the "Evil God Bed" for the bed, which can increase the percentage of attack power within 10 seconds after refresh, suitable for concentrated burst periods. For the gate, use the "Dart Dark Gate," which can launch a bleeding-inflicting dart every 30 seconds. The bleeding effect is linked to the team's overall attack power, perfectly synergizing with the bleed mechanism. The main character's skin, "Li Bai Drunken," can give physical characters extra damage and armor penetration, serving as an excellent output reinforcement. Additionally, character skins have significant effects in actual combat. For example, pairing with "Zeus" or "Dunhuang" themed skins not only increases all attributes but also allows direct deployment at the start of the battle, reducing preparation time. It is recommended to prioritize giving these skins to Pangu and Guanyin.
This concludes the sharing about the "Monster Gold Finger" lineup. The Bleed Team focuses on steady and continuous attrition, relying on attack speed and passive stacking damage mechanisms to accumulate advantages, suitable for players who seek stable progression. The Bleed Team is quite strong and very efficient in clearing stages once formed. Players need to pair support, defense, and buff units around the main DPS character to deal with the complex and varied enemy formations. There are other systems in the game, such as the Burn and Critical Hit systems, which we won't go into detail here due to space limitations. If you're interested, you can check out the "Monster Gold Finger" special feature on 9Games.
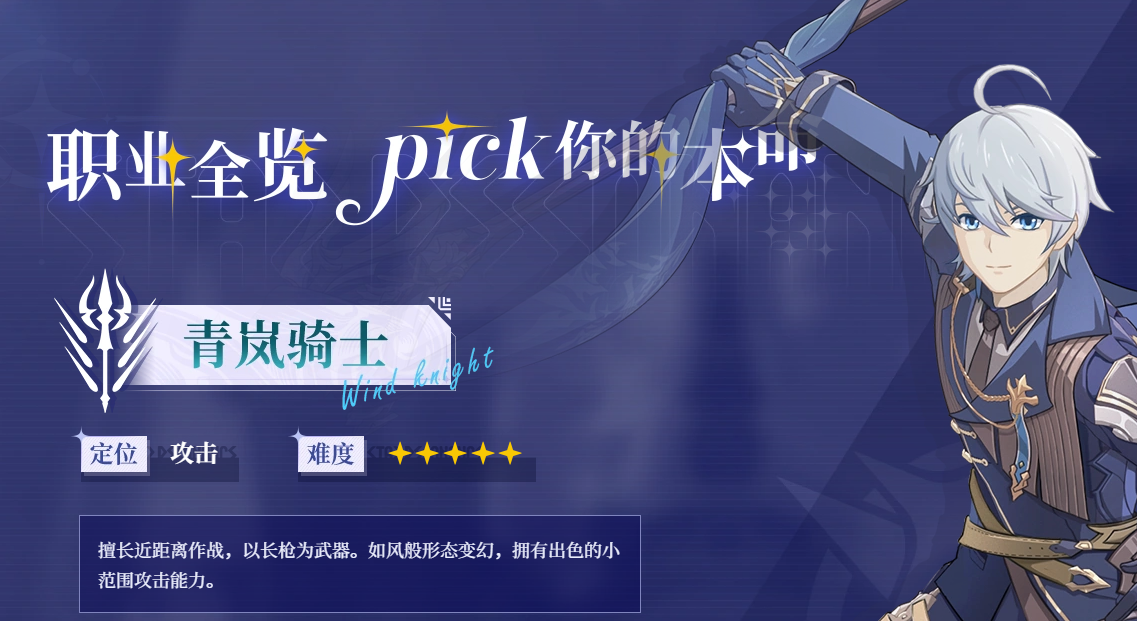
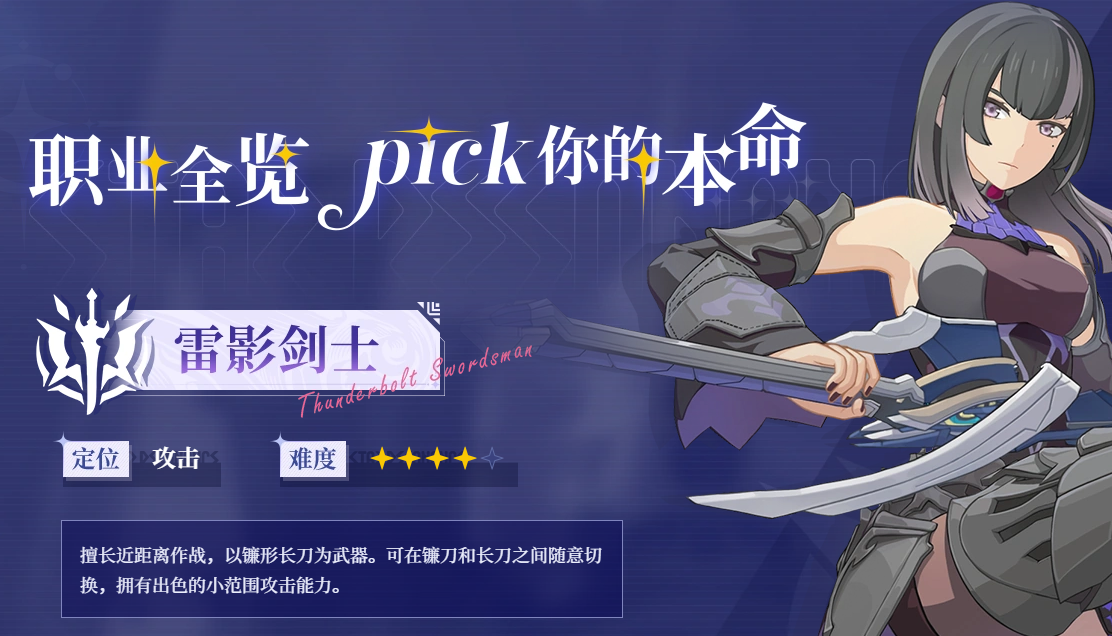
Which class is faster for grinding with Star Trace Resonance? Which class should be chosen for grinding with Star Trace Resonance?
Today, we will be discussing which classes in Star Resonance are the fastest for map clearing. In the game Star Resonance, map clearing efficiency is a key factor that affects players' resource acquisition, level advancement, and story progression. Different classes have varying skill mechanisms, attack patterns, and damage characteristics, leading to significant differences in efficiency when facing various map clearing scenarios. Understanding the advantages and features of each class in map clearing is an important prerequisite for players to choose a suitable class based on their needs and improve their map clearing experience. Let's take a closer look together.
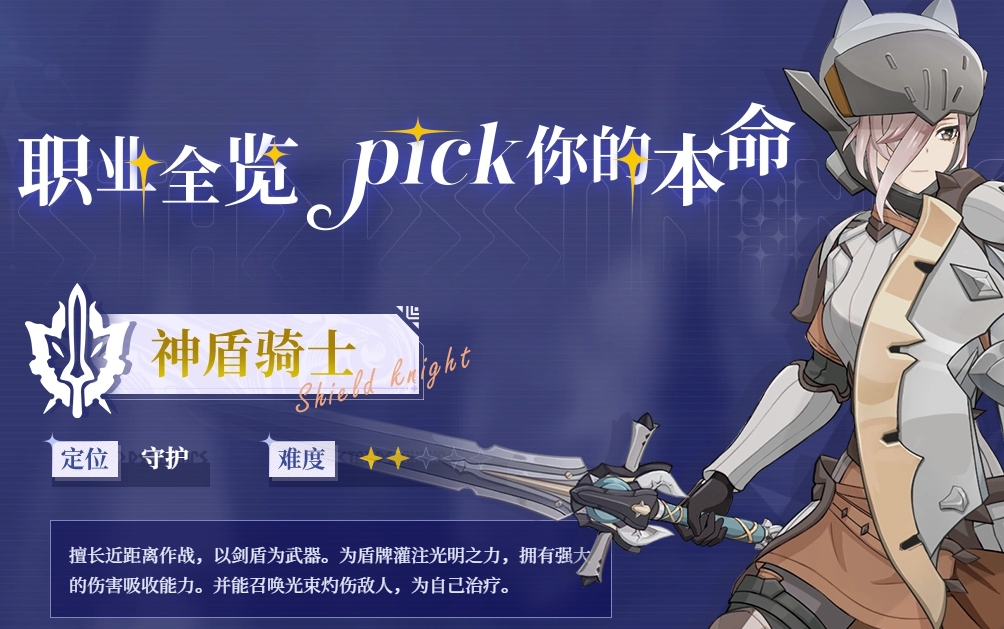
The Azure Knight is a highly mobile class that combines speed and power, using a lance as its weapon. Its diverse skill system allows it to excel in map clearing. This class can opt for the heavy armor build, accumulating courage resources during combat, and once these resources reach a certain level, high-damage skills can be unleashed. Additionally, the aerial combat style is another highlight of the Azure Knight, utilizing jump attacks to effectively counter large groups of enemies on the ground. In some open map clearing scenarios, frequent jump attacks not only help avoid some monster attacks but also allow players to quickly move through enemy groups, further improving the efficiency of clearing monsters.
The Thunder Shadow Swordsman is a melee class known for its speed and burst damage, wielding a unique scythe-like long sword. It demonstrates strong output capabilities during map clearing. For example, with the Moonblade Summoning build, players accumulate Thunder Marks during combat, allowing them to summon Moonblades for high-frequency attacks. Combined with the Thunder Slash skill, they can unleash multiple strikes on single or small groups of enemies within a short time, dealing significant damage. The Scythe Charge skill lets the character spin the scythe forward, inflicting continuous damage over a wide area. This high-damage, high-frequency output pattern enables the Thunder Shadow Swordsman to clear large numbers of enemies quickly.
The Divine Archer is a ranged physical DPS class with high mobility and flexible long-range attack capabilities, making it very suitable for map clearing. The Divine Archer can also enhance its critical hit rate and attack frequency by coordinating with a falcon. Normal attacks can perform multiple long-range shots on enemies, while the Torrential Shot skill, when in the Light Energy Reforged state, significantly increases damage output and has a wide attack range, capable of dealing substantial damage to enemies in a fan-shaped area in front. High mobility allows players to easily maintain a safe distance from enemies during map clearing, using agile positioning to dodge monster attacks and reduce the risk of being hit.
The content about which classes in Star Resonance are the fastest for map clearing is now complete. Different classes in Star Resonance have their own strengths in map clearing, each providing strong support for efficient map clearing. Players can choose a suitable class based on their operational habits and preferences for the game style.
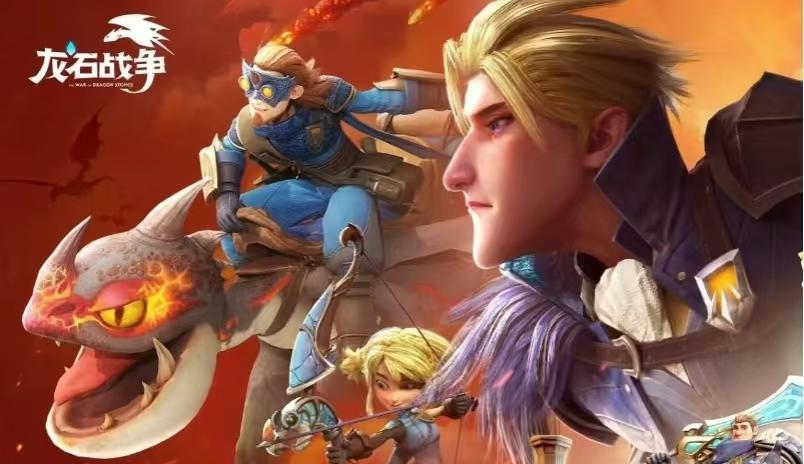
How to Pair Up the Lineup for Map Clearing in Dragon Stone War: A Guide for Map Clearing Lineups in Dragon Stone War
Dragonstone War, as a strategy game, focuses on three-dimensional warfare across land, sea, and air, along with free city building. Players in the game tame dragons, build cities, match troops, and develop heroes to participate in wars, where every castle is a battlefield. How to match the lineup for pushing maps in Dragonstone War is a question many players are concerned about. The editor has compiled some lineup matching strategies, hoping to help everyone deepen their understanding of the game.
The team in Dragonstone War consists of two heroes and a group of soldiers, following the logic of multi-army combat. During the early stages of the game, it is recommended to choose tank heroes and ranged damage dealers, which can improve map-pushing efficiency and reduce battle losses. Shino is currently the hero with the highest tankiness. If you haven't drawn him, you can also choose Haro and Osode, both of whom are given by the system and have good damage absorption effects.
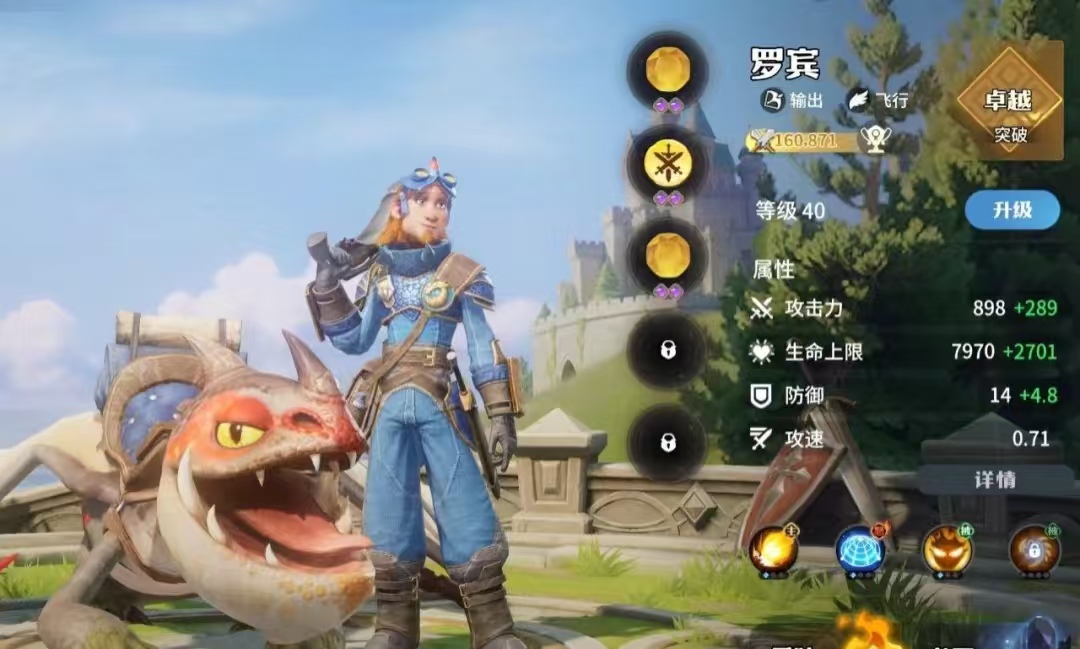
Currently, there are two schools of thought for ranged damage-dealing heroes: one is AOE (Area of Effect) attacks, and the other is summoning. For AOE, Robin and Thor are recommended; they can be obtained during early events. For summoning, Cilice and Skaka are recommended. Cilice summons acorns to join the battle, each acorn having 10% of the main body's attack power and 60% of its health. Skaka is a control type hero, relatively fragile, with lower priority for output. Andrena targets units with high health, dealing 15% of their maximum health as damage. Overall, the top choice for damage-dealing heroes is Thor, followed by Cilice.
In terms of troop types, giant mud acorns are the first choice. It is suggested to use this type of troop exclusively in the early stages. Once more soldiers become available later, then consider other troop types. This combination offers both survival and output, making it suitable for most battles.
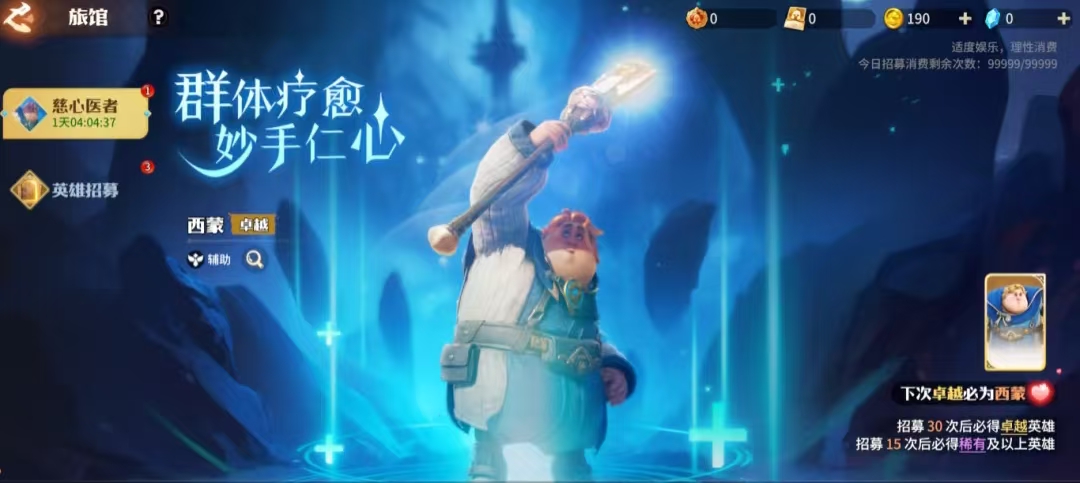
Selecting an appropriate support in the game is also very important. For casual players, Simon is currently recommended. He provides sufficient healing, becoming stronger the more allies there are. Senakin is another support worth acquiring. The robots he summons serve as guards, ensuring that backline attackers are not ambushed by assassins. His healing and recovery abilities are also quite good, and his output capability is considerable, making him a versatile option.
The requirements for pairing flying units are relatively high, requiring some front-line tanks among the flyers to provide good protection for units like Robin. However, it's currently difficult to assemble a full lineup of flying units. If the lineup only has one flying damage dealer, it's easy for them to be focused down by anti-air troops in PVE.
For warrior-type heroes, Osode and Carago are recommended. Carago has a high ceiling but a low floor, while Osode is more balanced. The highest priority goes to Achilles, who can be drawn from limited-time pools. Additionally, assassin-type heroes, due to their inconsistent performance, are not suitable for early-stage casual players, though enthusiasts may explore them on their own.
This concludes the guide on how to match lineups for pushing maps in Dragonstone War. After reading the guide, friends should have a good idea of how to pair heroes. While adhering to the basic logic of the game, players can also explore lineups that suit them. Download the game now and start building a powerful lineup to begin your battles!
How to Pair Up the Early Game Map Clearing Team in Fingertip Mountains and Seas: Sharing of Early Game Lineups
After the official release of Fingertip Mountains and Seas, how do you plan to tackle the more challenging content? In fact, in the current discussion about the early game lineup for Fingertip Mountains and Seas, I've already gathered many players' choices. If you've played strategy games before, you might have heard of the Fire Team, which exists in similar forms in various games. In Fingertip Mountains and Seas, the developers have made some nice innovations to it.
The Fire Team we're going to detail here consists of Golden Crow, Hanba, Qin Shi Huang, and Xi Shi, though the last position has a lot of flexible options. First, let's talk about Golden Crow, which is the core of the Fire Team. Golden Crow's ultimate skill has an area-of-effect slow effect and can also apply a burn status. This skill can effectively disrupt the enemy's rhythm in battle, putting them at a disadvantage. Its passive, Solar Crown Protection, is a highlight; when an enemy with a burn status attacks Golden Crow, the damage taken by Golden Crow is reduced.
With the buffs provided by Golden Crow, as long as it stands in the back row, the front-row teammates can get a self-action bar push at the end of their turn. When Golden Crow reaches 9 stars, its effects become even stronger, with a chance to silence enemies after triggering the burn. In terms of basic attacks, Golden Crow's attack is quite special; it can perform follow-up attacks and can also trigger a light explosion to increase hit rate, apply more burns, and maintain negative statuses for a long time.
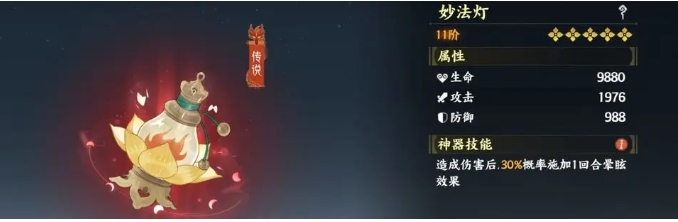
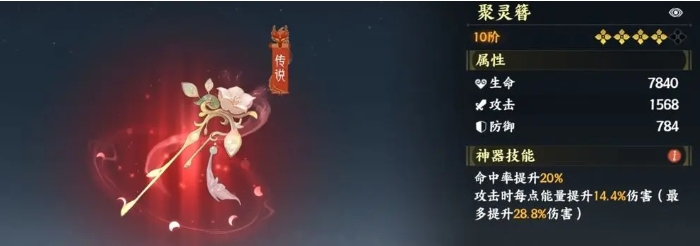
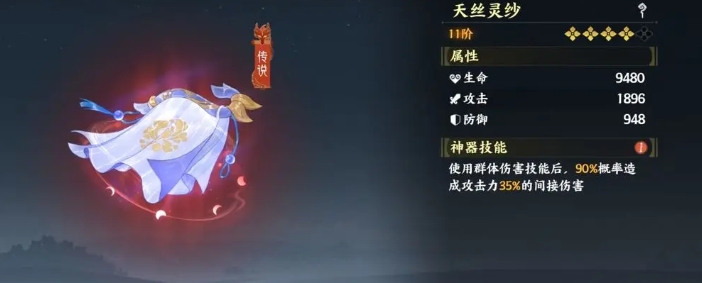
For Golden Crow's equipment, you can choose attack sets and hit rate sets. For main stats, attack shoes can boost its damage output, while a hit rate ring can increase the probability of skill hits. A crit necklace can also enhance output to some extent. The priority for sub-stats is attack > effect hit rate > crit. For artifacts, consider the Mystic Lamp, which enhances control effects, allowing Golden Crow to better restrict enemy actions in battle. The Heavenly Silk Gauze is also worth considering, as it can increase indirect damage, further boosting Golden Crow's output.
Next is the second core of the Fire Team, Hanba. Hanba's skills are also very distinctive. Its ultimate can directly remove three buffs from the enemy, and shields are considered buffs. This skill can effectively weaken the enemy's defenses and buffs, creating a better environment for your team's output. Additionally, Hanba's ultimate can apply burns, further enhancing the team's burn stacking effect. When Hanba reaches a high star level, it can deal 10% of the target's max HP as damage and apply two layers of debuff, reducing the enemy's attack and defense, with a chance to stun and deal indirect damage.
Hanba's turn-based skill is also powerful, providing both immortality and lifesteal. Its passive depends on whether the previous skill was triggered or ended normally; Hanba can stack a layer of debuff. In terms of basic attacks, Hanba can provide an action bar boost. For main stats, choose speed for shoes, and prioritize vitality for other parts to ensure Hanba's survivability and speed. The priority for sub-stats is speed > attack > health. Artifacts like the Spirit Gathering Hairpin and North Sea Pearl are good recommendations.
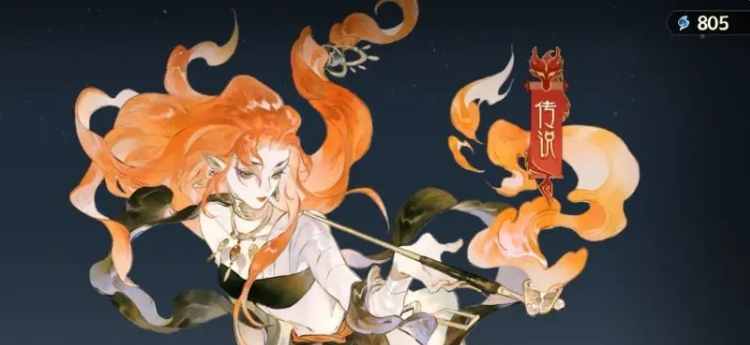
Xi Shi serves as the secondary crowd controller in the team. Her most important skill is her turn-based skill, which can extend the duration of negative statuses, keeping the burn effect active. She is also the best choice for pushing the action bar, as she can provide a 20% push to all allies. Xi Shi's ultimate deals area damage and has a chance to apply bleeding, reduce attack, and slow. The first use also reduces energy consumption, and based on the number of negative statuses applied, Xi Shi can gain a self-action bar push.
Equip the Mystic Lamp to increase crowd control, giving her basic attacks a chance to affect the enemy's hit rate. For artifacts, the Mystic Lamp and Heavenly Silk Gauze are both suitable. Considering the overall cost of the Fire Team, for players who spend money, if you have a high-star Qin Shi Huang, placing him in the fourth position is a good choice.
Qin Shi Huang's ability to definitely flank behind teammates allows Golden Crow to deal more area damage with basic attacks, increasing the team's overall output. His ultimate, which pushes the action bar and cleanses all negative statuses from teammates, is also very useful. For Qin Shi Huang's main stats, focus on vitality, and for sub-stats, prioritize health above all else. Artifacts like the Sky-Repairing Stone or the Nine Provinces Cauldron are good choices.
Now you know how to set up the early game lineup for Fingertip Mountains and Seas. Of course, the choice for the last position is very flexible. Characters like Lian Po, Kunpeng, or Chang'e, who are healers, are all viable. Different characters bring different lineup strategies, so players can choose the most suitable character for the last position based on their actual situation and the characters they own.
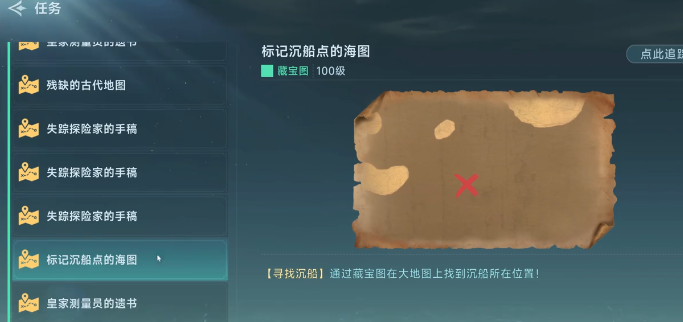
Introduction to the Use of Treasure Maps in the Age of Great Voyages How to Use Treasure Maps in the Age of Great Voyages
In the Age of Great Voyages, players will fully realize their sailing dreams, transforming into brave navigators, steering cool ships to embark on thrilling adventures at sea. The game offers many props that can be helpful, such as treasure maps which are crucial! Below is an introduction to the usage of treasure maps in the Age of Great Voyages, hoping to help everyone gain a better understanding and have a better gaming experience!
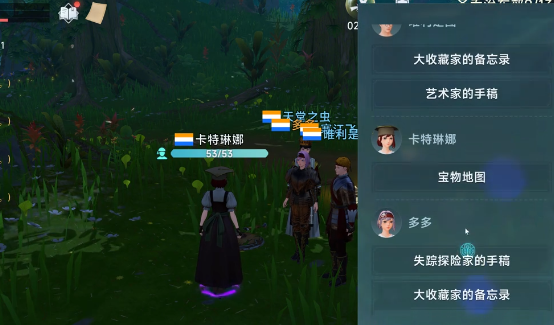
To use the treasure map, the first step is to obtain it. In the game, completing the field treasure map quests is key to obtaining one. During this process, players need to fight monsters or open chests in the wild. If you're lucky, opening a chest will reveal the long-desired treasure map. Once you successfully get the treasure map, quickly head to the Spahn Adventure Instructor to submit it.
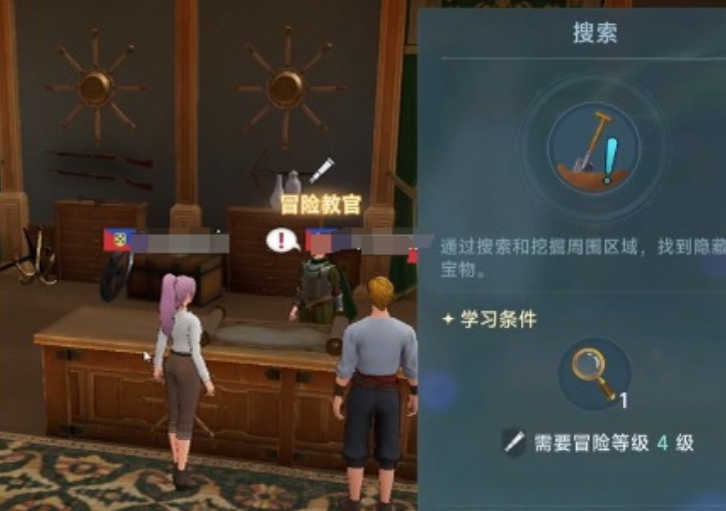
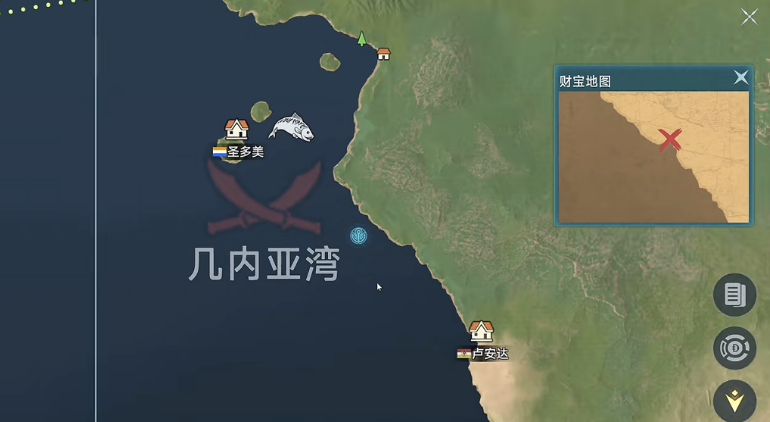
After acquiring and submitting the treasure map, you can unlock 5 adventure skills that everyone needs to learn. Mastering them is crucial for later stages of the game. Next, carefully study the treasure map; those mysterious symbols, special patterns, and brief hints on the map are all very important clues. Through these clues, you can determine where to go, and once you find the location of the treasure, you can start digging, using tools like shovels to assist you.
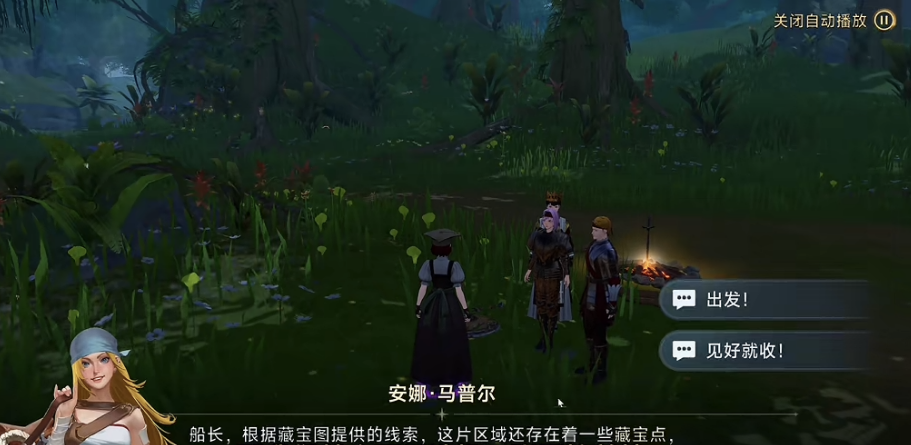
Be careful during the treasure digging process, as there may also be some small traps. After you dig it out, you will be able to receive generous rewards, such as gold coins, powerful equipment, or rare items, all of which will help you progress more smoothly in the game.
After reading this introduction to the usage of treasure maps in the Age of Great Voyages, has everyone mastered it? The method is actually quite simple; as long as you pay a little attention, everyone can complete the task smoothly. Quickly try it out in the game and start even more exciting adventures!
Guide to Using the Legend of the Great Age of Exploration Treasure Map How to Use the Legend of the Great Age of Exploration Treasure Map
Many players, although they have found the treasure map, do not know how to use it. The use of the treasure map in the Age of Sail is not as complicated as everyone imagines. Today, I will give you a detailed introduction on how to use the treasure map and its main unique features, hoping that everyone can understand.
First, players should find the location indicated by the treasure map and then go there directly. If it's your first time, you'll notice some patterns; the locations are mainly distributed across three areas: one is along the west coast of Africa, another around the Caribbean, and the third in the Black Sea region. To effectively save on the complexity of searching, players can start from the beginning and follow the coastline. Once you get close, you'll see corresponding prompts. At this point, you can successfully find the location and open the treasure map to obtain the items you need. However, there are also some more convenient operations that players can master with the following few tips.
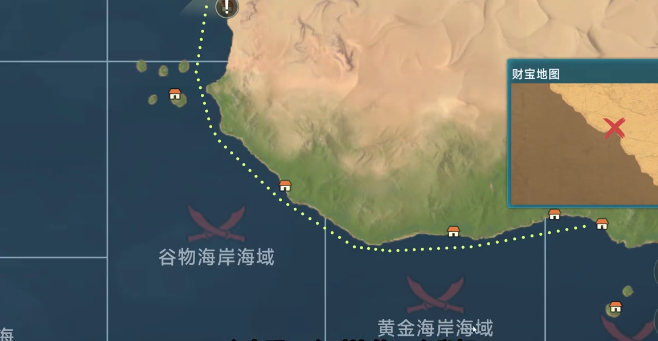
For example, after finding the treasure map, you need to open it next. Here, I want to mention a few attributes related to the benefits of opening the map. First, your skills need to meet the requirements; if they don't, the benefits of opening the map will be affected. Another aspect is the treasure hunting rate. Players can see an adventurer's blessing. After touching the statue, you can receive the corresponding value, which effectively enhances your personal advantage.
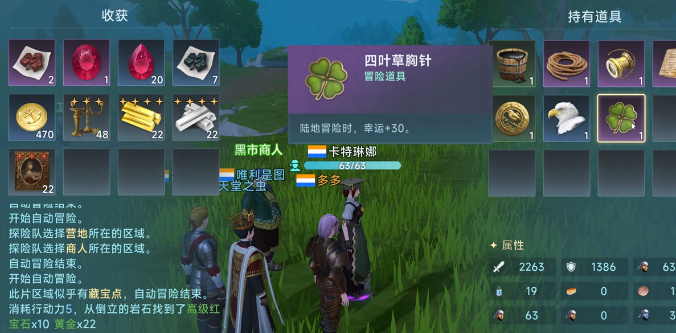
In addition, when using the treasure map, players can also obtain a four-leaf clover brooch, of which a total of 5 can be obtained. Each one basically increases the luck value by 30 points, significantly increasing the drop rate of materials from the treasure map. Therefore, smart players immediately think of a high-end strategy: when entering the treasure map area, choose some lower-level ones. The further you progress in your adventure, the more items you can obtain, thus improving the efficiency of your rewards.
The above is an introduction to using the treasure map in the Age of Sail. Many players do not know how to use the treasure map, and their success rate is not high after trying. This is mainly because they haven't considered the aspects mentioned above. Everyone can take a look and learn about them.
Recommend


Strategy

A Guide to Zhetian Fanchen Yiyue Sharing Tips for New Players on How to Play Zhetian Fanchen Yiyue
Introduction to the Public Beta Time of Zhetian Fanchen Yeyi When is the public beta for Zhetian Fanchen Yeyi?
How is Zi Yue from Zhetian Fanchen? Introduction to Zi Yue from Zhetian Fanchen
What are the Luhida Origin redemption codes? Sharing of Luhida Origin mobile game gift codes
Lu Xida Origin Team Recommendations Lu Xida Origin Team Guide
Lu Xida Origin Strategy Sharing: Beginner's Guide to Lu Xida Origin
